Tuesday, 29 December 2009

Christmas Card with Baja Breeze and Winter Post


I think I have said this before, but I love the mixture of images in the Winter Post set. Here I sat down to experiment with a collage style Christmas card for a special friend and customer. I was thinking about the skaters image and thought I might try to suggest movement by creating a shadow effect with a lighter colour layered behind and slightly offset. So, all of you who are looking at it and thinking I have slipped with my stamp due to one too many glasses of bubbly, you'd be wrong! LOL! I think it works OK, not quite as easy as the Upsy Daisy set, as the stamp is not a solid image, but when I coloured the top image in using my blender pen and Baja Breeze/Not Quite Navy inks, it looked more real.


So, I started with a Baja Breeze base, folded as a gatefold in landscape for a bit of a change, and sponged the edges with Not Quite Navy ink. I attached a mat of Brushed Silver cardstock from our gorgeous Brushed Metallic cardstock pack (p130 IB&C, 106559, $17.25) to just the upper flap of the gatefold. Over this, I put a thin Not Quite Navy mat, and then the stamped Whisper White panel.


First, I used silver Encore ink and clear embossing powder, to stamp the "postcard" stamp. next, I stamped the first skaters image in stamped-off 1x Baja Breeze ink, and I used my Stamp-a-ma-jig to very slightly offset a second image stamped in Not Quite Navy. I used a combination of these inks in various amounts of stampin off with the snowflake image. Last, I added the postmark stamp in Encore Silver. To finish, I stamped the Season's Greetings stamp from the Many Merry Messages set on the bottom gatefold flap, so it shows when the card is opened up. I closed it by attaching a Baja Breeze corduroy button and some silver cord, like an old-fashioned document envelope. Hope you like it, I think it turned out quite noice!

Monday, 28 December 2009

Summer Days/School Holidays...


Here are three delightful munchkins who were all enjoying an icecream on Christmas Eve, after a swim in the pool. They were happy as, and quite willing to co-operate with an impromptu photo shoot. This one is my fave! It might even inspire me to scrap it - you never know... (but don't hold your breath either!)

Sunday, 27 December 2009

Teacher Gifts with Raspberry Tart and a Happy New Year


Two thousand and ten. Twenty Ten. Neither of those sound right, although the preferred version seems to be the first. Dunno why really, I grew up in the previous millenium (yeah, I'm THAT old! ) and we were firmly in the habit of saying Nineteen Ninety-one etc. All I know is that the years are accelerating!


Here are a couple of pics of the teacher gifts I made for Ciaran's main teacher. As with last year, I also made some mini fruit cakes again . I took a Heaven Hot Chocolate tin, saved from when they still made that delicious stuff, and decorated it using the yummy Raspberry Tart papers and matching Kiwi Kiss/Vanilla double sided satin ribbon. On the top I layered two Felt Fusion flowers and a Kiwi Kiss corduroy button from the Spring Mini. I tied them together with some (retired) pink Organza ribbon, as it had the right degree of "floatiness" (and I could thread it through the button holes!) The pencil erasers (still very much in demand in Year Two) have been decorated using scraps of various Stampin' Up! Designer Series Papers. The little cards with ribbon snips were stamped on Confetti Cream using some of the cute images from the Teacher's Pet stamp set. I jazzed them up a little with either scallop or eyelet lace border punches, and layered them onto Bold Brights cardstock. I coloured the images using a blender pen and Watercolor Wonder Crayons. They are blank at the bottom and the back, so the lovely Mrs Ward can write a little note to the recipient. I hope she liked it, must make a change from coffee cups and chocolates, as useful as those are!


Saturday, 26 December 2009

I wish you a Merry Christmas!


I hope everyone reading had a safe and happy Christmas, and are able to relax and recover today - Boxing Day! Here's to a 2010 ahead full of creative inspiration, health and happiness.

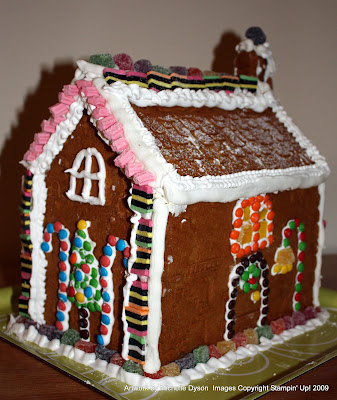
In the pic is the Gingerbread House I made with the assistance of my two lollie directors! It is the first time I have made one, and I was quite pleased that it turned out just like the picture on the baking mould box! Lots and lots of Royal Icing went into the gluing together too! It's now missing its chimney, and the odd sweet, but it seems almost too pretty to break apart and eat!

But, that leads me to one of my New Year Resolutions - don't hoard, USE! Take a look at your stash, and choose something that you have been saving for a 'special occasion' - be it ribbon, patterned paper, fancy embellishments or anything else! It's not fulfilling its purpose in your drawer, so pull it out and use it up! Make a card, a scrapbook page, decorate a tin, and enjoy your creation.

The best bit is that when you have run out, you can buy some more, guilt free LOL!

Wednesday, 23 December 2009

Look what I got!


Here is a pic of the card and goodies I received recently from the Secret Santa exchange I participated in. I love Secret Santa, and it is always nice to make something very special for a recipient who has no idea it's you! (at least to start with, the clues usually start to appear after a while) We've all been getting trickier and trickier though, with parcels going on scenic routes to disguise their origins, putting the team leader's return address on many of the parcels, lifting card ideas from red-herring blogs and more. Lots of fun!! I received a bunch of Riding Hood Red Designer Series paper, a pack of the utterly delectable Dots and Designs Rub-ons from the Summer Mini, and some totally yummy ribbon - the red polka dot grosgrain and a half pack of Valet Ribbon Originals. My card gave me the idea for the birthday cards I made this week too, so cute!! Thanks so much Secret Santa, it's just perfect, and I can't wait to have a play, with the rubons in particular! Now to see if MY recipient, who has opened her parcel can pick me out....

Tuesday, 22 December 2009

Mini Gift Box - step by step

Yeah, I know, it was supposed to be LAST week. I always forget just how hard it is to get anything done when school hols are on and both kids are home. Especially when the weather dictates that they are in the pool while I sit poolside with a book! Anyway, better late than never, here is my step-by-step photo tutorial on how to make a cute little box, out of just half a sheet of A4 cardstock. This is a box we made at the recent Stampin' Up! Regional training, using the Hello Again set. I have made it several times since, because it is easy, fast and economical. I hope you like my instructions and photos - click on each image if you would like to get a clearer view.

Standard A4 sheet, no trimming, just cut in half as if you were making two A5 folded cards, and then into A6 rectangles, four from one sheet.


I have drawn pencil lines on one of the pieces to indicate where to score - 1" in from each side and each end. Do this for 2 pieces if making one box, or all 4 if you are making two.


On the left hand side is the box base. Cut in to the horizontal score lines from each short end. For the other half of the box, which will become the lid, cut two corner pieces away completely, up to the score lines. On the other side, cut just to the score line from the short end, as for the base. Take a circle punch and take a half chomp half way along the longer edge.

Decorate now, it's easier when flat! I have used Versamark and the Winter Post stamp set here, and a band of the same snowflake stamped in Baja Breeze over the top. It's also a great size for using your Stampin' Around wheels - then it is an easy matter of using the co-ordinating stamp set to decorate the tag or accent for the box.


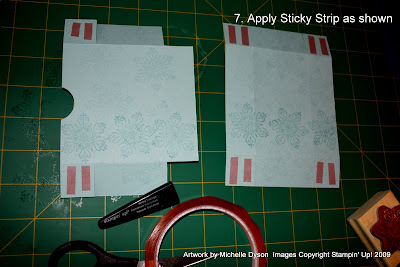
Apply Sticky Strip super strength double sided tape to the corners as shown. Then remove the red liner plastic and assemble the lid and base.


After making the lid and base, add another piece of Sticky Strip along the back edge. A bit lower than where I have placed it would be better...


Line up the lid flap with the back of the box base and stick into place. Done!!


Now you can decorate it as you please. I have added a simple tag stamped with the snowflake again, and overstamped with a silver embossed reindeer. I added some Dazzling Diamonds, using my 2 way glue pen. I mounted the 1 3/4" circle onto a 2" scallop circle punched from Brushed Silver metallic cardstock. Then I tied a piece of white taffeta around, and looped a piece of the sadly retired silver cord around it to complete the box. It's a great size for a little treat, and quick to make!


Hoot Hoot Hooray! Birthday cards with Owl Together Now


Here are a couple of cards I made for two little boy birthdays recently. I started with the same layout and colours, but finished them separately, and changed around the final details just a little, for variety (or, more precisely, because I thought of something a little different AFTER I finished the first one!)


They use the set "Owl Together Now" and boy is it a cute one! Owls have been a bit of a trend for quite a while now, and not just in the stamping and scrapbooking world either - a visit to your local homewares store will be proof of that! Maybe it has something to do with the on-going Harry Potter phenomenon, who knows!


OK, on to the cards...


The card bases are Kiwi Kiss, stamped with the little hearts image from the Owl Together Now set, using Versamark ink, just for a little texture,


Next, there is a large mat of Not Quite Navy, sponged around the edges with NQN ink.

Next, we have a thin mat of distressed Summer Sun cardstock, under the image band of Whisper White.


I stamped the branch and owls with Stazon, my preferred ink for watercolouring, using my indispensible Stamp-a-ma-jig. Do you own one yet? I sense a tutorial about it's merits coming soon...


I used blender pen and marker to colour the owls in shades of Creamy Caramel, Close to Cocoa, Chocolate Chip, Old Olive, Summer Sun, a smidge of Pumpkin Pie and Not Quite Navy.


The sentiment "Hoot Hoot Hooray" stamp was inked up line by line using my trusty markers.


Here's where the cards diverge...


One card uses the Curly Label Punch and co-ordinating Cute n Curly Stamp set. I inked up the border with Not Quite Navy ink, omitting the 'thankyou' before stamping on Whisper White. I cut around the edge of the frame, as this allows me to punch a mat using the Curly label punch. I popped it up on dimensionals for depth. There is a tie of Kiwi Kiss striped grosgrain ribbon at the right to finish , and three Vintage metallic brads.


The other card uses the Scallop circle punch layered onto 1 3/8 and 1 1/4" circles, and to embellish I have used two of the gorgeous "Build a brad" pieces. What is a Build a brad??? It consists of a brad base, available in Antique Brass and Pewter finishes, and a clear epoxy disc that self-adheres to the top. What makes them so great is that you can customise the middle layer any way you like. Here I have simply punched out 1/2" circles from Good Morning Sunshine paper scraps, but you can stamp a co-ordinating image and punch that out instead. Or, make a large glitter brad by filling the centre with Crystal Effects dimensional adhesive mixed with Supernova coloured glitter! A wee scrap of Kiwi Kiss striped grosgrain, left over from trimming the first card I suspect, finishes it off. Ta da! Variations on a theme!

Sunday, 20 December 2009

All About Sale-a-Bration


Sale-a-bration is undoubtedly the BEST time of the year to host a workshop, and also to join up as a demonstrator in my StampInkPaper team.


Here's why:


* For each $100 spent on Stampin' Up! products, you and your guests can choose one of FOUR different, limited edition FREE stamp sets! There is no limit, order $400 worth and collect ALL of them!


* When your Workshop sales reach $600, as the hostess you can choose an extra FREE Sale-a-bration set. Reach $1200 in sales, and you can choose TWO extra sets. All this is on top of the already generous Hostess Benefits, which start at just $300 in Workshop Sales (check out pages 16-23 of the Idea Book and Catalogue to view the exclusive Hostess Sets and Hostess Awards table)


* Join my team as a Stampin' Up! demonstrator during Sale-a-bration, and you can select an additional stamp set of your choice valued at up to $79.95 FREE, with your Starter Kit purchase. The Starter Kit is already discounted by around 40% on retail prices, so this deal packs in even more value. You also get an ongoing discount on your Stampin' Up! products, as well as the opportunity to grow your own, flexible, income producing business. Just call me on (02) 9484 9447 to be sent a free, no-obligation information pack, or to chat about what I can offer you.


I'm taking bookings now for Sale-a-bration Workshops, which can be held at your home (within 1 hr travelling time of Cherrybrook) or mine (with a minimum of 5 guests). SAB runs from January 25th to 31st March, 2010, so get your new diaries out and give me a call to arrange a date to suit. Then tell your friends, because everyone LOVES free stamps!


So, what IS a Workshop exactly??


When you book a Workshop with me, I provide you with a free Idea Book and Catalogue valued at $12.95, and a package with everything you need to host a successful workshop, including invitations and guest checklist. On the chosen day, I come to your home, and show you and a group of your friends the range of Stampin' Up! products. Everyone gets hands-on experience with our products by making two different projects, such as cards or a scrapbook page. There is the opportunity to place orders from the catalogue, and the Hostess can select free merchandise and Hostess Stamp sets according to the Sales total reached. There are no high-pressure sales tactics, the products simply sell themselves. It is a great chance to get together with some friends and have some creative fun. Stampin' Up! Workshops are FREE OF CHARGE, and I supply ALL materials and tools required. No elaborate preparations are required on the part of the Hostess, a dining table and light refreshments are all that is needed, everyone will be far to busy creating to notice if you got round to the dusting!


While you are waiting for your Workshop date, make sure to browse the special Inventory Clearance Sale offer - everyone should be clamouring to add at least one alphabet set to their collection for just $38.98 (+p/h) That's HALF PRICE! There is a wide variety of discounted sets and accessories to choose from, click HERE to view the flyer, and if you'd like to be emailed a PDF with scanned images of the stamp sets, just email me. The Inventory Sale runs until January 24th 2010, while stocks last (hurry for best selection!)

Thursday, 17 December 2009

Ooooh! getting close!


My little blog counter is getting ready to tick over to 10,000! How exciting! Who will be the 10,000th visitor I wonder? Leave me a comment if you're the one and I'll send you a gift :) I'll be a watchin!

Wednesday, 16 December 2009

Best Wishes and More (it's Christmas after all!)


Here is a card I made back at the team weekend in August. It was made for a colour challenge, and I wanted to use a set that I don't own myself. I have never been quite sure of the success of the final result, but enough people have picked it out of my samples box to comment on, so I guess it must be OK!


The colour challenge was: Sahara Sand, Old Olive, Certainly Celery and Whisper White. The set is called "Best Wishes and More" and can be found on page 53 of the Idea Book and Catalogue. I used all the images in the set other than the Snowflake, so you get a fair idea of what you could do with it. The sentiments are great too. I stamped the leaf in Sahara Sand onto a Sahara Sand background, and I laid a sponged piece of Old Olive over the centre. I think if I was making it again I would make a thin mat with a second piece of cardstock behind the Old Olive, in Whisper White, but hey, that's what you get in hindsight!! The flower, heart and birdie are stamped on Whisper White and mounted on nested circles using Stampin' Dimensionals.


At the left I have used a round Flower Designer Brad, and a scrap of Old Olive striped grosgrain. These brads are much larger, heavier and more substantial than I expected, so you can easily get away with using just one of them on a card. The sentiment is stamped in Old Olive , and I added an Eyelet Border punch base. What do you think?????? All products from Stampin' Up!, all available to order through me. Got a question about a Stampin' Up! product? Just send me a note and I'd be happy to help you out!

Tuesday, 15 December 2009

Get THIS list and check it twice - BARGAINS GALORE!


Do you like to do your Christmas Shopping AFTER Christmas at the Clearance Sales? Or, have you got some gift money to spend?


Read on, because I have a great deal to show you! And, if you order ASAP there is still the chance to receive your goodies in time for Christmas (although it cannot be guaranteed from now on)


So, what's on offer? A great selection of Stamp sets and accessories, at clearance prices in the first ever Stampin' Up! Inventory Clearance Sale.


Until 24 January, 2010 you will get amazing discounts on selected, high-quality Stampin’ Up! products with no minimum purchase, and no limits to how many you can purchase!


To view the complete list of sale items- please click on the link below
CLEARANCE SALE FLYER


Products are available at these prices while stocks last during the promotional period, although they are all products that are featured in the 2009-2010 Idea Book & Catalogue and will be available at normal catalogue prices until September 2010.


You may have read my excited noises about the transition to die-cut stamps, and that stamp sets will be produced in die-cut form when existing stocks of square cut stamps are exhausted. That's why all the stamp sets on offer are in square cut form. Never fear, the small amount of extra work is more than made up with the great savings. Some stand-out examples include 3 different alphabet sets, all 50% off! Grab 'em while they last at a teeny weeny $38.95 (+p/h) Jumbo Outline Alphabet is shown in the image above.


There's also chunky glitter, hodgepodge, die cut blooms, and ribbon, to name but a small selection. No cutting required there, just plain old great bargains!


Don't delay, some items are so well priced they can't last for long, and I'd hate for you to miss out. Click on the link to go to the flyer above, and get back to me ASAP with your list! Call me on (02) 9484 9447 or email me - your order can be delivered anywhere within Australia for just $5.95 or 5%, whichever is higher.

Saturday, 12 December 2009

Christmas Classics part III


Here's the second card I whipped up using the Christmas Classics stamp set, this time using the Star stamp. I entertained the idea of using the other image from the set, the Christmas tree, but I thought it would look a little too strange dangling from the 'sky' - a bit of lateral thinking and design modification required, but I think I will give it a go to make the trifecta. The card is made in the exact same way as the previous bauble design, but using the star instead.


I really love how the detailed cross hatching on the stamps looks so authentically 3D when embossed. It's also the kind of stamp that looks great stamped in one colour, without needing to be coloured, or, you can stamp in Stazon ink and sponge colour over it, using a dauber. See, there's some more versatility with this set!

Friday, 11 December 2009

Christmas Classics part II

As promised, here is another card I made this week using the Christmas Classics stamp set. I made this (and the companion card coming later) together, quite quickly. Again, it is a simple layout that is ideally suited to mass production.


The base of the card is Kraft cardstock, and I have stamped the Holly stamp all over the front and the back using Sahara Sand ink (which looks like I imagine "Kraft" ink would look - I wonder why Stampin' Up! didn't call it that??).


Then we have a Very Vanilla panel that I have sponged with Sahara Sand ink around the edges, to blend it into the base card. I stamped the bauble 4 times across the width, at varying heights for visual interest. The strings I was thinking to stamp using the string stamp from Tree Trimmings, but I had a lazy moment and just hand-drew them with the Sahara Sand marker instead.


I then stamped the bauble again, this time in Gold Encore ink, onto Kraft cardstock, before embossing with gold embossing powder. Two of these were cut out, and mounted on top of the base stamped versions using Stampin' Dimensionals. Before mounting, I punched a hole through the loops of the baubles, and threaded some (sadly retired) gold cord through them. I anchored them onto a strip of Kraft Taffeta ribbon.


To finish, I added a sentiment in embossed gold from the Many Merry Messages stamp set. Non traditional colours, modern styled stamps, easy Christmas card! I hope you like it!

Thursday, 10 December 2009

Time is running out for FREE punches


Contact me today to place your order for the Christmas Extravaganza promotion, it ends on December 14th (that's this coming MONDAY)
Choose either of the two great punches shown above, each valued at $30.95 when you purchase $85 worth of products from the special flyer.


Click HERE to visit the PDF of the flyer, or visit my post where the items are listed by type HERE

My favourite combinations of must-haves are these:


*curly label punch bundle

*spiral punch

total: $86.90 , including free punch!


*Simply Sent Cardmaking kit (great gift!!)

*choice of Stampin' Write marker - Real Red, Glorious Green or Brilliant Blue

total: $89.70, including free punch!


Or, choose both of these combinations, and select one of each punch! That's $238.50 worth of products for just $176.60. (postage and handling charges are not included in totals) There is no limit to the number of punches you can receive!


Other great basics on the list include the Cutter Kit and Whisper White cardstock, so check it out today and give me a call on (02) 9484 9447 to place your order, which can be delivered anywhere in Australia for $5.95 or 5% of the order total (whichever is greater).


Christmas Classics for quick cards


I love this set, everytime I sit down with it I can make something that looks different. This card is one I designed as a Workshop Make and Take project. The base is Garden Green, and I have stamped the Holly all over in Versamark ink. The patterned paper is from the Holiday Treasures DSP pack, and I have used the Eyelet Border punch to edge it, before sponging the edges with Riding Hood Red ink. The main image is inked up using markers in Chocolate Chip, Ruby Red and a combination of Apricot Appeal and Summer Sun for the bell. I stamped an extra bell and punched it out with the 1/2" circle punch and mounted on Stampin dimensionals. I also added a little dab of 2 way glue pen and sprinkled some Dazzling Diamonds glitter onto the second bell layer. I have matted with Riding Hood Red and a peek of Summer Sun to finish. Quick, easy and great for bulk production. More coming with this stamp set, stay tuned!

Tuesday, 8 December 2009

Upsy Daisy with a citrus and kiwi twist


Lots of people have said they are tired of this stamp set, because they have used it so much! But I think that is the mark of a GREAT stamp set to own! Not least because you are never, ever going to be stuck for ways to use it, there must be about a million google results for it! I like it because it is


* versatile - can be combined with pretty much any sentiment for any occasion


* simple bold image means it is a quick stamp to use


* suitable for lots of different techniques - shadowing, marker to rubber, crayon to rubber, bleaching and more!


This is a card I made for a friend of my uncle, who is visiting from PNG. She wove two fabulous traditional "Bilum" bags for my kids, after they commented on the one she had brought with her. I hope you like it Veronica!

The base of the card is Tangerine Tango, toned down a little by adding a layer of Kiwi Kiss Designer Series paper over the lower half. Over the join is a piece of Kiwi Kiss Striped grosgrain, and I have threaded it through a little treat from the Summer Mini - Designer Hardware Jumbo Grommets. These come in a mixed pack of neutral colours, including silver, white, vanilla and black, and add a great finishing touch.


The Upsy Daisy stamp was inked up using Markers direct to the rubber. I blended lots of different colours together, including Tangerine tango and Kiwi Kiss using a blender pen. I misted the surface of the stamp very lightly with a water spray before stamping onto a piece of Watercolor paper. A distressed Kiwi Kiss mat and a greeting from Sincere Salutations complete the card. It was a lot of fun, and could be adapted to lots of other colour schemes.


Hope you like it!

Monday, 7 December 2009

Summer Mini Make n Takes with Hello Again and Retro Remix


At the recent Stampin' Up! Regional Training day, we received the Summer Mini set "Hello Again" and the "Retro Remix" wheel as part of our registration. We used these stamps to create a number of projects in our Make n Takes for the day, and you can see the cute projects above.

At the left we have a card made from More Mustard cardstock, with a simple white stamped panel. This is set off by some stamping peeking from underneath the the panel, an extended mat of Old Olive, and a tie of the gorgeous Valet Ribbon Originals satin chocolate polka dot ribbon.

At right, we have a Certainly Celery trifold card, with a double window mat cut from Baja Breeze. Peeking out from the base is a row of Scallop edge Rose Red. Over the window are 4 1" punches, each stamped with a different coloured heart from the Hello Again set. It is finished off with a tie of Tangerine Tango striped grosgrain attached to a Hardware Clip.


At the front, behind a bit of sundapple shadow sorry! is a cute little box. This is the box that inspired the Pale Plum butterfly box a couple of posts down. It was so easy that I have no idea why I've never made one before! I have been asked to do a step-by-step tutorial on this little box, so hopefully I'll get to that this week. This particular box is made from Old Olive textured cardstock, and wheeled across with the Retro Remix wheel. It's wrapped with the fabulously retro orange ricrac from the Pigtails Ribbon Originals pack. A whisper white stamped panel finishes it off. It's a handy size for a few choccies, or a special gift (like that Pandora bracelet loaded up with gold charms perhaps?)


This set did not really jump out at me from the Mini catalogue when I first saw it, but it's on my list now that I've had a play and seen it's versatility in action.


And, if you're a ribbon addict like me, check out the Christmas Extravaganza brochure, as the Ribbon Originals packs are all on there. Yummy!

Sunday, 6 December 2009

the BEST Stampin Studio is finished!


It has taken quite a while to sort everything out, but here is my new Stampin Studio! Ta Da!!
I moved all my stuff (well, most of it - there is still a fair chunk of other craft-type stuff left behind) from a small upstairs bedroom to the downstairs study. Andrew's computer gear and big workdesk units were somehow dissassembled and man+woman handled UP the stairs, where they fitted perfectly. Thank goodness for that, because I have no idea how we would have got them back out and down again if they didn't quite fit!!

The top photo shows my Ikea Expedit unit, which also survived the move downstairs intact. It houses my paper shelves, office/filing type stuff, sample card boxes, magazines and catalogues and some Trofast tubs with other bulky bits and bobs. This is pretty much the same as it was before (if you remember the original pics I posted a while back) but now I'm downstairs, my office stuff and craft stuff are together. The extra space was created in this shelf unit by...


My new BEST scrapbooking furniture!!! Woohoo!! I've been drooling over the ads in the mags and in various dream stamping studio blog posts for the last couple of years, and I finally have some of my own! I have started with the desk and a Double Mini unit. The desk is lovely and wide, and you have everything at your fingertips in the two side storage sections. The Double Mini fits a huge amount of storage into a compact space, and it is on castors, so you can move it around with ease. I decided to get just the drawers, in 1" and 2" sizes, rather than paper shelves, because I thought it would be more flexible. As it has turned out, 12x12 paper does fit inside the drawers in a neat yet snug fashion, so I have more options to move things around. My labelling machine went into overdrive as I found good homes for all sorts of bits and pieces that cluttered up my previous space, so it is nice and easy to find things.


My new, larger punch rack is up now too, and holds all except my small punches, which now fit neatly in a desk-side drawer. It's a great creating space, so I hope it gives you a little inspiration!

Saturday, 5 December 2009

Time to prod your loved ones in the right direction!


It's starting to look a LOT like Christmas... A bit scary, because I am hugely underprepared this year, or at least I feel like I have barely started organising and planning. And, the family Christmas gathering is at my house this year EEEEK!!


So, it is most definitely time to start giving a little nudge to your hubbies and families in the direction you'd like them to head for your Christmas gifts. That is unless of course you would like to receive a 'vegetable scrubbing brush' from your nearest and dearest. Yes, that has happened, you may even read about it on a blog perhaps?? Or, perhaps you'll get a hedge trimmer. Or a boxed set of your partner's favourite TV series. Or, nothing at all because they had no idea what to get you (DOH!) and then ran out of time to try and find something...


All you need to do is to write out your Stampin' Up! wishlist, hand it to them with my details jotted on the back, and tell them that if they ring me, it will all be taken care of in one easy step. Complete with bonus handmade card, and giftwrapping too if you're local. What could be easier for them, and more satisfying for you? Everybody happy, and that's the way it should be! It's Christmas!

Phone me on (02) 9484 9447 or email me at michelle.dyson@bigpond.com Gifts can be delivered ANYWHERE in Australia (the handmade card will be forwarded separately from the delivery if you are outside my personal delivery area)


Ho Ho Ho! Just call me Santa ;)

Friday, 4 December 2009

My new Stampin Up! Website!


It's brand new, and I'm still finding my feet around editing and personalising it, but if you're interested in popping over for a look, here's the link (and clicking the picture should also work, I hope!):


Demonstrator Business Web Site - Michelle Dyson


There are some very cool features, my fave is being able to bypass all the forms and sign up to become a member of my StampInkPaper Inc team, all with the click of a few buttons! All you need to do before joining is to contact me for the special password, but you'd probably want to have a chat first anyway!


It's also a great place to go and see all the latest in official promotions offered by Stampin' Up!, like the Christmas Extravaganza promo, running until December 14th (quick!) Free punches, pretty cool deal!


What else? You can sign up to get a newsletter, get RSS feeds etc when I update, view my schedule of classes and events, see some projects, and lots more. I'll still be keeping my blog, especially while I am still a learner on the proper website, but I hope to be updating both on a regular basis. So, do drop by and have a peek, and leave me a comment here to let me know you've visited. I'll draw a little RAK from the people who comment in a week's time... (PS - Lynda S!! I haven't forgotten, your RAK is on my whiteboard to-do, promise it won't be much longer!)

Wednesday, 2 December 2009

Summer Mini has landed!!


The Stampin' Up! Summer Mini Catalogue has officially begun. Just when you thought there couldn't be any MORE "must-haves" to add to your collection, a whole new bright collection has arrived. Click on the pretty cover in the image directly above to be taken to a downloadable/printable PDF version, and drop me a line at michelle.dyson@bigpond.com and I'll get a paper copy in the post to you in a jiffy! Or, click on the sidebar picture at the right to be taken to the Stampin' Up! Online Catalogue version where you can flick through the pages.


So, what's inside that takes MY fancy??


* More new individual stamps, in the "a la carte" section. These are great to add to your collection, as they are an economical way of making your existing image and sentiment stamps more versatile, and they also make a great, well-priced gift for a teacher or someone new to stamping.


* A new punch - those of you who are regular readers will probably have noticed that I have somewhat of a passion (or should that be obsession?) with punches. Stay tuned for an upcoming post which will showcase my new, improved (larger!) punch rack! This punch is an extra large 1 3/4" circle, that nests nicely with our existing circle and circle scallop punches, and gives you even more layering options. And, even more of our images and sentiment stamps from the main catalogue will fit inside it! As with all our large punches, the price is a very competitive $30.95, and the item code is 112004.


But, that's not all...


This punch happens to be the perfect size for another new item in the Mini, Sweet Treat Cups. These are a little plastic bubble that makes shaker cards and edible nibbles a snap to incorporate in your cardmaking, and are just so perfect for special Christmas cards. You can see one in action in the top image above, where I have filled it with 'gumballs' stamped with the age of the child who was receiving it. I've also seen Santa tummies, Flowers, snow scenes and even liquid-gel filled creations. The cups have a self-adhesive rim, so inserting them is easy, and what you put in the cup will stay put.


The stamp set I used to create this card is called "Something Sweet" and is packed with great images you can use, with or without the Sweet Treat Cups. You can make a fish bowl, a babies rattle, a flower and more, and the sentiments cover all these occasions and more. It's code number is 117699 and the price is $44.95. I have also used the Calendar Alphabet and Numbers set (115766, $35.95) to stamp the '5's, a 1/4" circle punch to pop them out of some scraps. I have used my Bold Bright Markers to ink up the stamps direct to rubber. The greeting is from the On Your Birthday set. The accessories are also NEW! in the summer mini, and I can see myself using a lot of these beauties - 3/4" double sided Real Red Polka dot grosgrain, and Basic Jumbo Grommets.


* SPECIAL PACKAGE DEAL *

Contact me to order the Something Sweet stamp set and the matching 1 3/4" punch and I'll include a FREE package of 12 Sweet Treat cups, valued at $6.50!


This offer is valid until December 31st, 2009, and the total price including postage and handling to your door is $81.85

That will do for now, back later to show you some more goodies!

Monday, 23 November 2009

Phew! What a week!


My apologies for it being a while between posts, but this last week has been a little more hectic than usual. We had our Solar Electricity system installed, so I actually look forward to the next bill, which I am hoping will be minimal or even in credit! In addition to that, there was Stampin' Up! Regional training on Saturday and a Christmas Market at Normanhurst West Primary school, along with preparation of associated swaps and goodies to sell. Phew!


Regional training was a fantastic day, and my guest Kay also enjoyed herself immensely, and is ready to join me on the StampInkPaper team. It is great to catch up with members of my wider team, see presentations from top demonstrators, and stamp with a huge room full of happy people. Kim Tonnet and I, along with my Supporting Demonstrator, husband Andrew can be seen above enjoying some swap making, along with some liquid refreshment


The Christmas Market last year was a great day, this year however it fell on one of the hottest days in Sydney - 41 degrees of stifling heat... Sensibly, visitors thought better of an outing and stayed close to air conditioning! It was very quiet, and most stall holders packed up just after lunch. We headed home for a good swim in the pool. A pic above shows Ryn smiling behind our stall.


The top three photos are of some of the goodies we had for the stall.


First is a small box made from an A5 sheet of cardstock, decorated with some stamps in the about to end Spring Mini catalogue, Soft Summer and Great Friend. I made it using a half sheet of Pale Plum cardstock, then stamped using Perfect Plum. The butterfly was inked up with markers in Pale Plum, Perfect Plum and Lovely Lilac, using the thumping technique, to give a tie-dyed effect. It was very easy to make, and would be the perfect size for something special for a special someone.


Next up are some decorated notebooks, using some of last year's Retired Designer Series papers - Summer Picnic, Ginger Blossom and Apple Cider. The pens I made to match by spraying the ink tube with adhesive, and rolling in glitter for a bit of bling! Just the thing for your Christmas list, shopping list, reminders, etc. The wire spirals have been prettied up a bit with some ribbon snips.


Then we have some more mini Pizza box notelet packs, with stamped sheets inside. These are similar to the other Pizza Boxes I made a while back, but in retired colours of Cranberry Crisp, and using the (sob) retired set Stem Silhouettes.


Hopefully I'll be back soon with some more pics.


In the meantime, my Stampin' Crop day is on Saturday, 28th November, and there are a couple of vacancies. Great chance to stamp up a storm and finish off those Christmas cards! Interested? Call me on 9484 9447 if you're close enough to Cherrybrook to join us.

Tuesday, 17 November 2009

Tangerine Tango with a bit of Curly Label


Here is a card I made a while ago, duly photographed, and then didn't post for some reason!


It's a card I made for my son's birthday, when he turned 8 in September. His all-time-fave colour is orange, so I broke out the brighter In Colors for this year's catalogue to see what I could come up with.

The card base is Tangerine Tango, stamped with Tangerine Tango ink using the Polka Dot background stamp. Then I have a vertical band of Pacific Point striped grosgrain ribbon. Over this I placed a grunged up piece of Kiwi Kiss cardstock, punched with the Spiral Punch, and distressed with the Cutter Kit distressing tool.

The image is from Fun and Fast Notes, and I have custom mounted this set so the Happy Birthday greeting and image can be used separately id desired. I coloured the image using my blender pens and markers, and inkpads for the In Colors. I have used Stampin' Up!'s lovely watercolor paper to stamp on, in Stazon ink, as it really makes it so easy to achieve a pleasing result.

I matted it onto a piece of Pacific Point cardstock, using staples to give it a masculine touch. The sentiment panel is stamped in Pacific Point using the Fun and Fast Notes set, and the frame is from the Cute n Curly stamp set that comes with the Curly Label Punch Bundle.

What?? You don't recall seeing a plain frame in that set? Well, there's not, but by the magic of marker omission, I often leave out the (useful but not what I wanted this time) "thank you" and ink up just the border. That means I can take my punch template book and peruse my sentiment stamp collection to see what fits in the cute n curly box. Ta da!! Gotta love the flexibility that Stampin' Up! offer with their products!

I used my trusty Paper Snips to cut around the framed image, which then meant I could use the Curly Label punch to mat the sentiment.

All done! He thought it was cool, so that's the whole point really.


So, what's all the Bold and Green stuff about? Well, this card uses several of the items listed on the Christmas Extravaganza flyer, more than enough to score a FREE punch, either the Scallop Square or the Boho Blossoms punch, each worth $30.95.

In fact, add a pack of Whisper White cardstock to those items, and some co-ordinating ribbon Pigtails Ribbon originals and you can choose BOTH of the punches, free, worth almost $62 .


This promotion is detailed a bit further down, so make sure to check it for must-have items, and get your order in before December 14th!

Friday, 13 November 2009

Parisian Breeze - yummy, don't miss it!


What could be better than textured, double sided cardstock? Printed even! That's our gorgeous specialty cardstocks, Slumber Party in the main IB&C and Parisian Breeze in the Spring Mini ENDING SOON! While some of the stamps may make an encore appearance in a future catalogue, we won't see Parisian Breeze in the versatile colourway of choc, cocoa, baja and white ever again after the 30th November. And the designs are just so use-able! There's spots, stripes, floral, damask.... It comes as a pack of 12 sheets, for $22.95, so it's great value for such a heavy weight textured printed cardstock.


Here are some projects I have made with it:


At the top we have some calendar panels made with a Close to Cocoa base, Parisian Breeze paper, and the Eyelet border punch. The stamp set I have used is "Dreams Du Jour" and I have inked the circular stamp first in Baja Breeze, before adding some Close to Cocoa highlights over the top. The ribbon is wide stitched grosgrain in Baja Breeze. The little calendar panels are available from school supply shops, but your could also add a photo here. I hope to sell these, amongst other goodies at a market to be held at Normanhurst West Public School, on November 22nd. Do stop by if you're around the area!


The next is a card I made for my husband's birthday, using the On Your Birthday set for the greeting and the dandelion from A Happy Heart for the image. This card also features the oh-so-must-have Corduroy buttons/brads, also in the Spring Mini, and matching Baja Breeze striped grosgrain ribbon (from the main catalogue) He liked it, and I was pleased with it, the paper and the colourway are so versatile.


I have made sure that I have an extra pack of this paper put away for 'the future' - remembering of course that there is no such thing as too much paper!! Don't miss it, I'll be placing my last order for the Spring Mini catalogue on 30th November, so call me!

Monday, 9 November 2009

Spring Mini catalogue ends soon... don't miss out!


It's been a fast four months! The spring mini catalogue officially ends on November 30th. Many of the items in it won't be available ever again. Some may re-appear in next year's main catalogue, but since that isn't released until September 2010 you'll have a bit of a wait!


The images above show just three of my fave products from this mini - Ski Slope Designer Series paper, Corduroy Buttons and Brads and the Tree Trimmings stamp set. The Ski Slope paper in particular, along with the matching tree trimmings set is so easy to work with, you'll be creating beautifully co-ordinated christmas cards in no time!


Please, please check your wishlists for anything that comes from this lovely little catalogue, before it disappears. If you don't have a hard copy handy, you can click on the cover image link at the right sidebar. Call me, email me, last orders will be going in November 30th.

Saturday, 7 November 2009

Sort your Christmas Shopping out now and get a free punch!


Stampin' Up! have presented a selection of goodies to make your Christmas shopping easy!


And, as a bonus, with each $85 purchased from the items listed on the flyer you can choose either a Square Scallop punch (112081) or a Boho Blossoms punch (110711) each valued at $30.95! Order $170 worth from the selected products and choose one of each!


There are some great gifting choices listed, including Simply Scrappin scrapbooking kits, and it is a fantastic opportunity to purchase a Simply Sent card making kit. The "No one like You" (116811) and "More thoughts" (116810) kits contain EVERYTHING you need to make the card designs. They come complete with stamps, ink spot pads, adhesives, pre-cut cardstock, ribbon, envelopes and more, with step by step instructions. They are a beautiful gift for any crafty person, new to stamping or not.


There are also some great basics to stock up on, including the wonderful Whisper White cardstock, the versatile Cutter Kit tool, Spiral punch, ribbons, buttons and more.


Here is a list of everything included in the offer for you, or click on the image above to visit the printable PDF version:


Simply Scrappin Kits


Petal Party $36.95 113059 Pg 136


Rock-a-bye girl $36.95 112165 Pg 137


Rock-a-bye Boy $36.95 112172 Pg 137


Sweet Nothings $36.95 113925 Pg 138


Hoppy Memories $36.95 113936 Pg 138


I wish $36.95 112193 Pg 137


Ribbons


Old Olive 5/8" grosgrain ribbon $14.95 109054 Pg 151


Riding hood red 5/8" striped grosgrain ribbon $19.50 111374 Pg 150


Dress Up Ribbon Originals $24.95 114317 Pg 150


Valet Ribbon Originals $24.95 114318 Pg 150


Pigtails Ribbon Originals $27.95 114316 Pg 150


Simply Sent Kits


Thanks x 2 Simply Sent Card Elements and More Kit $48.95 116809 Pg 142


More Thoughts simply sent kit $83.95 116810 Pg 143


2U simply sent card elements and More Kit $48.95 116808 Pg 142


No one like you Simply Sent Kit $83.95 116811 Pg 143


Stamp Sets


From the Kitchen of Stamp set $52.95 115810 Pg 93


Just Jawing Stamp set $45.95 115828 Pg 67


Punches and Tools


Curly label punch bundle $65.95 112966 Pg 153


Cutter Kit $33.95 106958 Pg 155


Spiral Punch $20.95 108341 Pg 152


Buttons


Button Latte Designer Buttons $15.50 114333 Pg 151


Button Bouquet Designer Buttons $15.50 112092 Pg 151


Cardstock


Kiwi Kiss A4 cardstock $10.50 116204 Pg 126


Whisper White A4 cardstock $13.50 106549 Pg 127


Real Red 12 x 12 cardstock $14.50 106545 Pg 128


Bold Brights A4 assorted cardstock $14.50 106560 Pg128


Markers


Real Red Stampin’ Write marker $5.75 100052 Pg128


Brilliant Blue Stampin’ Write Marker $5.75 100057 Pg128


Glorious Green Stampin’ Write Marker $5.75 100047 Pg128


Other Items


Small flat cellophane bags $7.50 103104 Pg 130


On Board 5 x 5 Art Journal $13.50 108495 Pg 147


So, get your wishlist together, and give me a call (02) 9484 9447 or email me at michelle.dyson@bigpond.com. Or, hand your hubby your list and he can skip the Christmas eve last minute hoopla. Everybody happy! The offer closes on the 14 December 2009 so please don't leave it too late.

Friday, 6 November 2009

We're baaaaaaacccckkkkk!


Gosh, I feel such a slacker for not posting here in so long, especially since Kim Tonnet has not only posted a few times since our return from Fiji but also managed a couple of updates while we were there!! We all had a fantastic time, although as Kim also mentions, holidays with kids are never quite the same as the 'good old days' BC! We packed in lots of activities, interspersed with cocktails by the pool and a beach massage. I even took some Stazon stamped images to colour with Watercolor Wonder Crayons and a blender pen, but didn't manage many!


It is good to be home though, travelling always makes me appreciate how good we have it here in Australia. One of the highlights was a village tour where we met some local children. Because it was a weekend, the tour of their school wasn't on, but the kids were around the village instead.
Just before leaving I was reading some reviews of various tours, and discovered that stationery supplies like exercise books, pencils, pens, textas etc are in very short supply in rural Fiji, and are beyond the budget of many village families. I raided my stash of school supplies and took a bag full of things with me to give the children. They were delighted, and I encourage anyone visiting similar places to do the same. One young girl was proudly telling me she wishes to become a nurse, so anything we can do to help them on their path will be greatly appreciated. I plan to stock up big when the 'back to school' sales are on and post a parcel with more supplies early in the new year. Many of the resorts have a village they sponsor, so a parcel addressed care of a major resort should see the items reach their intended destination.


Ah well, better get back to it, so many things on my to do list!
I leave you with a couple of photos taken by my 8 year old son, it's amazing what kind of genuine images you can capture when the photographer is a youngster! I think he did a great job. The top one is of a Firewalking Warrior, and the second one is of my son with some of his village friends.

Wednesday, 21 October 2009

And a great day was had by all - part II


I'm back with some more photos and tales from the Christmas Craft Day. My bestie and co-organiser (or is that co-conspirator??) Kim Tonnet has posted a lovely wrap up on her blog too. THANKS Kim! Certainly couldn't have done it without you either! The entire day was most definitely a team effort, with my husband Andrew, Kim's mum Robyne and our downlines Ryn and Clare all pitching in with abundant help.
From the top is a photo of one of the Make and Take projects, silly me forgot to photograph the fully assembled item, but you may be able to tell it is a calendar. The sample is still firmly buried in the piles of boxes in my studio, one day I may be able to find it again to give you ap proper look! I made it with some retired designer series papers, Afternoon Tea, and the matching (also retired) stamp set "live your dream" Sigh, I miss this set, especially the quote, very inspiring. At least I'll be looking at it all year stuck to the fridge!!


Next up we have the Wall of Inspiration. I am quite proud of my wall hanging displays. I was lucky to find some of the special "wall runner" fabric that velcro sticks to at a nearby Spotlight, and at a clearance price no less! My much under-utilised sewing machine roared into action. And the best thing is that I can roll them up and use them over and over again! We were lent a large selection of samples by Ryn, Clare and also Jayne Mercer, thanks to you all. There was also a large selection of cardmaking books and magazines to stir the creative juices of our guests.

Next we have the talented Ryn, who demonstrated some fab acetate cards using the new Stazon white ink in the Spring Mini catalogue. I will have to ask her to post some pics and instructions for it, it was very clever!


Lastly, we have our youngest guest, the adorably dribbly Miss Katie, with her mum Clare. Clare demonstrated a couple of cool embossing techniques, on ribbon and on Sticky Strip adhesive tape. Again, need to give her a gentle prod to post a step-by step on her blog with some piccies :)

That's it for now, Kim's turn again!