

Welcome to the INKlings "Christmas in Winter" Blog Hop!
You may have arrived here from Vanessa's blog or just be visiting my blog, whichever way once you’ve checked out my creations you can continue the hop through the link at the end of this post to the next team member.
How quick is this year going! Have you started to think about your Christmas cards and projects yet? The INKlings team has and we thought that this month was the perfect time to host a Christmas in July blog hop. You'll find lots of great ideas when you take a tour of the blogs of 15 of our crafty team members.
Want to win some Blog Candy? Simply leave a comment on each blog and then email Clare and let her know you’ve done so and you’ll be in the running for a fantastic prize of 15 handmade items plus other goodies.
Sorry Blog Candy prize not available to SU! demonstrators but you're more than welcome to leave us a comment!
My projects use the delightful stamp set, "Welcome Christmas". You can find it on page 26 of the Idea Book and Catalogue, 121584 $49.95 in woodmount, and 120597 $39.95 in clear mount. It has a variety of images, so I find it quite versatile. I've made three different cards with it, and some gift tags are under construction - you may have to come back another time to see those! I've stuck to a simple palette of Crumb Cake, Cherry Cobbler, Early Espresso and Very Vanilla, and have used our Basics Adhesive Pearls and 1 1/4" striped grosgrain ribbon for embellishment on each of the three cards.
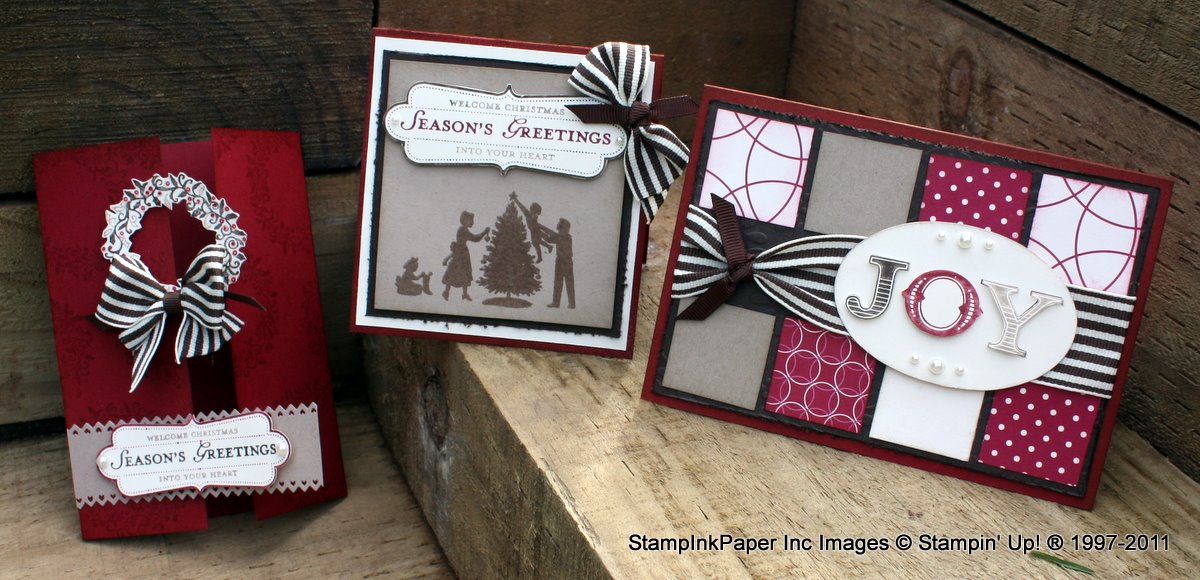

Card one is a 1/3 sheet card, so it's a good choice for a gift card, or if you have several squillion people on your Christmas card list. It is quite suited to production en masse, and is the kind of card you could make while watching a DVD in the evenings.
The card base is Cherry Cobbler (oooh YUM!), and I have inked the edges and given it a good squirt with my DIY Shimmer Mist (you can click HERE for a tutorial I did earlier on this). Next is a layer of Very Vanilla, cut just 1/4" smaller on each side for neat layering. Then there is a layer of Early Espresso, my new favourite brown. I've roughed up the edges with my trusty distressing tool from the Cutter Kit here. (tip - you need this tool if your trimmer cuts tend towards the wonky, it masks a multitude of sins...) More squirting with shimmer here too.
Then, a Crumb Cake layer, sponged on the edges, and clear embossed using Versamark ink and the lovely silhouette style Christmas tree family stamp. The label stamp is part of the set, and I have simply inked it with markers in Cherry Cobbler, Early Espresso and Crumb Cake, and stamped onto Very Vanilla. It looks fiddly and time consuming, but it's faster and easier than you'd think.
I've added some Basics Pearls and some Stampin Dimensionals behind this to give it some lift from the front of the card. To finish, I have used some of the extra wide stripy Grosgrain ribbon in matching Early Espresso. When I first saw this wide ribbon, I thought "what the!" , thinking it would take masses of ribbon to make something on the right scale. I've since discovered that there are several ways to use this wide ribbon on a card, and with pretty small pieces too. Here I have taken a short snip, approximately 8-10cm, and have folded in half-ish (deliberately not evenly). The centre is secured with a short piece of Early Espresso narrow grosgrain, and it's attached with a mini glue dot (or two for good measure). Ta da! Done!

Card 2 is a standard landscape orientation A5 fold, and again I have used Cherry Cobbler as the card base. Then, a layer of Early Espresso cut 1/2" smaller is layered on this (and I've used the edge distressing tool again) Before I distressed and attached it, I ran it through the Big Shot using the Finial Press Embossing Folder, you can see a peek of this behind where the ribbon is tied. The squares are cut from Very Vanilla, Crumb Cake, and Jolly Holiday DSP using the 1 1/4" square punch, and inked the edges before attaching them to the Espresso panel. Here's another way of using the wide ribbon, as a band across the centre, but tied at one point with matching narrow ribbon. The "joy" sentiment is from the set, and I have stamped it twice, cutting a second layer of letters out for a dimensional effect. I cut the oval using the Oval Big Shot Sizzix originals die, a great choice when you need more room than a punch. It's dressed up with a few more pearls, and attached with Stampin' Dimensionals.

The final card in the trio is a Gate Fold A5 card. The card base is Cherry Cobbler, and I have inked the edges and stamped with the gorgeous wreath stamp in matching ink all over the base. The wreath was stamped again ont Very Vanilla after using markers in Cherry Cobbler, Early Espresso and Crumb Cake to pick out the berries and open leaves for some colour variation. I then trimmed around it carefully, but for speed and ease of production, you could simply leave it as a stamped panel. The "bow" is not really a bow - yet another way of using a small bit of wide ribbon for maximum effect. it's about 15cm, bunched into two loops and secured with a needle and thread around the middle to stop it from springing apart. I used my
I hope you have enjoyed looking at my projects, please don't be shy in asking a question about how I have done something, I love questions! I will be running some Christmas Card Stamp-a-Stacks between now and the end of the year, you can sign up for my newsletter or follow my blog to be kept informed.
Well that’s all from me. Next stop on the INKlings’ Team Blog Hop is the lovely
Ryn Gibbs. Have fun and don't forget to leave a comment on each blog to win some great Blog Candy.
If for any reason you find a missing link on the blog hop head back here to find links to all the members taking part. After the blog hop is over, I'll pop back in here to convert these to permalinks to the actual Blog Hop posts, so you will be able to do it all over again for inspiration later on!
1. Clare http://www.crafty-cow.com
2. Janice http://www.janicespencer.blogspot.com
3. Christie http://www.christiescreativecorner.blogspot.com
4. Kari http://www.karigail.wordpress.com
5. Joanna http://www.joannawassens.com
6. Michelle http://stampinground.wordpress.com
7. Alana http://www.alanagalagher.blogspot.com
8. Carol http://www.inkantations-and-inkarnations.blogspot.com
9. Cath http://cathdeanpapercraft.blogspot.com
10. Amy http://amyandersonsblog.blogspot.com
11. Vanessa http://stampness.blogspot.com
12. Michelle D http://stampinkpaper.blogspot.com
13. Ryn http://rynscraps.blogspot.com
14. Fiona B http://fionajanestamping.blogspot.com
15. Liz Halbisch http://lizhalbisch.blogspot.com


