Showing posts with label kids. Show all posts

Thursday, 12 July 2012

Triple Treat flower and Dandelion Project needs your support!


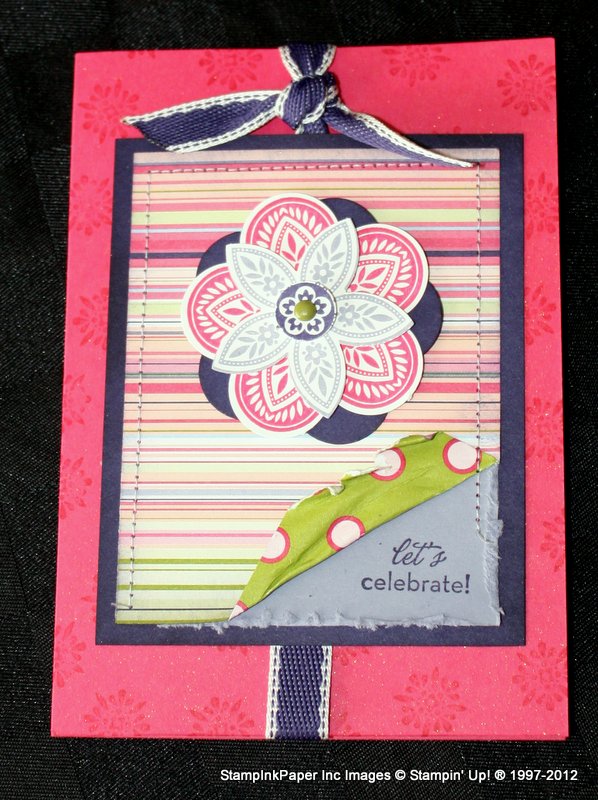
Here are two cards that I made having chosen a colour combination inspired by the delicious "Cheerful Treat" Hostess Designer Series Paper.  I used the Triple Treat flower stamp, from the a la carte collection (see it on page 14 of the catalogue, #125040 just $16.95!).  As the name suggests, this stamp can be used with (or without!) three different punches for quick easy cards - 5 petal flower, Fancy Flower and 1/2" circle punch.  It also suits the "Rock and Roll" technique for adding a darker colour around the outside of the stamp for a two-tone effect, or you can use markers to colour different sections of the stamp.    There's some sewing, some distressing and some yum Concord Crush poly twill ribbon.  Concord will be leaving us come September 1, and it is a quite unique dark purple/blue, which looks stunning with Wisteria Wonder, Melon Mambo, Lucky Limeade and lots more - make sure to stock up (and get a reinker for your pad!) before it's gone...  act now!

Speaking of 'act now', here's a totally non-stamping related plug for a cause about which I am most passionate - bullying.  More precisely, it's a support and anti-bullying digital book being planned.  It's a unique idea, with obvious appeal to children, presented in an accessible digital format.
The "Dandelion - Bullying is for People with no Imagination" project is currently listed on "Kickstarter", with 10 days to go to reach the funding target.  There is a short video with information by the creator, access it via the widget below and lots of options to help - every dollar counts!  I'm sure as a community of very imaginative people we can get them over the line and feel proud to have contributed a little to a big cause.


Please help if you can, and spread the word so we can help make this project come to life!

Friday, 6 July 2012

Not a card, but a very PINK cake!

After the circus themed wedding cake, I was under instruction from my little girl to make a "9 inch cake with 5" top layer mud cake with pink icing and flowers" for her birthday back in April.  Well, I wasn't planning on making a multi-tiered masterpiece, but the other bits were fairly easy to achieve! Under the Buttercream 'dirty icing'/crumb coat there is a rich, dense chocolate mud cake.
 Next we have a pink fondant layer, very pink!  Probably a hang-over from the circus cake that was very brightly coloured, I dolloped in a generous blob of paste colour, then realised that it was probably a bit toooo much!  Never mind, when you are 7, 'Pinkie Pie Pink' is about as good as it gets! There are a few lumps and bumps in this, but I was without my cake smoother tools so I was still fairly pleased with how it turned out.  I used a magic plastic mat set to roll the fondant, so it wasn't super thick. 
 Decoration is fun when you have a cricut cake machine!  I intended to use this with paper, but had no idea that cutting icing would be as fun and easy as it is, so it is yet to see anything non-edible!  Very green icing this time, rolled onto the cutting mat, ready to go into the machine.
 Here are the first two layers of the design, they are cut separately and then added together.
 Here is the finished cake, with some (wonky) swirls around the sides.  It is much harder to position things vertically than on the top surface!
The birthday girls, with some of Grandma's macarons for more yummy treats.  Next cake will probably be for Master 10 turning 11 - I wonder what the request will be??!!

Thursday, 10 May 2012

Kate Mason's Canvas Napkin Art Class

There is no stamping on this particular example, but you could quite easily add stamping to this really cool, really fun, and easy technique!
Kate Mason was one of the three awesome teachers this year, and she taught a class on the fascinating technique of paper napkin collage.  The teaser images on the class flyer and the plethora of darling artworks on her blog and etsy shop had me quite excited to try something new. I'm planning to have a go with some of my immense collection of Stampin' Up! Designer Series paper and fabrics too, chucking in a bit of texture paste and gauze too maybe, a la Louise Nelson (who's workshop I loved at last year's e2c).  Adding it to the never ending 'to do' list.  Shame there's so much tedious, less crafty stuff that must come first.  I wonder how many art subjects I would need to do at uni before I would be allowed to teach that too???  Hmm, there's an idea!  After all, there's plenty of science in art!
 I changed the designs only a little from the class samples, mainly moving the images to make space for a large quote on each, and switching the colours around.  I had an idea straight off that I wanted to put an inspirational quote on each as a gift for my two lovely kids.  I went looking for rubons, but the only ones I liked were too small and/or the wrong font style.  Hmm, what to do?  I was not keen on writing directly onto the finished canvas, for fear of stuffing it up, but I had a brainwave about using the white layers from the 3 ply napkins, which weren't used on the canvas base.  I took my Sakura Pigma black pen and hand-wrote what I wanted to say, then carefully cut around the lettering and applied it just like another layer of printed napkin.  It meant I could write a word as many times as I needed to get the spacing and look to be how I wanted.  I just need to add a final coat of matte sealer, and then the kids can have them.  I'm desperate to make more, but as per above, there's less fun stuff ahead in the queue :(  Better get off here and start ticking some of those items off I guess... 


Thursday, 3 May 2012

Update...

It's been a little while, life has been somewhat hectic, in a creative way though!
I hope to get back to regular posting very soon, but in the mean time I have a little rush of catch-up posts to make up for my slackness.

 These are the fastest, easiest easter treats for my kids to hand out to their classmates!  I was a bit over chocolate, even before easter got here (did I actually say that?? ).  I had also found a mega jar of Jelly Belly beans at Costco that if I didn't parcel them up and ship them out, would have found their way into my tummy...  (maybe it was sugar I was over rather than chocolate?  Yeah, that sounds better!)  50 something packs of beans made short work of the jar, so that worked out really well.  I used skinny cello self seal bags, and had an idea to use the new Sizzix Framelits Labels Collection from the Autumn Winter mini as a topper for the bag.  Just like the fabulous "Top Note" Sizzix Bigz die we've had for ages, the Framelit shapes are symmetrical, and can be folded in either portrait or landscape to form a bag topper.  The best thing?  The SIZES!  I had no idea until they arrived that the largest Framelit shape is much bigger than the usual nested dies, big enough to use as a decent sized card.  So, there was a die size for pretty much any bag, including the mini bags I was using.  I was able to cut the label Framelits three sheets of cardstock at a time (pretty amazing) on the Bigshot, and was able to use up lots of scrap cardstock.   You can check out the Framelits on page 18 of the mini catalogue, $49.95, 125598.  The Designer Label punch was perfect for the front label, and I whizzed up a batch of those using the chick stamp from the "Best of Everything"set, 124946 $47.95.  I inked up in Daffodil Delight ink, but then I rolled the edges of the inked stamp onto a Peach Parfait inkpad, to get more contrast for the edges against the sharp white label.  A little greeting from good old "Teeny Tiny (something for everything) Sentiments" and a dab of SNAIL, and they were done!  I did gather them all together for the pics above, because they looked so cute and colourful.  They went down a treat apparently, so all was good there. 

Here I am, at my car boot sale stall, just after the completion of set up.  I managed to sell a few of the retired sets on offer, and quite a few cards from the donation box were purchased to benefit the Dural Rural Fire Brigade.  Thanks so much to the lovely customers who were able to drop by for a visit.  Unfortunately, the drawcard, car stopper of a Jumping Castle for the kids was a last minute no-show, so traffic was a bit lighter than expected.  I did manage to make quite a few swap cards, so it worked out to be a fun day.  Off to find more neglected pics in my blog folder!

Sunday, 22 January 2012

Hand made gifts for some very special teachers

 My kids had some very special teachers last year, so I wanted to make some special gifts to thank them for their hard work.  Mr 10's teacher was able to appreciate his quirky character, like his useful ability to remember collecting notes and classroom organisational type stuff, while conveniently forgetting things like how to spell and times tables.  So, together we made Mr M a noticeboard to keep track of paperwork!  I built a deep rebate frame with some chunky moulding.  The insert is a piece of "Wonderwall" noticeboard stuff I chanced across at Spotlight one day, it is like the wall panel stuff that velcro sticks to, but with a thick EVA foam backing attached so it can be used with pins as well.  We used a papier-mache type technique to cover the frame with the school colours, using little bits and bobs of all kinds of patterned paper, some from my stash and some from now retired DSP prints packs.  The ribbons are Purely Pomegranate and Blue Bayou Stitched Grosgrain from in colors a couple of  years ago, and they are attached on with Build-a-brads and Corduroy brads.  I gave the frame a good coat of glue varnish to make it nice and durable.  I hope he finds it a useful tool, and remind him of one of his more challenging students!


 Miss 6 had a pair of teachers last year, in a 3/2 jobshare.  Mrs W was lovely, and I only found out that she is actually the sister of one of my lovely customers when I gave her this crafty gift - a very small world it is indeed!
I made a covered clipboard with some interesting adhesive fabric paper, and a wide variety of ribbons to match the colours.  The fabric paper isn't SU, but the colours were so perfect for Pool Party, So Saffron, Calypso Coral, Regal Rose and Chocolate Chip  The tin to match has a Calypso Coral and So Saffron ruffled flower on the top, and contained a stash of erasers, merit stickers, and some owl santa chocs.

Mr Mc was quite charmed by Miss 6 I think, and she had a ball in his class.  As Mr Mc moves about the school in his dual role as Deputy Principal, I thought he might find it useful to have a tote tray for some of his most needed supplies.  It's an MDF caddy, covered with some DSP in newsprinty style papers, and some lettering and a crown cut from some offcuts of black core gold matboard.  Mr Mc uses a crown avatar for the class blog, and is definitely king of his little charges, so that explains the decoration!  I sponged gold shimmer paint all around the seams, and added some erasers, merit stickers and Santa Owl chocs.

I had lots of fun making these, and the thinking cap is on again already for this year!  I'd love to read your comments and ideas for teacher gifts - always helps to start early with inspiration!

Tuesday, 6 July 2010

Pretty Pink Pony Party

There's been a bit of a rush of birthdays in Lillian's kindergarten class, and the other weekend she attended two parties on the same day!  Luckily, through arrangement by the mums involved, there was a neat half hour between them to allow for the shuttling between process.  This card is the one I made for Isabella, who likes pink and horses (according to Lillian! )

The card base is Pink Passion, stamped with Polka Dot background with Pink Passion ink.  I sponged the edges too.  I do this with most cards if I have time, since it adds depth and interest quickly and easily.

The colour scheme for the rest of the card was inspired by a piece of Kaleidoscope Designer Series Paper (from the Summer Mini, now retired)  There's a piece of Gable Green behind the DSP panel, and the circle behind the stamped image is textured Apricot Appeal, again sponged with matching ink.

The circles were cut on the Circle Scissor, at 2 3/4" for the inner and 3" for the outer.  I used my Dotto to stop the watercolour paper circle from wandering about while I stamped the pony in Stazon Black ink using the Stamp a ma jig to position it carefully.

To colour, I used Watercolor Wonder Crayons from the Bold Brights set, and applied them around the inside edges of the image, and along the internal lines in light strokes.  Using a Blender Pen in a small circular motion, I blended and drew the colour in to complete the image.  For the really detailed areas, here is a little trick for you:
Scribble a small patch of crayon on the inside of the lid, and use the Blender Pen to pick up just a smidge.  Then you can use the fine detailed point on your Blender Pen to get carefully into the nooks and crannies of the mane and tail for example.

The greeting was stamped in Stazon Black onto a scrap of watercolour paper, and trimmed to a banner shape before fixing at one end with a Flower Designer Brad and shaping with a Stampin' Dimensional for a bit of lift.

Tuesday, 5 January 2010

And now for something COMPLETELY different!!


Here's a bit of an oddball post, and it has nothing at all to do with stamping! I was shopping last week with the kids and we happened to see some fluffy pencil cases. As it is the beginning of kindergarten in just 2o something days for Lillian, she naturally wanted one. As did Ciaran, who has most definitely inherited his mother's love of all things stationery! Hmm, says I, looking at the hefty price tag and the rather ordinary quality.

Spotlight happened to be just across the road, and I promised them I would sew them each a furry pencil case. Off we trooped, and found a dazzling selection of fake fur. I was thinking that Miss Lillian would definitely go for pink, and she surprised me by deciding on a steely grey that she named "Bentley" - he's our pretty British Blue cat. Having named the colour, she then decided, naturally, that the pencil case should look like a cat. Hmm. OK, well, we'll buy some pink too. Ciaran is my Mr Orange, always has been, so I thought that would be his choice. Wrong AGAIN - he chooses Leopard Print!

I made them in an evening, and they were quite fun. I lined them with some mid-weight denim, and made them with open end zippers (which makes assembling them easier as the zipper seams are enclosed to make them open smoothly) I like this style of pencil case with the sipper down the middle because it sits nicely on the desk without spilling the contents.

Lillian's has a pink 'tongue', and they both have a tie of ribbon to make opening the zip easier.

At least I know that amongst a host of smiggle/barbie/dora/smash pencil cases, they will both have something pretty unique. I made a couple of smaller zipped purse pouches with the excess width of the fabric, so they have a matching pouch for their lunch money too. Cool hey!

Saturday, 25 July 2009

Beginners Watercolouring! Echoes of Kindness

Yes, it is a little lop-sided in terms of matting. Yes, the colour combination is at best curious. Yes, the watercolouring isn't up to the usual standard! However, I think this is a great card, because my littlest stamper made it almost all by herself. This is the card that Lillian made for Aunty Kim's birthday recently. Both Ciaran and Lillian made Kim a card, and both took great pride in exertion of full artistic control over their creations.

They know that her favourite colour is purple, hence the choice of Elegant Eggplant for the card base. Lillian loves pink, and chose this flower stem stamp from the Level 2 Hostess Set Echoes of Kindness to colour. She even stamped the image in Stazon by herself.

The colouring was done with a blender pen and the ink-pad puddle technique, absolutely without any help at all, including the choice of Glorious Green and Pink Passion. Of course matching matting was required, and mum did help a touch with the use of the trimmer, although the sticking was all her own work.

This is how she left it, and I finished it off before giving away with a scallop circle and circle punch greeting to match, and Kim will hopefully find a few spare minutes soon to show you the completed version. I'm very very proud of my little one, and Aunty Kim loved it too :)