Showing posts with label punches. Show all posts

Monday, 19 August 2013

Mosaic Madness Birthday


Here is a card I made for a special orange-loving friend using the new "Mosaic Madness" stamp set, matching folder and punch.  I had made a few different colour and pattern combos, and was playing around with the layout when I discovered I could make a heart shape.  Some of the tiles are popped up with Stampin' Dimensionals, and the littlest stamps are placed directly onto the Whisper White of the embossed background.  The greeting is from Itty Bitty Banners, and the colours are Daffodil Delight, Tangerine Tango, Pumpkin Pie and Calypso Coral.    The versatility of this set is incredible, I can't wait to have more of a play!

Sunday, 1 July 2012

Today's Goodies! Want some? Read on...

Here's a pic of the collection of items I have created for today's Party at Vanessa's.  The two cards at top and right are our Make and Takes, and the lower card and treat tube are demonstrations and will be gifts for lucky attendees, amongst other stuff.

Vanessa's friends will be learning a few new techniques and will each get to take home at least 2 completed cards.  Sound like fun?  Want goodies for yourself?  I can show your friends how to make beautiful cards at your own Stampin' Party - within ~ 1hr travel time from Cherrybrook, North Western Sydney.  Call me, 9484 9447 or email to book your date - Extra Hostess dollars promotion runs until 31st July - best time to book for maximum goodies!

Best finish packing!

Saturday, 30 June 2012

Owl punch, Pennants and Calypso Coral


This was a bit of fun, I hadn't played with the Owl Builder punch since late last year (maybe the 60 Santa Owls I did for the kid's classmates turned me away for a while??).  I also wanted to use "Calypso Coral", an In Color for 2012-13.  I was pleasantly surprised when I saw it for the first time, as I was not a fan of "Cameo Coral" that retired with the Colour Renovation project.  Combined with "Pool Party" and "Daffodil Delight" it makes a bright yet sophisticated combination that is very on-trend at the moment.  This colour combination was inspired by the "Attic Boutique" Designer Series Paper in the Autumn/Winter Mini.  At first glance you'd never think this paper would work for a fun card, but the patterns are remarkably versatile. Here I have simply hand-cut small triangles and strung them along a piece of "Calypso Coral" bakers twine with Stampin' Dimensionals to make them appear to float in front of the card.
Mr Owl is punched from scraps of Calypso Coral, Daffodil Delight, Baja Breeze and Soft Suede and glued together with 2-way glue pen (ideal for fiddly little bits like eyeballs!)
The top layer is Whisper White, and the backing layers are a piece of retired specialty cardstock "Parisian Breeze" and a scrap of fabric that was a good match for Daffodil Delight. The sentiment is from "Curly Cute", a versatile font that fills a card nicely, stamped in Soft Suede.   So quick, so easy, I went on to make a few more. (But not 60!)

Here's a list of some of the items I used here:
118074 Owl Builder Punch - $33.95
100425 2-Way glue pen - $6.50
125573 Calypso Coral bakers twine  - $4.95  (Autumn Winter Mini - one month to go!)
121500 Curly Cute (wood) - $34.95
125407 Attic Boutique Designer Series paper pack (12 sheets 12x12, double sided) - $18.95 (A/W Mini!)

Off to finish prepping for a workshop PARTY! tomorrow, looking forward to it!


Tuesday, 26 June 2012

Twitterpated with Pretty Postage


I don't know if it was my childhood collection of another kind of stamp entirely, but when I first saw the Pretty Postage stamp set and matching punch, I just knew it would be coming to live with me!

And, the Designer Series Paper "Twitterpated" is such a great selection of patterns in pleasing combinations, that it became an instant favourite.  It is a little unusual, as patterned paper packs go, as it could be used for both masculine and feminine cards, depending on which side of the paper you choose.

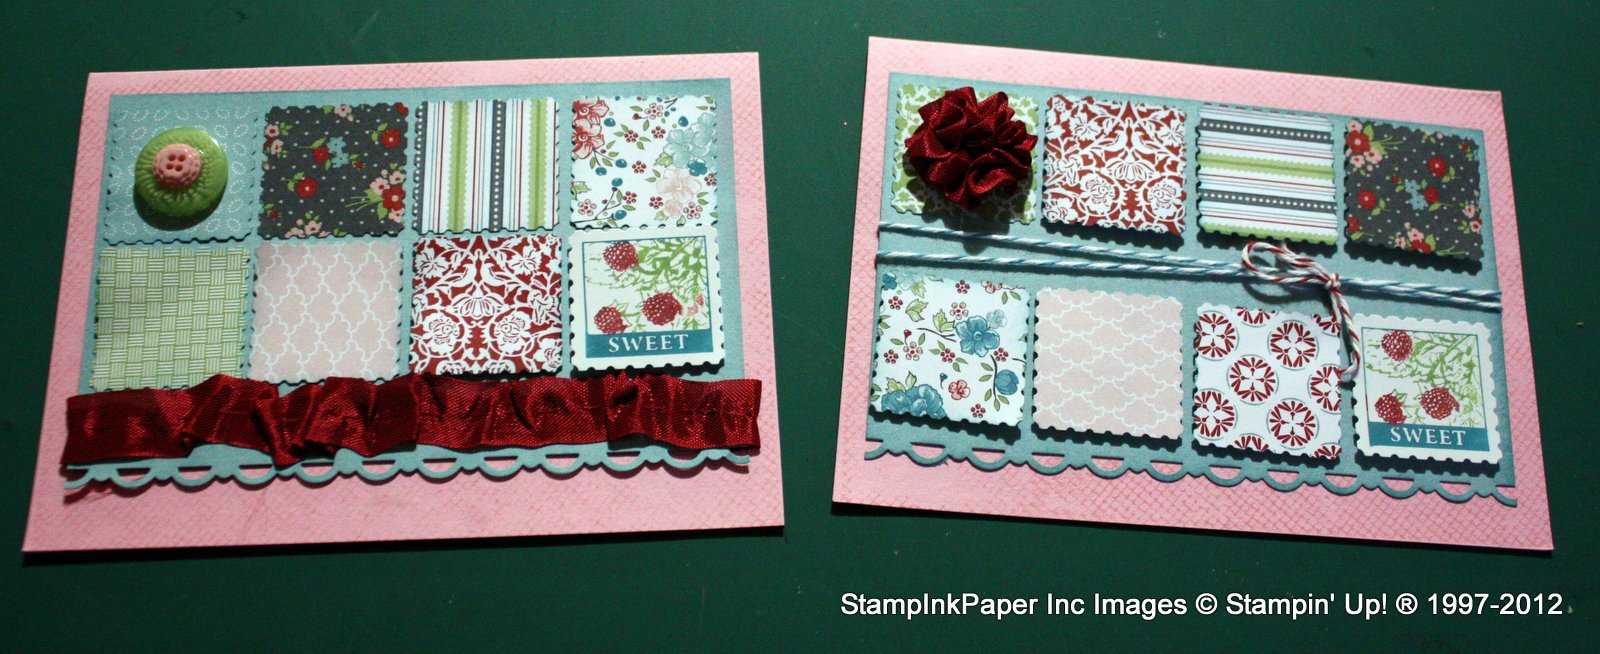
Together, they make a quite versatile pair!  I made this pair of cards above for Mother's day, and as you can see, they started out the same, and then I changed them around to give a slightly different look.

The base layer is Blushing Bride, followed by a layer of Baja Breeze that has been edged with the scallop trim punch.  Then I have punched out a series of squares with the postage punch.  After inking the edges with sponge, and popping them up on Stampin' Dimensionals they were all done.  The image squares were made with the Pretty Postage stamp set from the Summer Mini, inked up with markers in matching colours.  Both cards have Cherry Cobbler seam binding ribbon (oh so delish!), but one has been made into a 'raspberry' by gathering it onto a thread and pulling to tighten, and the other has a ruffled band instead.  One got a matching cute pink Twitterpated button, and the other got some Island Indigo and Cherry Cobbler bakers twine in the middle.  Ta da!  All done :)

Here's a list of some of the products used:
Twitterpated Designer Series Paper 125406 $18.95 12 sheets 12x12 heavy weight double sided paper
Twitterpated Designer Buttons 125579 $12.95 for snap container of 48 buttons
Postage Stamp Punch  122344 $30.95
Cherry Cobbler Seam Binding 120992 $12.95
Scallop trim punch 118402 $30.95

If you would like to order anything I have used here, please contact me, I can have your order delivered anywhere in Australia!


Thursday, 3 May 2012

Update...

It's been a little while, life has been somewhat hectic, in a creative way though!
I hope to get back to regular posting very soon, but in the mean time I have a little rush of catch-up posts to make up for my slackness.

 These are the fastest, easiest easter treats for my kids to hand out to their classmates!  I was a bit over chocolate, even before easter got here (did I actually say that?? ).  I had also found a mega jar of Jelly Belly beans at Costco that if I didn't parcel them up and ship them out, would have found their way into my tummy...  (maybe it was sugar I was over rather than chocolate?  Yeah, that sounds better!)  50 something packs of beans made short work of the jar, so that worked out really well.  I used skinny cello self seal bags, and had an idea to use the new Sizzix Framelits Labels Collection from the Autumn Winter mini as a topper for the bag.  Just like the fabulous "Top Note" Sizzix Bigz die we've had for ages, the Framelit shapes are symmetrical, and can be folded in either portrait or landscape to form a bag topper.  The best thing?  The SIZES!  I had no idea until they arrived that the largest Framelit shape is much bigger than the usual nested dies, big enough to use as a decent sized card.  So, there was a die size for pretty much any bag, including the mini bags I was using.  I was able to cut the label Framelits three sheets of cardstock at a time (pretty amazing) on the Bigshot, and was able to use up lots of scrap cardstock.   You can check out the Framelits on page 18 of the mini catalogue, $49.95, 125598.  The Designer Label punch was perfect for the front label, and I whizzed up a batch of those using the chick stamp from the "Best of Everything"set, 124946 $47.95.  I inked up in Daffodil Delight ink, but then I rolled the edges of the inked stamp onto a Peach Parfait inkpad, to get more contrast for the edges against the sharp white label.  A little greeting from good old "Teeny Tiny (something for everything) Sentiments" and a dab of SNAIL, and they were done!  I did gather them all together for the pics above, because they looked so cute and colourful.  They went down a treat apparently, so all was good there. 

Here I am, at my car boot sale stall, just after the completion of set up.  I managed to sell a few of the retired sets on offer, and quite a few cards from the donation box were purchased to benefit the Dural Rural Fire Brigade.  Thanks so much to the lovely customers who were able to drop by for a visit.  Unfortunately, the drawcard, car stopper of a Jumping Castle for the kids was a last minute no-show, so traffic was a bit lighter than expected.  I did manage to make quite a few swap cards, so it worked out to be a fun day.  Off to find more neglected pics in my blog folder!

Thursday, 29 March 2012

SUPER FAST, LAST MINUTE cards (+ SAB and Summer Mini orders!!!)

With 2 school aged kids, there is often a birthday party for someone to attend,  so a quick and simple card is always a good option, especially when I've forgotten about it until the LAST MINUTE!  This one was made using the fabulous "Cupcake Builder Punch" (121807, $33.95).  It's not just for cupcakes, I've seen clouds, hot air balloons, flower pots and lots more around blog land.  I've punched the tops from some scraps of patterned paper, "Just Add Cake".  I drew from the colours in the DSP to make the base from Baja Breeze, and a panel of Whisper White to build the cupcakes onto.  The wrappers are Early Espresso cardstock.    I added some Basics Rhinestones and a squirt of DIY Shimmer Spray, and my favourite Happy Birthday greeting from Party This Way (121558 $26.95 in wood mount, $21.95, 120609 in clear mount).  Ta Da!  Done, and out the door.  Well, I could have been, but this time I was a little more organised and had made it the day before, and even took a picture, as you can see!

Speaking of ORGANISED, and LAST MINUTE, has everyone checked and double checked the Summer Mini for must-haves?  Both the Summer Mini and the Sale-a-bration (free stamps!) promotion end THIS SATURDAY, 31st March.  I've got my Stampin' Crop day on this day, so if you're local pop by to have a look, or email me your order before 8pm.

Here's a good example, based on the card above.  You could have everything you need to make this card about 40 times with the products below, and endless numbers more by just adding more cardstock:

Designer Series Paper pack 12 sheets 12x12"    $18.95
Getting Started A4 Cardstock 24 sheets             $13.95
Party This Way stamp set, clear mount                $21.95
Cupcake Builder Punch                                      $33.95
Inkpad (Espresso used here)                              $11.95

total                                                                   $100.75


PLUS, your choice of  a FREE Sale-a-bration item, shown below:     


          Just think how many MORE cards you could make with one of these?

Special Offer - for customers able to PICK UP from Cherrybrook, I am offering FREE POSTAGE on any qualifying Sale-a-bration order of $100 or more

Have a good Friday, getting close to Easter Holidays now!                     

Monday, 3 October 2011

Wisteria Doilies and Butterflies

This card was made for a sketch challenge entry at the INKlings team weekend.  The inspiration card had a flower, but I have substituted a butterfly cut from a scrap of picture framing matboard using the Sizzix Big Shot Beautiful Butterflies die.  I love love LOVE how the steel-rule dies cut this material, it's got all the benefits of chipboard, but is acid free with a white (or coloured) core, which makes decorating a cinch.  I've stamped the butterfly with the Delicate Doilies stamp set in Melon Mambo, and also in Versamark, so I could add some Heat and Stick powder and a generous dose of Dazzling Diamonds glitter - hard to see in the photo, but it gave the butterfly a lovely texture and glimmer.
Behind the butterfly is a torn embossed panel of Melon Mambo, and a strip of Flirtatious Specialty DSP bordered with some Elegant Eggplant Scallop border trim.  The card base is another of the new In Colors for 2011-13, "Wisteria Wonder"  For those of you (and there were many!) who lamented the demise of the purples in the SU colour range, weep no more, this colour is just so pretty!  Finishing touches include some Organza Satin ribbon and a Triple Layer Doily punchie with a rhinestone.  Very girly :)

Saturday, 1 October 2011

Free stamps and punch! Book your Christmas Prep workshop NOW!


What a great promotion, and what great timing!
Everyone wins with the latest treats from Stampin' Up!
Firstly, you can purchase the Stitched Stockings stamp set and the co-ordinating Stockin Tag punch, which will be appearing in the upcoming Summer Mini catalogue, EARLY!  Just in time for getting those Christmas cards made!  The Summer Mini doesn't start until December 1st, so don't miss the opportunity!  You can click on the image above to see the PDF of the offer, with prices and codes.  I've already seen quite a few other ideas for this punch, from sock puppets to Hobby Horses and reindeer, and it also makes the quickest and easiest Christmas Gift tags you can imagine!

Or - get the festive season off to a great start with you and your friends at your very own Get Ready for Christmas workshop - and earn the stamp set AND the punch, for FREE!  with workshop sales of just $450.  That's up to $92.30 worth of products, free, in addition to your usual Hostess Benefits of $60 to spend in the catalogue, in the Hostess Gallery or anywhere else you like.

When:  This promo runs from 1st October to 31st October
How:
  • Call me to place your order for the punch, stamp set or both     OR
  • Place a $450 oder to receive them free!
  • Book your workshop to get yourself and your friends all sorted for Christmas
  • Host a Catalogue Party by collecting orders from friends to the value of $450
I have selected dates and times available for special "Get Ready for Christmas" themed workshops, please give me a call to book, 

Wednesday, 16 March 2011

(Plenty of) Elements of Style - Happy Birthday Ryn!

First, let me say that assignments are IN.  I was very good and refrained from procrastinating further until today.  Always plenty to do on the ole' to do list, but I do enjoy slipping in a cosy blog chat amongst the more mundane :)

My downline team member and good friend Carolyn, known as Ryn to many shares her birthday with me, along with lots of other things in common!  It wasn't possible to meet up on the day, as our schedules have become busier than ever lately with work, uni and other commitments.  But, we met for lunch yesterday at a T2 tea shop and enjoyed a yummo selection of high tea goodies with steaming pots of Earl Grey  (yet another taste we have in common!)  It was lots of fun, and I wished we got a chance to be decadent like that a little more often!

Anyway, here's the card I made for Ryn, using the Elements of Style set.  Again, this card started out as a rescue project, so I can thank Barbara (yes, the same Barbara who provided the beautiful rescued watercolouring in the post just before this) for her exacting standards.  This time it wasn't a wayward punch chomp, but a slightly wonky greeting.  Four words Barb, Stamp A Ma Jig.  But!  Never mind, it created material that I was keen to put to good use.  It involved a lot of fussy cutting, but I was very pleased with the result.  I chose colours from the crayon watercolouring used, Old Olive and Blushing Bride, and recycled a distressed piece of Confetti Cream cardstock from a previous stamping session. Ryn would be proud of me - she's big on minimising waste.  I stamped the same flower sprig onto the scrunched Confetti panel in Early Espresso ink, and mounted the cut out watercolour paper image over it with Stampin' Dimensionals.  I curled and distressed the edges of the other layers, and used my new punch, Pinking Hearts along the right hand side

(be quick for this punch - it's in the current mini, ending March 31st, and I'm not sure about it being available again until at least September)

The base of the card was stamped with the Bella Toile background in Old Olive ink, and I used an offcut made into a pennant shape to stamp the Birthday Wishes greeting from the Level 3 Hostess set Occasional Quotes.  I used an Antique brad to attach a scrap of Blusing Bride twill ribbon to the pennant, and slipped it behind the Confetti layer.

As a final touch, I got out the Crystal Effects dimensional lacquer, and dabbed glossy accents onto the flowers.  It takes a while to set, but gives a beautiful raised shiny finish to a special card for a special someone.  Happy Birthday Ryn!

Wednesday, 29 September 2010

Launch Party Winner and a Make and Take with "Friends Never Fade"

Congratulations to Vanessa J of Castle Hill for being the winner of the Lucky Door Prize at my New Catalogue Launch party a week or so back.  Vanessa has won a new stamp set, "Perfect Punches", a sampler pack of new colour cardstock, and some ribbon lengths.  The draw was based on attendance, but with a bonus ticket for each $50 in orders placed at the Launch Event.  Well done Vanessa, I hope you enjoy your new goodies and your prize!

Above is the card I designed for my Make and Take at the launch.  You can see the one designed by Carolyn Gibbs HERE, using "Morning Cup".  Carolyn Campbell-McLean had designed a cute 3D bauble using the "Delightful Decorations" set, I must ask her to post all the info!

My card uses the "Friends Never Fade" stamp set, one that jumped out at me from when I first laid eyes on it in the new US catalogue when it came out over there in July.  Thankfully, because of the catalogue realignnment, us downunder folks don't have to wait long at all!!  My review - it's a versatile set, with both bold and more delicate images.  The style is reminiscent of Art Nouveau, particularly the abstract flower. You can find it on page 71, and it's just $31.95 in wood mount!  It's shown in the catalogue in Peach Parfait orange, because it's one of the sets co-ordinating with the themed suite, "Graphic Botanical"  That means there is co-ordinating goodies and Designer Series Papers available, and it's a great way to theme an album or event.

I've based my card around the colours in one of the other Designer Series Papers, Elegant Soiree -  Baja Breeze, Soft Suede, Crumb Cake, Very Vanilla and Basic Gray.  This sample card uses the standard scallop edge punch, as I was waiting for my Scallop Trim punch to arrive - taking this photo I realised that I didn't take a photo of the real deal!!   Then there is a strip of Elegant Soiree paper, that has all the colours in a fine stripe pattern.  The card base is Basic Gray, and I have stamped around the edges with the abstract flower in Basic Gray ink.  The panel is Crumb Cake, stamped with matching Crumb Cake ink  (Yay!!  No more 'making do' with Sahara Sand ink as a Kraft substitute!) with the flower branch design.  I think it might be a Honeysuckle, at least that's what it reminds me of!  The motif is stamped in Baja Breeze, with touches of Early Espresso ink added with the matching marker, then mounted onto a Scallop Circle of Early Espresso.  I then layered it onto a Fancy Flower punchout in Baja Breeze, and there is a Stampin' Dimensional or two in there for some lift.  The sentiment is from my favourite Level 1 Hostess set, "Afterthoughts", stamped in Early Espresso.  To finish there is a simple knot of Early Espresso narrow grosgrain ribbon, attached with a mini glue dot.  Tell me what you think!

Tuesday, 1 June 2010

Deals of the Week Promotion - Week One - Selected Punches


Woohoo!!  Discounted goodies!

Stampin' Up! is offering a new group of specials for each week in June,  You can view the current special deal in several places: 
Here on the Stampin' Up! Website
Here on my Demonstrator Business Web Site Promotions page
and, maybe not as snappy as the above two sources, but right here on my blog

How does it work?  With the Deals of the Week, you'll get up to 50 percent off a selection of products from the 2009-2010 Idea Book & Catalogue!

Each Deal will only be available for the specified time period, before and after the allocated week the price will be the normal catalogue price.  And no, we as demonstrators don't know in advance what the deals are, so check back each week and phone or email your order to me ASAP.  Offers cannot be combined into a single order, as the time periods do not overlap.  However,  I will be placing at least one group order weekly, so if you wish to purchase from more than one Deal during June, I can offer you 5% postage and handling for local customers, and deliver your combined purchases together.  For non-local customers, I can collate your purchases and send in one batch using the most economical postage method.

This week's deals:
Scallop Square Punch - usual price $30.95, Deal of the Week Price $20.12 (+ 5% p/h)


Trio Flower Punch - usual price $30.95, Deal of the Week Price $20.12 (+ 5% p/h)

Boho Blossom Punch - usual price $30.95, Deal of the Week Price $20.12 (+ 5% p/h)


Scallop Oval Punch - usual price $30.95, Deal of the Week Price $20.12 (+ 5% p/h)

Order one of them, order ALLLL of of them!  There are no limits, so you could buy a gift or two for a Stampin' Friend.

Stay tuned for next week's offer, but don't delay sending me your list if you're keen on the current promo!
Schedule of times:
•Deal #1: Tuesday, 1 June 2010; 12:01 AM  Australian Eastern Standard time
•Deal #2: Wednesday, 9 June 2010; 12:01 AM
•Deal #3: Wednesday, 16 June 2010; 12:01 AM
•Deal #4: Wednesday, 23 June 2010; 12:01 AM

Each weekly offer concludes at till 11:50 PM on the following Tuesday, 10 minutes before the next weekly offer starts.  Enjoy!

Sunday, 9 May 2010

Friday Night Classes and Saturday Stampin' Crop


This week I have two events for you:


Friday Night 14th May 7.30 - 10pm Punches Class:

Come along to learn how to get more out of your paper punches. I've got a long list of tips and tricks to share with you, from 'outside the square' applications to clever punch art ideas. There are limited places available, so please give me a call to book your seat. The class cost is $20 and includes comprehensive written notes and all materials needed to make a bunch of samples - turn them into cards or keep them in your techniques folder for future reference. Either way, you'll go home enthused and keen to create with these invaluable tools


Where? My home in Cherrybrook, please call me on 9484 9447 or 0403 175 790 to book and get location details.


What to bring? Your pleasant company for an enjoyable evening of learning and crafting - everything you need will be supplied!


Saturday 15th May 10am-5pm Stampin' Crop Day:


Join myself and a lovely group of ladies for the day, and bring whatever projects you are keen to work on. I provide morning and afternoon tea, casual demonstration and instruction, heaps of inspiration, and my extensive collection of tools, punches, die cutting machines and stamps for your use on the day. Come and go as you please, lunch can be BYO or grab a bite to eat from the bakery or cafe just 2 minute walk away.


Where? My home in Cherrybrook, ring 9484 9447 or 0403 175 790 to book your spot and get location details. New ladies are most welcome!


What to bring?: Your basic papercrafting tools (trimmer, bone scorer), your projects, a selection of adhesives.


Cost: $15 for the day, includes tea, coffee, nibbles, morning and afternoon tea and use of my equipment.

Thursday, 29 April 2010

Gift Vouchers and Mothers Day Cards with Vintage Vogue, Manhattan Flower and Pendant Park


Here are some of the cards I've made over the last week or two in preparation for Mother's Day - Sunday week, 9th May. Would you like to receive some Stampin' stuff from your family?? It's not too late for delivery in time, orders placed by Monday 3rd should be fine for the eastern states.
And, for those hubbies who tend to leave things until the last minute, you can save their bacon by dropping hints about my gift voucher service. These can be posted anywhere in Australia, with a free hand-made card, and can be made out to any value you like. Something to remember if they forget completely and you wish to maximise the guilt value!!

OK, so the top card is one we made at my Autumn/Winter Mini launch last Saturday. It started with an idea of using the 2step Bird punch to create a big and little bird like this one I saw on Valita's Fresh Folds blog. She's a clever girl that one!
I had a brainwave when I'd made one large and one small bird - to make them into mother and child bird for Mother's Day.
The card base is Soft Suede, the overlay panel is Naturals Ivory, and I used my Circle Scissor to cut the two concentric circles in Kraft and Very Vanilla. I stamped the gorgeous tree from "Pendant Park" in Soft Suede ink onto the Vanilla circle. All of the layers were sponged with ink for definition.
Now for the birdies: The Mummy bird is straight from the punch, but with the addition of long stick legs cut from Soft Suede. Baby bird's construction really highlights the versatility of this punch (get you wishlist and pen handy, because you're gunna want this punch on there!!) Baby's body is the wing piece!! Same stick legs, but shorter. But what about the beak and baby wing?? Ah! So clever - they are simply two leaves cut from the branch and glued into position.
The layers have been sponged with Soft Suede ink for definition, and I added an eye with Chocolate Chip marker and a dot of white gel pen. The band is constructed from the border stamp in the "Pendant Park" set, stamped onto Naturals Ivory. Behind this is a scrap of Soft Suede Designer prints paper - not available here in Australia, but as Soft Suede will be joining the core colours come September, I have high hopes for its inclusion in the next catalogue. The sentiment is from the brilliant "Teeny Tiny Sentiments" set, also new in the A/W Mini and I finished with a scrap of Polka dot ribbon in Soft Suede.


Back later for the deets on the other cards, off to have a play with some new goodies!

Monday, 5 April 2010

Lovely New Goodies Galore in the Autumn Winter Mini


Stampin' Up! usually have a thick, juicy, delicious new Idea Book and Catalogue being released right now. But this year, our new main catalogue will be released in September, just a couple of months after the new US Stampin' Up! Catalogue {think: very short wait for lots of new goodies...} So. To tide us over until September, and to bring us "up to speed" with some of the products the US has had for a while now, we have an extra, bumper sized Mini Catalogue, which started 1st April. In it are some of the worst kept secrets in Australian papercrafting history!


One of the benefits of being a demonstrator is that we get to see new catalogues and order new products quite a while before they become generally available. And the squeals of delight just couldn't be suppressed or silenced, so there have been a few naughty leaks and sneak peeks.


Now that it's all official, it's hard to know where to start!! Probably the item that Australian demonstrators begged hardest for is the BigShot die cutting system by Sizzix. It's a great machine, with incredible flexibility and ability to accept lots of other brands and types of embossing folders, nesting dies, super thin dies, original 'red brick machine' sizzix dies etc. In fact, I don't think there is anything that can't be used with it, using various combinations of tabs on the {included} multipurpose platform and cutting plates. And, even more exciting, there are exclusive Stampin' Up! die and embossing folder designs to co-ordinate with our range of stamps, punches and more, such as the delicious "Top Note" die. It's competitively priced too!


It that wasn't enough excitement, there's also been a major revolution in our stamp offerings too! The new stamps in this Mini are available in either traditional wood mount, or new clear mount options. It's still the best, deep etched, die cut rubber with foam cushion that gives us our clear, sharp images, but with the added advantages of more compact storage, easy positioning and more. Unlike most unmounted rubber, Stampin' Up! clear mounts have their index label attached to the cling foam, so it shows beautifully through the acrylic block. And the blocks!! I had quite a few from other manufacturers already, and ordered just one to see how they compared. I'm definitely converted, the balance, weight and ergonomic shape has won me over completely! They are available individually, or as a set of 9 at a discounted price. One of my favourite things about the new clear mount sets is the slim DVD style storage case, with thumbnail images on the spine and full size index images on the front for fast reference.


Had enough yet? But wait! There's more! EK Success have recently redesigned their punches to store flat, and with a larger punching area. Since EK manufacture punches for SU!, we get the new style for our new punches too! There are three new punches in this Mini, a small heart, versatile jewellery tag in the medium size and large bird and branch punch. You can see them in
the photo third from the top.


So, grab a cuppa, and click on the cover image of the catalogue, and discover the new goodies for yourself! And if all this fabulous new gear is overwhelming you, maybe it's time to give me a call about joining my team and becoming a demonstrator yourself!

Friday, 2 April 2010

Sweet and Sour Razzleberry with a Top Note!

This is actually the last card I completed at the retreat I was at last weekend. I had it in my mind to create an old-fashioned apron using the Top Note Sizzix die from our delectable new Autumn-Winter Mini catalogue. However, I have asked around, and I have had a few other suggestions, including a hand bag and a pocket, and no one seems to think 'apron' so I'm not sure about the success of that plan!!


I took mainly new Mini products with me on the retreat, so I could immerse myself in making cards with as many new goodies as possible. In this card, I have used several, including Rich Razzleberry, one of the three "In Color" selections we have been given for the period between now and the release of the next main Idea Book and Catalogue in September. I've also used some Cottage Wall Designer Series Paper, and the "Sweet and Sour" stamp set, the Top Note die, and Rich Razzleberry Polkadot ribbon. Yum!!!! The tiny tags are from a set of the same name, very cute and useful, especially with the matching Jewelery tag punch.


The card base is Rich Razzleberry, and I sponged the edges with matching ink. Then, a co-ordinating colour from the Cottage Wall paper, Old Olive forms the next layer. I stamped the Polka Dot background in Rich Razzleberry onto Whisper White and sponged the edges very lightly for definition.

I cut a Top Note diecut made from Rich Razzleberry in half, and stamped a flower sprig from "Tiny Tags" all over in matching ink. I mounted this onto a piece of Cottage Wall DSP and hand-trimmed around it with Paper Snips to create a 'binding' edge. The 'pocket' is made from a Curly Label punch, and a stamped circle of Whisper White with the "plum/apricot/peach" stamp from the Sweet and Sour set (yes, it combines perfectly with the Tart and Tangy set!)

I inked up the 'plum' in "Melon Mambo", another of our extra new In Colors, and then daubered on some Rich Razzleberry to give a tonal effect. The stem is coloured with Old Olive Stampin' Write marker.


The 'apron strings' were made with a length of Rich Razzleberry Polkadot ribbon, and I added some tags made with the Jewellery tag punch and the Tiny Tags stamps, tied on with a scrap of olive embroidery floss. To finish, I added faux stitching around the Top Note die with White Gel pen. Apron or not, it was fun and I love the colours!

Monday, 29 March 2010

Valentines Card with "A Happy Heart"

Here's a card I had forgotten to upload and show you. It's a Valentine's Day card, obviously! The "A Happy Heart" stamp set is a useful selection of image stamps and greetings, and I think I have used almost every stamp on this card. The card base is Bashful Blue, sponged on the edges with matching ink. Next we have a layer of Real Red, and I have stamped some of the stamps in the set across the base in vertical rows, to create a background. I've stamped them in Real Red ink, which creates a subtle tone-on-tone effect.


So that the Real Red Polka dot ribbon didn't get 'lost' on the background, I have mounted it on a band of Bashful Blue. Have you stocked up on this fabulous ribbon yet??? It's about to disappear, as it's a Summer Mini product, so give me a quick yell and I'll make sure to order some for you before 9pm on March 31st.

Over the ribbon band is a heart stamped onto Whisper White in Real Red ink, cut out and mounted on a Bashful Blue layer. I used the double rectangle punch to make slots for a tie of Whisper White taffeta ribbon.


I stamped the greeting using the Stamp-a-ma-jig so I could split the sentiment onto three separate lines, and fit it inside a label stamp from "Cute and Curly" and punch it with the Curly Label punch. I also punched some hearts using the "Heart to Heart" punch, from Bashful Blue-stamped large heart stamp, and popped them up using Stampin' Dimensionals. A finishing touch is some faux stitching done with white Gel pen. Hope you like it, hubby did!


I'm on the way home from a retreat weekend, and I had a chance to make quite a few new cards showcasing some of the upcoming Autumn-Winter Mini catalogue, stay tuned for updates! Remember final orders for the Summer Mini close 8pm on Wednesday 31st March!! Email or call me with your shopping list!

Wednesday, 24 March 2010

Butterfly Prints - QUICK EASY CARDS! Get it while you can!


One of the most popular sets from our Summer Mini catalogue has been the "Butterfly Prints" set and the matching butterfly punch. This card was made laaaate one night, in preparation for a birthday party being attended by my daughter for one of her friends turning 5. I made it with leftover pieces from a Make n Take at a workshop earlier that evening, using the Sweet Always papers and the matching colours of Regal Rose, Pumpkin Pie, Whisper White and Chocolate Chip. Super quick (well, it needed to be!!), I simply stamped the butterflies randomly over the card base in matching Regal Rose ink and some on Whisper White in various colours above before punching out. So quick!! A band across the centre of the Designer Series Paper and some Felt Fusion flower accents with a Rhinestone brad and the Scallop Oval punch to add a greeting from the "Something Sweet" set. A final touch was a tie of wide grosgrain ribbon in Regal Rose.


This set (and all the others in the Summer Mini) are only going to be available until March 31st, so check the catalogue by clicking on the cover image at the right hand side and get in touch if there is anything you'd like to get before it's gone! Check this post from a little further down for my bonus free post or free marker offer!

Wednesday, 10 March 2010

And the card info...

Sorry, I was going to post the details about the card in the image below along with the Circle Scissor tips, but it was already pretty long by the time I'd finished with the tips so I called it a night there.


The card was inspired by the sudden ability to cut multiple concentric circles in whatever size appealed. I cut two from Whisper White and two from Old Olive, and inked the edges.

The card base is Real Red, and I sponged the edges with Real Red ink. I stuck them down as shown, taking care to lap them so I would have somewhere to put a greeting. To make the Old Olive circles stand out, I used the White Gel pen to put some faux stitching around the edges.


Next, I took the gorgeous butterfly stamps from "Butterfly Prints" and stamped a selection onto Whisper WHite in both Real Red and Old Olive ink, before punching out. Easy peasy! I attached them using Mini Glue dots, so that their wings could be bent slightly for dimension.

I used my Stamp a ma jig to position the greeting at the bottom right and a Jumbo Grommet at the left side to secure a structured bow of Real Red polka dot ribbon. It was quite tricky to get the prongs of the Grommet through all the layers of the ribbon, so next time I will use Sticky Strip to hold the folded ends in place, and then the Grommet will only need to go through one ribbon layer instead of 2.

Tuesday, 2 March 2010

Baby card with Something Sweet and Sweet Treat cup

Sorry about the lighting on this one, it was a little late when I decided I should get some pics. The panel of Kaleidoscope paper at the bottom is fresh pinks and lemon in real life!

It's yet another card variation using the Something Sweet stamp set from the Summer Mini catalogue, and this time I've used the rattle handle to create a pretty pink baby rattle.

I have used my circle scissor to cut the larger pretty in pink circle around the Sweet Treat cup and the 1 3/4" circle punch to make the opening for the cup.

Inside the cup I have put a mixture of Crystal and Pink Chunky Sprinkles glitter and Dazzling Diamonds, as well as lots of lolly coloured stamped hearts from the set. I punched these out using the Heart to Heart large punch - the smallest heart of the three is just perfect for this!


The card base is Pink Pirouette, and the band is textured Barely Banana cardstock sponged with Apricot Appeal. The Scallop edge punch was used for the top of the Kaleidoscope paper, and a Pretty in Pink narrow section was scallop edge-punched for underneath.


The sentiment was stamped using Pretty in Pink ink, and I have added a Sherbet Button collection button under the curve. To finish, I made a stitched bow using the wide Pink Pirouette grosgrain ribbon.


Very easy, quite quick, and certainly able to be adapted to suit a baby boy. Hope you like it! All products used are available to purchase through me, just give me a call (and there's still time to earn free Sale-a-bration sets too! - less than a month to go now!)

Sunday, 28 February 2010

Razzle Dazzle, Circle Scissor and a side serve of Rubons

Hi everyone,
Here's a card I made using lots of products from the Summer Mini cataloge. Razzle Dazzle is my most favourite set from the entire mini, and I will be sad sad sad if it doesn't make a reappearance in the new Idea Book and Catalogue this September. So will you, so make sure it's on your list and get your order to me before March 31st!


The first step was to create a half-wall effect with the border stripe stamp, stamping in Chocolate Chip on Chocolate Chip cardstock, using my Stamp-a-ma-jig to line the images up across the base.

For the 'dado rail' (continuing with the wall theme) I took a strip of Riding Hood Red cardstock and applied one of the beautiful Dots and Designs rubon panels to it.

For the 'pictures' hanging on the wall, I used a series of circle punches and the Circle Scissor. I inked up the large motif stamp using markers, and stamped onto Whisper White. I did this twice, and selected a smaller section to punch out.


I mounted some of the circles using Stampin' Dimensionals to give some lift, and used a piece of Hodgepodge Hardware and the large oval punch for the sentiment.
I've also sponged the edges of all of the sections.