Showing posts with label blog hop. Show all posts

Saturday, 4 May 2013

Tutorial Time - Downloading My Digital Studio software for Technophobes!

In the process of helping some of my team members get their MDS software up and running, I created a step-by-step tutorial with screen shots to guide even the most computer-phobic crafter into happy success with My Digital Studio.  It is a PDF file, and by clicking this link you can save the file to your computer and print it for guidance.

Why bother?  It's so much fun, and once downloaded, very easy to jump in and play.  Imagine being able to sit and watch a DVD and catch up on much-neglected scrapbooking?  With just a laptop to pack away?  To be able to make your own custom photobooks, cards and more? 

Here's a taster of things I have made recently, and also an ad for our upcoming Mother's Day Blog Hop!


Monday, 25 July 2011

Welcome Christmas in Winter with the Inklings Blog Hop!


Welcome to the INKlings "Christmas in Winter" Blog Hop!

You may have arrived here from  Vanessa's blog or just be visiting my blog, whichever way once you’ve checked out my creations you can continue the hop through the link at the end of this post to the next team member.

How quick is this year going! Have you started to think about your Christmas cards and projects yet? The INKlings team has and we thought that this month was the perfect time to host a Christmas in July blog hop. You'll find lots of great ideas when you take a tour of the blogs of 15 of our crafty team members.

Want to win some Blog Candy? Simply leave a comment on each blog and then email Clare and let her know you’ve done so and you’ll be in the running for a fantastic prize of 15 handmade items plus other goodies.

Sorry Blog Candy prize not available to SU! demonstrators but you're more than welcome to leave us a comment!

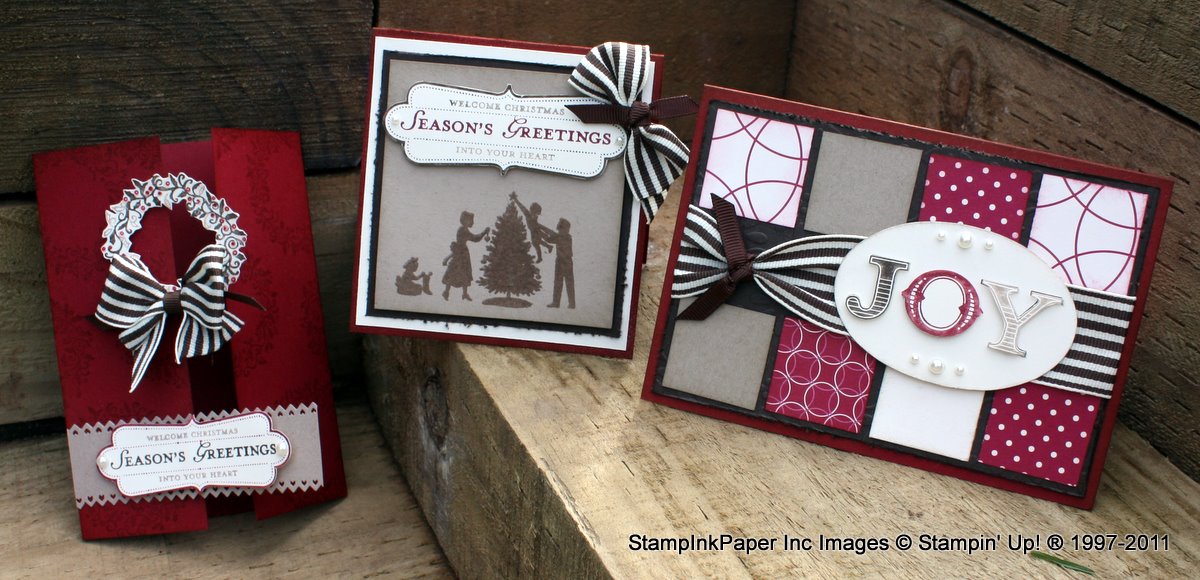
My projects use the delightful stamp set, "Welcome Christmas".  You can find it on page 26 of the Idea Book and Catalogue, 121584 $49.95 in woodmount, and 120597 $39.95 in clear mount.  It has a variety of images, so I find it quite versatile.  I've made three different cards with it, and some gift tags are under construction - you may have to come back another time to see those!  I've stuck to a simple palette of Crumb Cake, Cherry Cobbler, Early Espresso and Very Vanilla, and have used our Basics Adhesive Pearls and 1 1/4" striped grosgrain ribbon for embellishment on each of the three cards.


Card one is a 1/3 sheet card, so it's a good choice for a gift card, or if you have several squillion people on your Christmas card list.  It is quite suited to production en masse, and is the kind of card you could make while watching a DVD in the evenings.

The card base is Cherry Cobbler (oooh YUM!), and I have inked the edges and given it a good squirt with my DIY Shimmer Mist (you can click HERE for a tutorial I did earlier on this).  Next is a layer of Very Vanilla, cut just 1/4" smaller on each side for neat layering.  Then there is a layer of Early Espresso, my new favourite brown.  I've roughed up the edges with my trusty distressing tool from the Cutter Kit here.  (tip - you need this tool if your trimmer cuts tend towards the wonky, it masks a multitude of sins...)  More squirting with shimmer here too. 

Then, a Crumb Cake layer, sponged on the edges, and clear embossed using Versamark ink and the lovely silhouette style Christmas tree family stamp.  The label stamp is part of the set, and I have simply inked it with markers in Cherry Cobbler, Early Espresso and Crumb Cake, and stamped onto Very Vanilla.  It looks fiddly and time consuming, but it's faster and easier than you'd think.

I've added some Basics Pearls and some Stampin Dimensionals behind this to give it some lift from the front of the card.  To finish, I have used some of the extra wide stripy Grosgrain ribbon in matching Early Espresso.  When I first saw this wide ribbon, I thought "what the!" , thinking it would take masses of ribbon to make something on the right scale.  I've since discovered that there are several ways to use this wide ribbon on a card, and with pretty small pieces too.  Here I have taken a short snip, approximately 8-10cm, and have folded in half-ish (deliberately not evenly).  The centre is secured with a short piece of Early Espresso narrow grosgrain, and it's attached with a mini glue dot (or two for good measure).  Ta da!  Done!


Card 2 is a standard landscape orientation A5 fold, and again I have used Cherry Cobbler as the card base.  Then, a layer of Early Espresso cut 1/2" smaller is layered on this (and I've used the edge distressing tool again)  Before I distressed and attached it, I ran it through the Big Shot using the Finial Press Embossing Folder, you can see a peek of this behind where the ribbon is tied. The squares are cut from Very Vanilla, Crumb Cake, and Jolly Holiday DSP using the 1 1/4" square punch,  and inked the edges before attaching them to the Espresso panel.  Here's another way of using the wide ribbon, as a band across the centre, but tied at one point with matching narrow ribbon.  The "joy" sentiment is from the set, and I have stamped it twice, cutting a second layer of letters out for a dimensional effect.  I cut the oval using the Oval Big Shot Sizzix originals die, a great choice when you need more room than a punch.  It's dressed up with a few more pearls, and attached with Stampin' Dimensionals.


The final card in the trio is a Gate Fold A5 card.  The card base is Cherry Cobbler, and I have inked the edges and stamped with the gorgeous wreath stamp in matching ink all over the base.  The wreath was stamped again ont Very Vanilla after using markers in Cherry Cobbler, Early Espresso and Crumb Cake to pick out the berries and open leaves for some colour variation.  I then trimmed around it carefully, but for speed and ease of production, you could simply leave it as a stamped panel.  The "bow" is not really a bow - yet another way of using a small bit of wide ribbon for maximum effect.  it's about 15cm, bunched into two loops and secured with a needle and thread around the middle to stop it from springing apart.  I used my lighter portable miniature flame throwing tool to seal the ends of the ribbon on all these projects.  Never was a smoker really, but I will be mighty annoyed if these end up on a banned list sometime in the future!  I wrapped more Early Espresso narrow grosgrain around the centre, and the tails can be seen peeking through from the back for extra effect.  On the trimmed out wreath, I used some dots of Crystal Effects dimensional gloss adhesive to highlight the berries, but perhaps I should have used glitter, you'd be able to see it better in the pic!  The wreath is attached to only the left side of the gatefold, so you can still open the card in the normal way.  The same effect is used for the greeting and band, in Crumb Cake, and edged with the Pinking Hearts punch.  This punch appeared in the Summer Mini, but it is thankfully still available, and I am liking it more and more! The sentiment label was made as above for Card 1, and attached with Stampin Dimensionals and some blingy pearls attached.

I hope you have enjoyed looking at my projects, please don't be shy in asking a question about how I have done something, I love questions!  I will be running some Christmas Card Stamp-a-Stacks between now and the end of the year, you can sign up for my newsletter or follow my blog to be kept informed.

Well that’s all from me. Next stop on the INKlings’ Team Blog Hop is the lovely
Ryn Gibbs. Have fun and don't forget to leave a comment on each blog to win some great Blog Candy.

If for any reason you find a missing link on the blog hop head back here to find links to all the members taking part.   After the blog hop is over, I'll pop back in here to convert these to permalinks to the actual Blog Hop posts, so you will be able to do it all over again for inspiration later on!

1. Clare http://www.crafty-cow.com
2. Janice http://www.janicespencer.blogspot.com
3. Christie http://www.christiescreativecorner.blogspot.com
4. Kari http://www.karigail.wordpress.com
5. Joanna http://www.joannawassens.com
6. Michelle http://stampinground.wordpress.com
7. Alana http://www.alanagalagher.blogspot.com
8. Carol http://www.inkantations-and-inkarnations.blogspot.com
9. Cath http://cathdeanpapercraft.blogspot.com
10. Amy http://amyandersonsblog.blogspot.com
11. Vanessa http://stampness.blogspot.com
12. Michelle D http://stampinkpaper.blogspot.com
13. Ryn http://rynscraps.blogspot.com
14. Fiona B http://fionajanestamping.blogspot.com
15. Liz Halbisch http://lizhalbisch.blogspot.com

Friday, 22 July 2011

Get Ready for the Inklings "Christmas in Winter" bloghop!


It's time to get your thinking caps on, and gather some inspiration for your Christmas Projects!
Starting Monday 25th July at noon, you can take a tour of blogs where Inklings team members have posted some gorgeous projects to inspire you!  There will be blog candy on offer, so make a note in your diary, snuggle up with a notepad and hot cocoa, and get into the spirit of Christmas in Winter!

Friday, 29 October 2010

Punch Art Blog Hop - tutorials and samples galore!

Hello and welcome to the inaugural South Pacific punch art blog hop!!!


We are a bunch of Stampin Up demonstrators from New Zealand and Australia who love our Stampin' Up! punches. We have gotten together to showcase a selection of the punches you can purchase from Stampin' Up!. We know we will inspire you and encourage you to use those punches in new and beautiful ways. Please leave a comment and let us know what you think to go in the draw to win some yummy scrummy punch art blog candy (sorry, offer not available to su demos, but you're most welcome to leave a comment!).

Here's the list in case you get lost, you can start wherever you like, but to enter the Blog Candy Draw you must comment on all 15 blogs.

1. 2-step Bird  and Word Window - Karen Southwell - http://www.kareniescrafts.blogspot.com/ 


2. Petal card Double Punch - Carol-Ann Torrie http://queen-of-scraps.blogspot.com/

3. Fancy Flower - Sally Williams - http://www.sallycancraft.com/

4.  2 step Owl - Julia Leece - http://www.juliascards.blogspot.com/

5 XL Tag - Amy  http://ladybugsanddaisychains.blogspot.com/

6 Round tab  - Melissa Davies http://beedevinedesigns.blogspot.com/

7 Modern Label  - Michelle Dyson http://stampinkpaper.blogspot.com/2010/10/punch-art-blog-hop-tutorials-and.html

8 Jewellry tag medium, Boho Blossoms, 5 petal flower- clare mcilhatton http://www.crafty-cow.com/

9 Heart small , Scallop Square, Heart to Heart , Full Heart- Lisa Bullock http://daffyscrapper.wordpress.com/

10 Ovals - Pauline Bennetts - http://www.paulinebennetts.com/stampede

11 Butterfly - Tia Routledge  http://craftingwithtia.weebly.com/my-blog.html

12  Circle punches -  Emma Kirton  - http://www.emmakirton.blogspot.com/

13 Ornament - Angie Jones - http://angiescraftfusion.blogspot.com/

14 Scallop trim border and corner- Andrea Buckland http://creatingcardswithandrea.blogspot.com/
15 Eyelet border - Steph Gray http://stampinsteph.wordpress.com/


OK, I'm No 7 on the list, Michelle Dyson. You may have come here from Melissa Davies' blog or just be stopping by here randomly.  I've chosen the delectable "Modern Label" punch, which I affectionately term the "dog bone" because of it's shape.  Like the Word Window punch, it's a must have for adding sentiments neatly, but it's even more useful for the slightly larger and longer sentiments that can look a bit squished in the Word Window.  But hey, you *need* both of them anyway!! LOL :)  My projects also use a few other punches you may recognise, and will probably see more of as you hop through the tour! 

Here's my project, and a little tutorial about a neat trick using the Magnetic Movers and Shapers Moveable Pieces to co-ordinate with your punches.


Many of our Stampin' Up! punches can be used to create pretty 3D layered flowers, but this one has a nice cottage-y look, reminding me of a paeony flower.

The first step is to punch multiple Modern Label shapes from cardstock of your choice.  I have used So Saffron and Regal Rose, but you can stick to a single colour, or choose any other you like.


Next, I've folded them in half and used my Paper Snips to cut little diagonal snips from the middle fold, to give the 'petals' a waist, so to speak.  I've also punched a Circle Scallop to use as the base of the flower, this helps to keep it all together.

Next step is to make the cardstock flexible enough to split apart into layers, the "suede-ing' technique.  You can scrunch by hand, but that takes a while. If you have a Crimper tool (sort of like a punch in it's usefulness!), you can soften multiple punched shapes at once, and it's much easier on the hands too.  Roll the punchies back and forth through the Crimper, not quite all the way so they fall out.  Then eject them and put them back in at a 90 degree angle, and repeat.  This is breaking down the paper fibres and before long you will see the layers of paper making up the cardstock start to separate, like below.


Now it will be quite easy to peel apart the layers, producing two sides, with a soft, suede-like surface.
   It's a good idea to make lots, as there will be some casualties during the separation process.


I used my paper piercing tool and Mat Pack foam mat to poke a hole in the centre of each petal, and threaded them onto a Flower Brad.  You can twist the petals around gently to arrange them how you like once they are on the brad spike. 

Almost finished flower, with ruffled petals.

I did a little tutorial a few posts ago on this blog, showing how easy it is to create your own shimmer mist using our Shimmer Paint.  I tracked down some unscented Isopropanol (Rubbing Alcohol, Isocol) from my local pharmacy, good news for those of us with sensitivities to perfume!  I used the Champagne Mist colour to spray my flower.  The alcohol evaporates very quickly, but while it is damp you can shape and mould the flower

 Ta-da!!!  You can see the dampness and the shimmer.
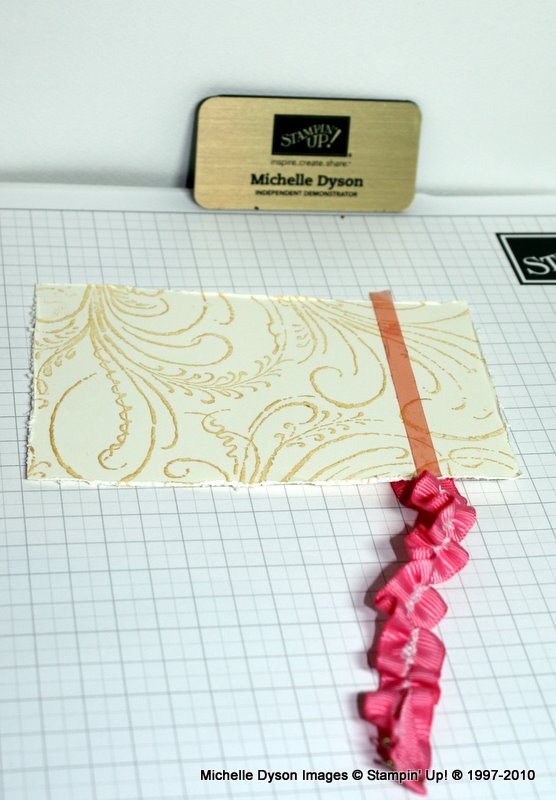
 Here is another little trick, making ruffled ribbon.  It works with most ribbons, this one is wide grosgrain.  Make a small snip in the centre of one end, and draw out a thread (only one or two strands, or it will be too hard to pull on)


It helps if you fold over the other end, and either stitch or staple it, to help prevent the thread pulling all the way out.  Ease the ruffles along the length.  You will need to start with a length of ribbon at least two and a half times the finished length you want.
Use Sticky Strip tape to secure the ruffled piece on the card, and press down to hold in place. No need to remove the staples, they'll be hidden on the back.

So, here are the tools I used and the finished project.  That little purple and black block is the Movers and Shapers piece that matches the Modern Label punch, see below for the cool (and economical!) trick!
 
The card base is Soft Suede, and I used the Decor Stampin' Around wheel to roll Soft Suede ink around the perimeter.  Next there is a layer of Regal Rose with sponged edges.  Then, a layer of So Saffron, which I rolled through the Crimper in both directions to echo the distressed flower.
The top layer is Very Vanilla, stamped in So Saffron using French FIligree background stamp, and I used the Cutter Kit distressing tool to roughen up the edges.
The leaves for the flower are made from the Scallop Oval punch, in River Rock cardstock.  I could have used Pear Pizzazz I guess, but didn't want to add another colour.  They are also crimped, and this makes them soft and flexible enough to fold and 'smoosh' into a leaf.  I used Mini Glue dots to attach.  The flower was attached with Sticky Strip, since it needs to STAY there!  The sentiment is stamped in Soft Suede on So Saffron, with the Curly Cute stamp set. 
 
But wait, you say, there's another layer under there?  How did you do that??  Ah HA!!
 
Here's what you need:  2 x clear cutting plates, and either a third cutting plate or a black "Texturz Impressions" pad  - this is simply to adjust the thickness to compensate for the lack of the Movers and Shapers base die.
The shapes in the Punch Windows set can be seen there, the Scallop Oval, Large Heart, Modern Label and Large Star.  All will result in a shape that is just slightly larger than the punched shape, so you can layer them!!
The little square block  is an optional extra, it's a "Magnetic Ejection Blank" and just helps to get the cardstock off the shaper piece.


 Layer as follows:  Clear plate (non cutting if you save one plate for cut marks like I do)
Mover and Shaper piece, foam up
Cardstock over the top (hold in place with a little Dotto if needed)
Second Clear Plate (cutting)
Third clear plate or Black Impressions pad
Roll through!
 Ta Daaaaa!
Cool hey!!
The best part is that the set of 4 pieces is just $54.95.  Essentially, that makes 4 punches.  Great if you don't have the punch as an alternative, and even greater if you have the matching punch to layer with!
 
I hope you've enjoyed my tutorials, please say HI! and feel free to ask any questions you might have.
Next Stop on the Blog Hop is my super-dooper talented downline, Punch Art Queen Clare McIllhatton, whose idea this hop was :)  Enjoy!!

Thursday, 8 July 2010

It's the INKlings "Christmas in July" Blog Hop!!

Welcome to The INKlings’ Team’s Christmas in July blog hop. You may have arrived here from Carol Dunstan's blog or just be visiting my blog, whichever way once you’ve checked out my creations you can continue the hop through the link at the end of this post to the next team member.

The year is flying by, and it's time to start thinking about your Christmas cards and projects! The INKlings team has been busy getting some inspiring projects together to get you off to a flying start, so we're hosting a Christmas in July blog hop. You'll find lots of great ideas as you hop through the chain of 17 different team members’ fantastic blogs.  Why not add my blog to your "follow" list, or subscribe to my newsletter for info about my upcoming Christmas Stamp-a-stack classes.

Want to win some Blog Candy? Simply leave a comment on each blog and then email Christie Wallace and let her know you’ve done so and you’ll be in the running for a fantastic prize of handmade cards plus other goodies from each of the 17 participants.

(Sorry Blog Candy prize not available to SU! demonstrators but you're more than welcome to leave us a comment! )


My projects use the new Stampin' Up! exclusive design cutting die for the BigShot, the Pennant Die. At first glance at the catalogue line-art, you'd be thinking "what on earth would I need that for??" Pretty much my first reaction too, until I saw a few different projects using various components of the die. Once I had it in my hot little hands, I immediately saw the potential for making the small and large Christmas trees below.


They are both made in the same way, by cutting folded cardstock placed onto the die base and run through the BigShot machine.  I made several of each size in both Riding Hood Red cardstock and Designer Series Prints paper and Kiwi Kiss cardstock and Designer Series Prints paper.  I stamped the several of the snowflake images from the "Snow Swirled" set in matching ink all over the plain cardstock, and sponged the edges.  I alternated the colours, and stitched the layers together at the 'spine' with a piercing tool, needle and thread.  The bases are made from a Scallop circle cut from the Bigz Bigshot die (small tree), and from a circle cut using the Circle Scissor (large tree).  The small tree has been sprinkled with Supernova glitter using a 2way glue pen, and 1/2" circle punchies were glittered up to make some baubles for the large tree.  The stars were made from the small and large star punches, folded and glued together.

Now, as you can see from the die line-art, there are also some large scalloped circles - so I applied the same principle to make a paper bauble.


The circles are pre-scored, so all you need to do is to fold in the centre and join them in alternating colours using Sticky Strip tape.  You can make them as full as you like, mine has 8 folded circles.  To decorate, I threaded some Pretties Kit beads, punched and Felt Fusion flowers onto some fine nylon thread, passing it through the centre hole of the bauble. A tie of Kiwi Kiss satin ribbon and a loop of Riding Hood Red taffeta is the finishing touch.

And, there's more!  I also found a great tutorial by Arielle Gordon using this die to make a cute little box!  I've made one here in matching colours to the trees, and I think it would make a nice table place favour.  This one uses four small pennants, and makes a box about 3 inches square.  I plan to have a go at making a larger box with the large pennant.  It is constructed using Sticky Strip, and decorated with some of the spare scallop circles in Designer Series Paper folded over the corners, and a scallop circle with a monogram stamp in the centre from the Schoolbook Serif alphabet.  A tie of gingham ribbon, some tissue paper and some choccies complete the box.


Well that’s three things you can make with the Pennant Die, and we haven't even touched on actual PENNANTS yet!  Next stop on the INKlings’ Team Blog Hop is Jayne Mercer. Have fun and don't forget to leave a comment on each blog to win some great Blog Candy
In case you should get lost along the way, here is the full list of participants and their blog links.


1. Christie
2. Dani H
3. Carol 
4. Michelle D
5. Jayne
6. Kylie S
7. Kari
8. Dani F
9. Beth
10. Nicky A
11. Clare
12. Amy
13. Fiona
14 . Michelle Frost-Stevenson
15. Fiona Poirier 
16. Divya Rao 
17 Rachel Jackson 
 
Thanks very much for visiting, come back soon for some more Christmas themed projects!

Thursday, 13 May 2010

INKLINGS Team Blog Hop - Masculine Ideas Galore!!


Welcome to The INKlings’ Team’s first ever blog hop. You may have arrived here from Joanna Wassens blog or just be visiting my blog, whichever way once you’ve checked out my creations you can continue the hop through the link at the end of this post to the next team member, Christie Wallace who has some cool 'manly' BigShot projects to show us.


What style of cards do we frequently get asked for inspiration for? More often than not it’s masculine cards, be it little boys or grandfathers everyone seems to struggle with cards for the males in our lives. So as a team we thought we’d help you out by providing you with 20 team members’ fantastic blogs that you can hop through and get lots of creative inspiration from. Be sure to bookmark your faves, or add us to your "follow" list so you can come back and visit us again!


Want to win some Blog Candy? Simply leave a comment on each blog and then email Michelle Dyson (yes, that's me, I'm co-ordinating this bit) and let her know you’ve done so and you’ll be in the running for a fantastic prize of 20 handmade cards and other goodies.

Sorry,  Blog Candy prize not available to SU! demonstrators. But everyone is most welcome to leave a comment! 


So, what have I created to show you? I think I must be a bit strange, because I enjoy creating 'blokey' cards, probably because I can easily conjure up a grungy, messy style. Neat and elegant - not so much!


My dad was the inspiration behind this card, as he is a Boilermaker by trade, welding and making interesting stuff with metal. And, I've recently run a class on Heat Embossing techniques, where one of the techniques we learned about was "Faux Metal". I made some metal-look embellishments by stamping the "Totally Tool" stamp set images into a puddle of molten silver embossing powder, and then trimmed around the tools. They really do look like they are made from pressed tin!

For the rest of the card, I chose Basic Gray cardstock, which happens to be pretty much "Overall Gray" too. I've used the "Sanded" background on the top section of the card, with Basic Gray ink, and the nuts and bolt stamp from the "Lots of Bots" Autumn/Winter mini stamp set to stamp the lower section, in honour of the various screws, split pins and bolts that would come out of the washing machine with the (cleaner) grey overalls. I have taken a layer of Brushed Silver metallic cardstock, and used the "Spiral" punch along one edge.

 Next came the fun bit - scrunching it up and distressing the edges. Since one of my enduring memories of childhood was greasy smudges, I used a great 'blokey' tool, the "Spritzer" and my Basic Gray marker to squirt random inky splodges over the background and metallic layer.   Over this, I have put a 'rivetted' panel, stamped many times with the "Sanded" background to darken the Basic Gray panel.  I then ran it through another great tool for masculine cards, the Crimper, giving it a corrugated iron effect.  I matted this piece on a distressed Basic Black panel and attached the layers with some Antique Pewter Jumbo Eyelets with my Crop-a-dile.  Yes, they are very slightly wonky, but I think it adds to the effect.. (that's my excuse anyway).  I mounted the faux metal using Pop Up Glue dots, which are a great choice for adding dimension when you don't want white foam to show.  At the bottom of the card, I added a sentiment from "Teeny Tiny Sentiments" on a spritzed piece of Whisper White, punched out with the large oval, mounted with Stampin' Dimensionals Then I added a row of Pewter brads and Jumbo Eyelet.  Now, I don't think my dad is ever going to actually retire, but at least he might have more time to muck about in his workshop these days!


My second project was designed to co-ordinate with the card.  Again, inspired by my dad, who always, always has a notebook with him to jot down important measurements, sizes, contact details etc.   I have taken an Office One spiral bound notebook from KMart, which happens to have the same coil spacing as our Spiral punch, and punched along the side of a piece of Basic Gray Designer Prints paper, before sticking down onto the notebook cover.  I stamped the nuts and bolts again, as above, and sponged the edges to give them a 'pre-smudged' look.  Down the spine I have tied some short ribbon lengths, in black gingham, black grosgrain and Basic Gray Taffeta.  A second piece of Designer Prints paper was matted on a distressed Basic Black panel, and layered with two more faux metal tools and a silver embossed monogram rivetted on with some more Jumbo eyelets.

Well that’s all from me. Next stop on the INKlings’ Team Blog Hop is Christie Wallace
for a clever gift card holder and Big Shot card. Have fun and don't forget to leave a comment on each blog to win some great Blog Candy.  Did you add me to your Bloglines/follow list/bookmarks yet? 

List of participants - in case you get lost or something gets broken along the way, you can hop back here and find the next Blog in the chain to visit. The names of the girls are the bloghop posts, and the URLs are their blog home addresses, to make this useful for people who want to do the hop further down the track...

1. Clare McIllhatton http://craftycowcreations.blogspot.com/
2. Janice Spencer http://www.janicespencer.blogspot.com/
3. Dani Holland http://www.daniholland.wordpress.com/
4. Kylie Swain http://kraftykylie.typepad.com/blossom_designs/
5. Amy Anderson http://amyandersonsblog.blogspot.com/
6. Kari Hughes http://www.karigail.wordpress.com/
7. Jayne Mercer http://www.jaynemercer.com/blogs
8. Joanna Wassens http://www.joannawassens.com/
9. Michelle Dyson http://stampinkpaper.blogspot.com/
10. Christie Wallace http://christiescreativecorner.blogspot.com/
11. Ryn Gibbs http://rynscraps.blogspot.com/
12. Fiona Brown http://www.fionajanestamping.blogspot.com/
13. Beth Stewart http://www.elisabethstewart.com/
14. Nicky Adamson http:/nickyadamson.blogspot.com
15. Dani Fender http://danifender.blogspot.com/
16. Michelle Frost-Stevenson http://stampinground.wordpress.com/
17. Rachel Jackson http://havefunstamping.blogspot.com/
18. Rachel Capps http://rachelcapps.wordpress.com/
19. Carolyn Campbell-McLean http://carolyncampbell-mclean.blogspot.com/
20. Michelle Le Breton http://www.michellescraftclasses.blogspot.com/