 Standard A4 sheet, no trimming, just cut in half as if you were making two A5 folded cards, and then into A6 rectangles, four from one sheet.
I have drawn pencil lines on one of the pieces to indicate where to score - 1" in from each side and each end. Do this for 2 pieces if making one box, or all 4 if you are making two.

On the left hand side is the box base. Cut in to the horizontal score lines from each short end. For the other half of the box, which will become the lid, cut two corner pieces away completely, up to the score lines. On the other side, cut just to the score line from the short end, as for the base. Take a circle punch and take a half chomp half way along the longer edge.
 Decorate now, it's easier when flat! I have used Versamark and the Winter Post stamp set here, and a band of the same snowflake stamped in Baja Breeze over the top. It's also a great size for using your Stampin' Around wheels - then it is an easy matter of using the co-ordinating stamp set to decorate the tag or accent for the box.
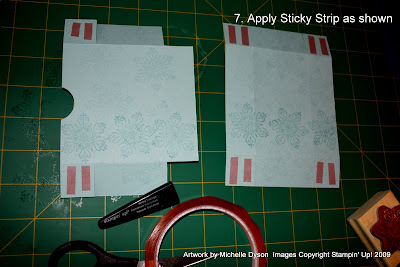
Apply Sticky Strip super strength double sided tape to the corners as shown. Then remove the red liner plastic and assemble the lid and base.

After making the lid and base, add another piece of Sticky Strip along the back edge. A bit lower than where I have placed it would be better...

Line up the lid flap with the back of the box base and stick into place. Done!!

Now you can decorate it as you please. I have added a simple tag stamped with the snowflake again, and overstamped with a silver embossed reindeer. I added some Dazzling Diamonds, using my 2 way glue pen. I mounted the 1 3/4" circle onto a 2" scallop circle punched from Brushed Silver metallic cardstock. Then I tied a piece of white taffeta around, and looped a piece of the sadly retired silver cord around it to complete the box. It's a great size for a little treat, and quick to make!

1 comment:
Morning Michelle. I JUST got this post thru my inbox and I HAD to comment. TFS these cute-to0toot boxes. How devine (and a real ecomonical bonus!! Your tutorial is FAB and very easy to follow and u'stand. Ta for all your hard wk.
If I don't get another opportunity...MErry Christmas!! Thanks for all your creative inspiration throughout the year. ooxx
Post a Comment