Friday, 30 January 2009

The Punch Rack


I thought I'd share a bit about how my great punch racks are made.

I have two now, but they are basically the same in construction. You can make them longer to take more rails too, or simply build another one when your collection grows!

The rails with the round bases are from Ikea, called Bygel, and retail for the astronomical price of $1.95 each! Rather than attach them directly to the wall, which means 4 holes per rail, my clever hubby decided to mount them on short lengths of pine timber , meaning only 4 holes in total. This also creates more depth between the wall behind and the rail for the large punches.

The rail with the white end caps is a piece of aluminium tubing from Bunnings Hardware, and this rail is attached to the timber with screw eyes. This rail is closer to the wall, so it's perfect for the small punches. The hooks are also from the Bygel range at Ikea, and are great for the ends of the rails to hold bits and pieces.

So, basically you only need to measure your biggest punch, and space the rails accordingly, screw them to the timber, then attach the timber to the wall with Wallmates or similar, to suit the type of your wall. Ta Da!

Thursday, 29 January 2009

Birds and Cats


Don't necessarily go together, but they do here! I was playing with the big lens on my new camera (55-250mm) and seeing how close I could get to our cats, Monte and Fudge, both Burmese. They both make all the right noises when it comes to birds, but won't move a paw to even scare them away, even the pesky feral Indian Mynas that eat the strawberries from right under their feline noses. So, given that fact, I think the other bird in this post is entirely safe! I love how glossy their fur on their faces is, and how regal they look, love my furbabies! They are both getting on a little in years, Monte is now a sprightly 11, and Fudge is 9. However, since Burmese often live for 18 years or more, the birds around our house can look forward to many more years of twitching tails and chattering yowls in complete safety LOL!

Sorry, but I've used the "Always" set again, from the Spring Mini last year. Perhaps it is wishful thinking that the more I continue to use it, the more likely it will grace the pages of the 2009-10 Idea Book and Catalogue?? Or, that since so many of you bought it already, maybe I can just convince myself I'm providing useful inspiration??

Whatever the excuse, here it is. I started with a Rose Red base and stamped the berry branch stamp along the bottom edge. I then made 2 scallop edges from Confetti White cardstock strips to back a piece of Summer Picnic Designer Series Paper, sponged with Rose Red and Groovy Guava inks.

I used Groovy Guava to ink up the bird stamp, and then "Rock n roll"ed the edges in Rose Red, also adding a few Rose Red highlights with my marker to highlight the flower design. Birdy was trimmed out, and popped up with Dimensionals on the patterned paper strip. The sentiment scallop circle is stamped off first with Groovy Guava ink onto Confetti White, then the Always circle a was added using my SAMJ. I punched the circle with my 1 1/4" punch, and added a 1 3/8" Groovy Guava circle before layering again onto the scallop circle, more foam Dimensionals there too. Oh, and behind that I added a strip of Pumpkin Pie grosgrain ribbon. I thought I'd make this a Valentine's card for my orange mad and bird-loving son :) Hope you like it!

Wednesday, 28 January 2009

Organisational Ideas


I thought after posting some photos of my newly re-jigged craft room that I would share a few of the ideas that I have used to organise my stuff, especially since the layout and storage is working out so well in a practical sense.


For my stamps, I have them organised by the size of the clear clam shell box, and they are roughly stacked in groups eg backgrounds together-ish. They sit nicely in two rows in the cubes of the Expedit shelving unit, and there is room to move them about and sort within the shelf while looking for 'the one', without making a mess on my bench (which is what used to happen....) I have my Sale-a-bration sets for this year in a stack, so that makes grabbing them for samples and workshops fast. Same goes for the Summer Mini sets. Retired sets and past-mini sets (can't quite bring myself to say they are GONE yet!!) are in a cube of their own, so I don't torture my readers with too many unavailable sets. My Simply Sent Kits are also together.


For A4 cardstock, I collected 8 filing organisers from Officeworks- similar are available from KMart. Most have 5 drawers, but there are some with 3, which means there is more room for the neutrals etc. They do stack securely, and thats how I had them pre-shuffle. I have the colours organised in Colour Families, two colours to a drawer mostly. They are labelled with some printed cardstock labels that can be found on Ebay, and it makes finding the right colour so fast that I'd never be without them now! There are also drawers for patterned paper pieces, and long scraps that don't fit in my bench scrap dish. The bonus with the Expedit unit is that there is room above the filing box for an Ikea Trofast tray for various bits and bobs, as well as room on the side for plastic file cases with class notes etc inside. Excuse the slightly fuzzy image, I recropped the photo from the other post, but you get the idea!


Off for a swim now, I'll be back another time with more tips as I think of them!

Monday, 26 January 2009

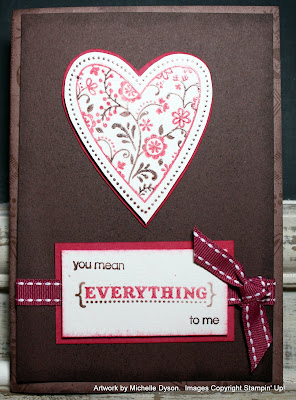
Roses and Chocolate anyone?


Yes, it's nearly that time of the year - the marketing opportunity between Christmas and Easter that retailers seize upon with gusto.... Valentine's Day! I don't have anything against a special day set aside to express love for your dearest, but I prefer to be a little more spontaneous with my affections! In the absence of spontaneity however, how about some real thought and effort put into a handmade card? My husband even made a hand-stamped masterpiece for me last year, with a little 'assistance' from the kids. So, the bar is set quite high this time, I'm looking forward to seeing it on Feb 14th.


Here's my first creation for the season, I have a few more ideas floating around in my head, and with my newly re-organised craft room and school returning this Wednesday they might just crystalise!!

The stamp set I have used here is "Always", featured in the Spring Mini this year. I'm really hoping hard it will make a re-appearance in the new 2009-10 catalogue, as I really didn't get enough time to explore it's potential.

I've used Rose Red and Chocolate Chip markers to colour the leaves and floral elements of the gorgeous heart, but to give it a little more impact and textural appeal, I then stamped the inked-up heart into a freshly re-inked Versamark pad before stamping onto Confetti White cardstock and sprinkling with clear embossing powder. A quick hit with my heat tool, and the colours are intensified and given a glossy raised finish. I did the same with the "everything" sentiment stamp, and then used markers and my Stamp-a-ma-jig to add the "you mean" and "to me" where I wanted them.

I also used my next favourite 'heart' set, "A Happy Heart", in the Summer Mini. I stamped the xoxo stamp all over the Close to Cocoa card base, before layering with a piece of Chocolate Chip speckled with my Spritzing tool. A bit of double stitched ribbon in Purely Pomegranate was the last step before assembling the card, using Stampin' Dimensional foam dots to pop up some of the elements. Stay tuned for the next card using more of "A Happy Heart" soon!


Sunday, 25 January 2009

A revamp and re-organise = refreshing!


It's done! Well, nearly! Handy Hubby is in the process of making me another punch rack to fill the gap between the metal note boards and the corner, hopefully it will be done tomorrow and I can then fill it up! (yes, I have a serious fondness for punches, no such thing as too many!!) The Ikea Expedit shelf unit is nicely filled, and the top is perfect for my 12x12 paper racks. I took some photos, both to show you, my visitors, and to remind myself what it should look like in a tidy state!! Although, I feel quite inspired to create now, so I don't have much hope of the floor looking that clean for long!


Still working on Valentines cards, but for now here is a card I made, from a design by Jayne Mercer for our team Charity, Camp Quality. I made some in blue, some in yellow, and some like this one in red and pink. It's a versatile design, simply change the occasion by stamping a different sentiment. I love the chunky sprinkles in the centres of the cut out flowers, very easy to do with the Tombow Multi glue.
It's also an easy one to do in batches, simply select 3 or 4 shades of the same colour, and stamp in sequence from lightest to darkest, overlapping them. The set used is the beautiful Eastern Blooms set from the Summer Mini catalogue, item 114275, just $39.95.

Enjoy a wonderful Australia Day, with plenty of relaxation and celebration!

Saturday, 24 January 2009

Blog Candy coming your way... ROBYN!


My apologies for not posting this earlier, time got away from me this week, but I have selected Robyn as the winner of my Blog Candy comp last week :) Thanks everyone for your ideas on what the New Year means to you. For me it means just a few more days before school goes back YAY! I'll send you a message Robyn to get your postal addy.


Stampin' Up! wise, I've been busy re-organising my craft room (again...) with a new shelf unit from IKEA - it's still not quite back together yet, but the improvement is remarkable! I neglected to take a 'before' shot (it was far too messy!) but when I've re-homed everything and vacuumed the floor, I'll take an 'after' shot to show you. The pic with this post shows an emptyish one, you'll have to wait to see it full of craft gear! I've also been working on some Valentine's day cards, so hopefully I'll get a chance to finish, photograph and upload those in the next couple of days.


Happy Australia Day everyone!!

Saturday, 17 January 2009

Kim is having a WONDERFUL time!

Pop on over to Kim's blog to see some snippets from her Africa trip - I've received an email and SMS, and she has managed to make a few blog updates despite very slow internet speeds. While I can't wait to have my friend back here, I'm so pleased she is having a fantastic time and enjoying her safari experiences!

For those of us stuck back here in relative ordinariness, perhaps a Stampin' Up! workshop is what you need?? I still have a selection of bookings available for the fantastic Sale-a-bration period, so give me a call on 9484 9447 to make your date for a great time and great benefits!

Keep the comments coming for the New Year blog candy, I'll choose the winner on Monday.
Off to have a play with some stamps and ATC cards I'm making for a swap, be back later hopefully with some pics. ENjoy your Saturday everyone!

Monday, 12 January 2009

Ring in the New, plus a bit of Blog Candy


These gorgeous mini tear-off calendars are available through suppliers such as Educational Experience, and several demonstrators purchased some to make some gift calendars. Here is my version, using the "Eastern Blooms" set and Ginger Blossom Designer Series paper from the Summer Mini. The River Rock base is stamped in River Rock with the branch stamp, and also stamped with Linen background, to create depth and texture. Next, I used the Scallop edge punch from the Summer Mini to edge a piece of Ginger Blossom and Very Vanilla cardstock. I used the Eastern Blooms set to re-create the patterned paper design on the cardstock, and attached it to the card base. The colours used were Groovy Guava, Ruby Red and River Rock, matching the paper. I mounted the little calendar on Ruby Red, and used a length of River Rock Double Stitched ribbon to finish. I found a roll of adhesive magnet strip at the local $2 shop - yes, it was $2! and a piece of this on the back attaches this nicely to the fridge. What do you think? Leave a comment here about your favourite thing about New Year, and I'll send a calendar and ribbon assortment to my favourite response. Entries close next Monday.

One last Christmas card


I'm not sure how this one slipped the blognet, because it was one of my favourites that I made last year. However, when I was tidying my bombsite of a craft room I unearthed it.
It uses the single tree from "Lovely as a Tree" (108866 $48.95), stamped in Always Artichoke on Very Vanilla card. The base is Always Artichoke, stamped with "Linen" background, using Artichoke ink.
A strip of Holiday Harmony paper from the Spring Mini is layered with Mellow Moss and Vanilla strips.
I stamped the 'noel' greeting from "Many Merry Messages" using versamark, and added a coat of glitter using Heat n Stick powder. I think next time I'll try Whisper White Craft pigment ink instead, for greater holding power for the adhesive granules of the Heat n stick, but I was quite pleased with how it turned out anyway.
I used dots of the fabulous Tombow liquid adhesive in the Summer Mini ($7.95, not $12.95 as printed in the catalogue) on the tree branches, and sprinkled with several colours of microfine glitter. To finish I added 3 brads in matching tones to the glitter.

Hope you like it! I must get the tree silhouette stamp from the Lovely as a Tree set and have a play with brayering techniques. Hmm, maybe when school goes back!!

Sunday, 11 January 2009

Sale-a-bration Inspiration


As promised, here are some cards I have made with the Sale-a-bration sets for 2009. I had a play with the sets I didn't own at a recent team stamping day, which was a lot of fun! I wish I took a photo of the group of cards we all made together, but alas my camera was left at home that day. Might have to see if someone else will share with me so I can show you the variety we created, it was quite interesting to see how many takes there were for each set.


The first photo shows the Botanical Blooms set, which is a 2 step stampin set. I have stamped the solid leaf in Rose Red ink on Rose Red cardstock. Next I took a strip of River Rock, and overlaid it with a strip of Mellow Moss, stamped in Mellow Moss ink using the leaf outline stamp. The flower and flower outline stamps were used on scraps of Very Vanilla, using the 'stampin off' technique to create a lighter and darker version of the same colour. These were punched with 1 1/4" circle punch and pop mounted with Stampin Dimensionals onto 1 3/8" circles and then scallop circles. I stamped the greeting from the Congrats set in Rose Red - next time I think Purely Pomegranate or Always Artichoke would make it stand out more. Live and learn!

The second photo is a card that popped into my head inspired in a way by a Christmas card made by Carol Dunstan, using whisper white ink on Kraft cardstock. I liked the subtle 'negative' look, but chose Kraft as the card base and Blue Bayou as the ground for the white. This is the Polka Dot Punches SAB set. As you can see, the doodle style dot flower fits beautifully inside the Scallop Circle punch. The star flower fits inside the 5 petal flower punch. The smaller flower suits the 1 1/4" circle punch. We don't yet have a heart punch, but I suspect there is one on the way!! I stamped the large flower again in Blue Bayou ink onto So Saffron cardstock and pop mounted it into the centre, before stamping the Congratulations greeting onto the Saffron strip with distressed edges.

The third photo shows the Yummy set and the card I made with it. "Yummy" is my favourite set from this year's collection, versatile, and useful for making quick tags for baked gifts and the like - the keenest eyes here might notice where else I previewed this set - a RAK will be sent for the first commenter to tell me!
The flourish and a little something for you sentiment are on the same large stamp, and I have been umming and ahhing about whether to cut them apart and mount separately. For now I have decided to leave it as it was made, and to use the option of marker-to-stamp omitting when I want to use one or the other but not both. I used markers here anyway, to colour the tiny flowers and greeting in burgundy, and the flourishes in artichoke. I used the Scallop edge punch (mmmmm, to die for!!) to create the vanilla scalloped borders, and mounted these on a different level with Stampin' Dimensionals. Underneath these are some Vanilla and Artichoke grosgrain ribbon. Oh, and the background is stamped with Polka Dot in Bravo Burgundy in on Bravo Burgundy cardstock.


Hope you like them, back with more before too long I hope!!

Nothing to do with stamping, but isn't she cute!??


This is a photo I'm quite pleased with! We have had a nocturnal orb spider weaving a web each night near our front door. But, with my previous camera I wasn't able to get the right picture of this gorgeously fluffy spider, and by morning she had always broken down her web and was hiding somewhere in the bushes. She's quite big, about 20c piece size across edited to add she's grown!! She's now about the same size as the scallop circle punch, and the lovely orange colour is quite accurate. I've seen lots of orb spiders, but never one quite as pretty as this. I am not a big fan of spiders generally, having been bitten more than once, but to watch this little creature weave a perfect web in mere minutes was truly awe-inspiring! Some of the detail is lost in the blog image, I was stunned to see two little pores in the centre of her back - I sure wasn't getting my nose that close to look IRL!!

A birthday card for a special friend


Here is a card I made for a friend turning the BIG 40!! Happy Birthday Nicky! Nicky's birthday is also Christmas day, but her family went to a very special effort to make a separate celebration for this very special birthday!!


It uses the cake stamp from the Pretty Princess set. The card base is Purely Pomegranate, stamped in Basic Black with the Polka Dot background. I ran a strip of black cardstock through my crimper, and mounted this on some whisper white to give it 'pop' from the background.
I used Watercolour Wonder Crayons in Bold Brights and an Aquapainter brush to colour the Stazon stamped image on Whisper White. It's easy to get an authentic watercolour effect by drawing fine lines of colour with dry crayon onto the image, then blending and 'melting' the crayon with the water brush, spreading out the colour as desired.
The panel was mounted on black to match the dots and crimped panel. The Happy Birthday sentiment is exactly the right size to go into the Square Scallop punch in the Summer Mini. I finished it off with a tie of the Pomegranate wide satin ribbon that was in the Spring Mini. I'd been lovingly holding onto my remaining piece until the right project came along, and this was it!

Off to photograph some more projects with my NEW CAMERA!!!! I'd been dropping hints for a while, and had been using my pretty nice point and shoot digital camera for over three years, but have been longing for a proper digital SLR camera to replace my Pentax film SLR, retired due to the cost of feeding it!

When Kim expressed interest in shopping for a new camera for her Africa trip, DH decided that it would be a nice 'surprise' for me to have one too. So, we are now both proud owners of a Canon 450D DSLR! I am still very much on auto settings, but at least being digital, I can play and experiment without undue expense! Back soon with some results I hope (says she who has not yet downloaded from the new camera...)

Friday, 9 January 2009

Sale-a-bration is here!


Sale-a-bration is a great promotion held every year in January and February, and there's lots on offer for guests, hostesses, and new demonstrators as well!

How does it work??

*For customers, you can choose a special limited edition Sale-a-bration set for each $100 spent on catalogue merchandise. There are four to choose from, and you can view them here in the online catalogue. There is no limit, so if you have a big wishlist, you could earn them all!


*For Hostesses, it's a great time to hold a workshop. Your guests will love the opportunity to earn free sets, which is great for your sales totals. In addition, when your workshop reaches $600, Hostesses receive an EXTRA Sale-a-bration set of their choice, as well as the normal, generous benefits. Reach $1200 in sales and earn 2 extra SAB sets! With the Summer Mini running as well, there's lots of new things to look at, so ring today to book a date.

*For new demonstrators, signing now is a great idea! In addition to the already heavily discounted Starter Kit, you can choose an additional set from the Idea Book and Catalogue, valued at up to $79.95, FREE! There is also a special offer for new demonstrators signing between January 1st and January 21st, so contact me today for a no-obligation chat and to be sent an information pack. I'd love to have you join my team, whether you're interested in the discount products, or if you want to build a successful business, or anything in between!

A warm welcome to Kim's blog visitors!

Hello to you all, and welcome to my blog! Kim has just left for the trip of a lifetime to Africa, I haven't heard from her yet but I can imagine her having a wonderful time! I did enquire about squeezing into her handluggage, but alas it was not to be - this time at least!! Kim hopes to get online a couple of times, to post on her blog, send emails etc, so I'll keep you updated here also.

As she will be away for much of the great Sale-a-bration promotion, in her absence, Kim has asked me to look after you with any Stampin Up needs or just plain crafting questions, and I'm delighted to be able to help her out! So, if you would like to place an order, have a product question, would like to host a Sale-a-bration workshop, please don't hesitate to call me on (02) 9484 9447, or email me and I'll endeavour to provide the same excellence in customer service that Kim does.


Now, as she has challenged me to provide inspiration, I'd better hop to it and do some creating!
I spent the entire week while my children were holidaying with Grandma and Grandpa painting their rooms - Pixie Pink and Apricot Appeal would be the closest SU colours , Pinkie Pie pink for my Pony obsessed daughter, and a subtle gelato orange for my orange mad son. I had to keep reminding myself it's just paint and can be covered over when bright and colourful is no longer in style!! The kids were delighted, especially my little boy, as he was unaware HIS room was being painted too. However, I didn't get to play with my new Summer Mini sets as much as I'd liked, so stand by for some samples and inspiration!