Thursday 30 December 2010

Gold Medal for exemplary customer service awarded to " Pink Poppy "


I am very much a believer in excellent customer service, and it is something I try hard to provide myself.  However, every now and again, I come across service that goes so far above and beyond the norm that I feel proud to bestow my thanks in as public a way as possible - hence this unusual blog post:

The back-story - On Christmas afternoon my 9yo son unwrapped a gift from his auntie, which included a cool animal shaped "Balloon Ball Buddy"  Miss Soon To Be 6 also received one.  Of the assorted treasures they received, these toys were the most captivating, and were quickly extricated from their packaging and inflated.  For a short few minutes, there was much amusement and pleasure, but then Master 9's tore apart under very moderate inflation.  There were tears, quite a few of them, wrapped in much disappointment.  Miss STB6 very graciously offered to stem the flow by telling Master 9 that she would share hers with him, although she was now anxious that her toy would suffer the same fate.  I offered that I would try and find him a replacement as soon as possible, and so as not to forget, and before the packaging could be binned, I sent off an email explaining the story above to the distributor address on the packaging,  Yipose Trading Company P/L, who are most commonly known as "Pink Poppy" , purveyor of all things pink and girly.  You've almost certainly seen their stands of hair clips and bows and similar goodies on your shopping adventures, but I'd never seen the balloon toys before.

Scroll forward to 9am Boxing Day morning, when the doorbell sounds.  Expecting to find neigbouring children keen to play, imagine my stunned amazement to find a representative from Pink Poppy, with not one, but TWO replacement "Ball Buddies", and an additional gift for both Master 9 and Miss STB6 of a cool 'projector' pen, and a sturdy kid-sized shopping bag to boot.  There were a few more tears, of happiness this time, along with profuse thanks.  Mere hours after sending the enquiry, on a traditional family day, where no one would be expected to read work-related emails, let alone act upon them.  Quite simply amazing!

I am so very impressed at the speed and thoughtfullness with which the drama was resolved, and would like to congratulate the people responsible for their excellent service.  You certainly made our day, and restored a little faith in the commercial world as well.  A very well deserved "StampInkPaper Gold Medal of Service " is hereby bestowed upon you!  If you're reading this and have an outlet that suits their range, perhaps you should check them out as a supplier!!

Friday 24 December 2010

Christmas Wishes


Posted by Picasa

Merry Christmas everyone!
I thought I had succeeded in doing something new with my Demonstrator Business website, making an e-card in a different program and inserting it into the e-card editor in DBWS.  It looked fine in preview, and I was quite proud of my efforts!!  However, something is not quite right..... Apologies to everyone who receives an email with a little red x square....  I'll try again, perhaps another day though!

Santa is nearly here, hope you've been good enough to get what you most would like :)

Tuesday 7 December 2010

Happy Birthday cards for kids with Printed Petals


Miss L has attended a rash of kindergarten birthday parties of late, about 5 in the last month.   Some were actual/close enough birthdays, others were kids who have birthdays during the upcoming holidays, so their wise parents moved the date up to ensure school mates would be around to attend.

I made a couple of  this card, using "Printed Petals"  I modelled it after this card, originally designed by Jayne Mercer as one of our team charity cards.  I made heaps with "Eastern Blooms" but I wanted to see if the larger flower from "Printed Petals" would work, and I quite like the effect.  Any stamp set with a largeish bold shape would work, and it's a great design for mass production.  Mmm, I feel inspired to go look in the cupboard to see what other stamps I might be able to use with this technique.  Simply, choose three or four monochromatic colours in varying shades.  Start with the lightest shade to avoid needing to clean in between, and stamp across the card, and off the sides.  Then switch to the next lightest shade, and so on, slightly overlapping the images.  Finish with a cut out of the darkest shade, popped up and glittered, with some leaves behind it to make it stand out.    This time I used the branch from the two step bird punch, but in the previous link I used the 5 petal flower through the crimper.  You could hand-cut them if you don't own the punch.  Standing by to take your order if you want one though!

The other great thing about this design is that it leaves a space for a greeting, that can be added at a later date to suit the occasion. Since the design is versatile, it could be pressed into service for anything from a birthday card, thank you, get well or note card.

The colours I used for this card are:  Melon Mambo base, Whisper White panel for stamping (essential for crisp images!), and the stamping is done in Pretty in Pink, Regal Rose, Melon Mambo and Rich Razzleberry.  The sentiment is from "Curly Cute", stamped in Melon Mambo and mounted on Rose Red.  The branches were punched in Old Olive.  Done!  I think I'll try it again without the mounted base, to see if no border gives the stamped panel more 'breathing space' What do you think??

All products are  Stampin' Up!, and all are available to order through me, just call (02) 9484 9447 or email me to place your order or join my mailing list here

Sunday 5 December 2010

Let's get organised - Inkpad labels and Cardstock Colour Labels

With the Colour Renovation now complete, you've probably had a chance to sort your supplies.  Why not start off your New Year all organised, with labels for your inkpads and colour labels for your cardstock files.


Inkpad colour names are laser printed on clear plastic labels, in navy text.  They are sized to fit across the end of the pad, so that if you have them stacked or in your Color Caddy, you'll be able to see the colour at a glance.  The colours are printed two per label, and there is an easy peel system for removing the backing.
 
They are printed in colour collections, so you'll be able to find the label you need quickly, and pre-snipped so they are ready to apply by peeling from the split backing.  The laser printed ink is resistant to isopropyl alcohol and Stampin' Mist, so you can clean your smudgy pads if you like, without damaging the label. 

The set includes all standard colours in the four Colour Collections - Brights, Subtles, Regals and Neutrals, current 2010-11 In Colors, specialty inks including Versamark, Stazon Black, Stazon White, and (now retired) Encore metallics and Very Vanilla (in anticipation of it's return maybe?!)  I've also included all the cardstock colours that don't come as inkpads -  Shimmery White, Naturals Ivory, Glossy White, vellums, metallics etc.  So if you like, you can use a second set to label a colour swatch book.

The cost per set is $5.00 and includes postage anywhere within Australia. 

There are also a limited number of sets that include all the current colours as above, as well as the old retired colours and old In Colors back to 2007 - these are available at $7 per set while stocks last, including postage within Australia.


Cardstock labels are laser printed onto matching cardstock, in black bold font.  They are pre-cut and sorted into mini ziplock bags per colour collection - Neutrals, Brights, Regals,Subtles, In Color and Specialties (Confetti, watercolor, vellums, metallics etc)  They are sized for use in suspension file tabs, and are ideal for labelling the multi-drawer stacking stationery units from Officeworks etc.

The cost per set is $5.00 and includes postage anywhere within Australia.


To order, please email me at michelle.dyson@bigpond.com with your name, address, number of sets of each type you require, and I will contact you to confirm and provide you with direct deposit banking details. 

Happy organising!

Friday 3 December 2010

Farewell Fudge and Welcome Kimba, aka "new and improved Fudge"

A few weeks ago we said a considered and sad farewell to our second fur-child, Fudge.  Fudge was 11years old, young for a burmese, but had been battling a rare (in cats) digestive condition for almost 2 years. She was suffering from a pancreatic enzyme insufficiency, which meant that she was unable to extract enough nutrition from her food.  She was perpetually hungry, and lost a great deal of weight, from a healthy 4.5kg in the top photo down as low as 2.3kg. 

Once she was diagnosed, and started on her treatment, she regained quite a bit of her body mass to 3kg, and was happy and active, if still ravenous!  However, she had some setbacks recently, and while she recovered from the first with a course of Flagyl, she was unable to bounce back a second time.  A week or so before her euthanasia, she stopped purring, and lay around not doing much, and the expression on her little face just said 'tired and sad'.  My children have grown up with Fudge, and were understandably upset at the prospect.  We discussed at length the fact that it was not fair to keep dragging her along as she was, and they could see that it was the right time to make the decision.

 We'd also heard that there was a large number of special cats in urgent need of re-homing after their breeder and owner had been forced to move interstate, and thought that if we could offer a kind and loving home to another animal in desperate need, it would both fill the void and make it easier (for us) to part with Fudge.
Unfortunately for us, the burmese cat we had hoped to adopt had been rehomed via the PetRescue site,  but we were told there was another cat, a little unwell, who may or may not be adoptable.  In a strange co-incidence, the foster carer called the same afternoon as Fudge's departure to say that she was improving and that we could adopt her.  In another uncanny co-incidence, the new cat was the same (quite uncommon) Chocolate Tortoiseshell colour burmese as our adored Fudge.  It was certainly meant to be.  And so, we have welcomed Kimba to our family, and she has made herself more than at home with her super affectionate nature, athletic exploits and kittenish curiousity - hence the "new and improved Fudge" tag.   That's Miss Kimba, also known as "Kimasarby Dream Catcher", in the lower photo, looking suitably adorable.

So, if you're looking at getting a family pet for Christmas, I do urge you to contact any of the several rescue organisations, such as Pet Rescue  to see if you can offer a happy home to an animal in need, instead of purchasing from a breeder or pet shop.  Many breeds of dogs and cats have their own Rescue organisations, and there are delightful bitzers and moggies as well, all waiting to lavish their love on you.

Soon, back to something more like craft, thanks for reading :)

Wednesday 1 December 2010

SUMMER MINI is here! Enter the Virtual Launch to win a great prize!

Woo hoo!  It's here!  And, it contains a number of the most requested items that didn't make it into our main Idea Book and Catalogue back in September.   Well, I guess Stampin' Up! had to keep something back to fill our mini with!

There's just too much else happening in everyone's lives this close to Christmas, so I won't be holding a formal launch like I usually do.    However, I'm having a Virtual Launch instead!  If you'd like me to send you a copy of the Mini catalogue, please use the "Contact Me" form on my Demonstrator Business Website to drop me a line.  Everyone who places an order of $20 or more from either the main IBC, December Frenzy promo or the Summer Mini  before December 29th will go into the draw to win a fabulous 'door prize' including stamps and accessories  (stay tuned for a pic of the prize goodies).  You'll get an entry ticket for each $20 you spend (excl p/h), so you could be getting an extra gift when you spend your Christmas money on some delicious Stampin' Goodies!  (yes, I changed it to a ticket per $20 spent in recognition of the expensive time of year - more chances to win!)

Bargain Stamping Goodies with December Frenzy - order today!


Roll up, Roll up!  It's December Frenzy time!
There are a great range of products to choose from, and some are as much as 50% off.  Click HERE or on the image above to visit the PDF flyer to print.  It shows the picture, price and catalogue page details for each item in the sale.  I do recommend that you are quick to place your order to avoid disappointment - if stock runs out it may be backordered until after Christmas.  I know I'm adding a few things from this great promotion to my Christmas Shopping list!

My picks:
* Teeny Tiny Sentiments set in Wood mount - Save a whopping 50% - there's absolutely NO excuse to put off owning this fabulous set in the best format.  Even if you already have it in clear mount, I'd be jumping at the chance!  Now just $31.48
* Autumn Days set in Wood Mount - a great set for Masculine cards, but versatile for Christmas even!  Now just $19.48,  that's 50% off.
*Pendant Park in Clear Mount  - what a bargain at $13.98!
* A Kind Heart Angel Policy stamp - another half-price deal, this stamp is all you need when you are creating items for sale using Stampin' Up! products, now just $5.98
*There's a selection of Stampin' Write marker colours, from $3.45 each and lots more.

This promo runs from now (1st Dec) till Dec 29th,  why not browse it alongside the new Summer Mini and call today to organise your Christmas Present to yourself :)

Friday 26 November 2010

Christmas Gift Ideas for Stampers - Wishlist Service


It's official, Christmas is less than a month away...
I was out shopping last night, and couldn't believe how busy it was, for a Thursday night - signs of things to come!

So, here's a way to shop from the comfort of your own home, using my Wishlist Service.  This works especially well for those of you with 'significant others' who tend to either:
a) leave things till the last minute and then fail spectacularly anyway, having ignored any subtle and not so subtle hints you've dropped over the last months.
b) just buy for you what they want for themselves, like that power tool or Taggart box set on DVD
c) get you nothing at all because they had no idea what to get you (DOH!) and then ran out of time to try and find something...

All you need to do is to write out your Stampin' Up! wishlist, hand it to them with my details jotted on the back, and tell them that if they ring me, it will all be taken care of in one easy step. Complete with bonus handmade card, and giftwrapping too if you're local. What could be easier for them, and more satisfying for you? Everybody happy, and that's the way it should be! It's Christmas!

Phone me on (02) 9484 9447 or email me at michelle.dyson@bigpond.com Gifts can be delivered ANYWHERE in Australia (the handmade card will be forwarded separately from the delivery if you are outside my personal delivery area)


Ho Ho Ho! Just call me Santa ;)

Tuesday 23 November 2010

Vintage Letterpress with Artistic Etchings

Here's one of the first cards I made with the Artistic Etchings set.  As much as I loved it when I saw the beautiful vintage elements, I wasn't sure how easy it would be to create with, but I was pleasantly surprised to find my 'vintage groove' straight away, and I've been enjoying the collage/quirky style very much!

I think the original layout came from a sketch challenge at our recent team weekend, but of a very different clean and simple style of card.  Not for long once I got hold of it!

Card base is Crumb Cake, and there is also Very Vanilla, Soft Suede and Basic Gray.  I've layered, I've distressed, I've asymetricked (yes, I know that's not a word, maybe it should be?), I've crimped, added metal embellishments, and all together it gives the vintage look.

One thing that was a bit of an experiment was using the Vintage Wallpaper embossing folder for the Big Shot machine to apply ink to the Debossed sections of the cardstock.  Here I used Baja Breeze ink, and swiped it over the smoother pattern side before running through.  You get a reverse type effect when you run the ink over the raised side.  This "letterpress" style is quite popular at the moment, and there are several newish tools on the market to make invitations with.  I think it's nice that you can take tools you already have and achieve a similar effect.  And if you don't already have the tools, then it's another reason to NEED them!! 

Speaking of NEEDS, there is a short while left on the Dressing Up Christmas Promotion, running until the 30th November.  The Ornament Punch bundle is currently unavailable however, due to a technical issue with the punch which is being worked on right now.  There are still three other bundles to choose from to get FREE RIBBON, including the Welcome Christmas bundle with very pretty Christmas Cocoa specialty paper.  Give me a call on 0403 175 790 to order.

For those of you who's significant others need some prodding and direction in the Christmas Gift department, stay tuned for details about my "Christmas Gift Wishlist" system, which makes it so easy for them to get you what you want!! Later today, hopefully, if I can get a few more things crossed off my to do list!

Thursday 11 November 2010

I'm going to be a SCIENCE TEACHER!

Woo Hoo!!  I thought it would be weeks and weeks before I would know, but this morning I received notification that I have been offered a place in the Graduate Diploma of Education at Macquarie Uni, starting next year.
No need to panic, I plan to continue with my Stampin' Up! life (it will no doubt help keep me sane!)
I'll be studying part time, and when I'm done in 2 years I'll be qualified to teach science to high school students.  I'm looking forward to the challenge, and to using the mothballed parts of my brain, in a career where I can share something else that I love, with the most important resource we have here in Australia, our children!

Thanks to Cafe Press for the image,  I'll be ordering!

Friday 5 November 2010

Important Update for 'We Stamp for Lara' PayPal be DAMNED!!!!

Despite Lara's mum Madonna going to considerable effort to get a Government Approval Sanction specifically for this fundraising project, PayPal have seized her account where the donations have been made, and will not release any funds. PayPal were even asked prior to the donation buttons being placed if they required a copy of the documentation, but have blocked the account anyway. Come ON!!! We're mothers and friends helping a severely disabled child to access vital equipment, not terrorists or drug dealers!!! Get over yourselves, PayPal!! I'll be closing my Paypal accounts after this has been resolved, and I encourage you to do the same if at all possible. Vote with your feet to show how you feel about this reprehensible 'bully-boy' behaviour!

To this end, a brief message from the lovely Mads:

So, if you have friends that you want to join up or know of anyone else who’s interested, please direct them to Lara’s trust account:

Heritage Building Society
Mrs M J Dunn T/F Lara May Dunn
BSB 638010
A/C #: 12189650

So pass along the message girls. We will make sure that PayPal release the funds quickly. Word of mouth is a powerful tool. An angry Mother is another one!

Love and Hugs,
Mad

There's still plenty of time to jump in and join, you'll be able to access all of the daily tutorials to date, all the future daily tutorials and prize draws and of course, the grand prize draw of a Bigshot! Let's stick it to PayPal and show them we can succeed without their high fees and heavy-handed tactics!

Monday 1 November 2010

Special masculine birthday card with Medallion

This one is a square card for a change, and I've been making a few of them lately and I've enjoyed the change in proportion.
I love, love LOVE the Medallion stamp, it can be used in so many ways for so many occasions.

Here it has a textured Very Vanilla base, 10" x 5" folded, followed by a Basic Black layer with distressed edges.  Tying the colours all together is a piece of the wonderfully useful "Newsprint" Designer Series Paper.  I've really ripped into this layer, tearing and rolling to give a distressed appearance.  The image layer is Confetti Cream, and I started the Medallion image by inking up with River Rock.  I then daubered a small amount of Basic Black ink  around the edges of the "branches" before stamping.  I repeated the image on a second piece of Confetti Cream, this time using Sahara Sand and Basic Black.  I trimmed the centre circular motif  and distressed the edges with the Cutter Kit distresser tool, mounting it over the base layer circle, with Stampin' Dimensionals for a bit of  'pop'  The finishing touch is a pewter "build-a-brad" with s 1/2" punched circle of Newsprint paper under the epoxy dome.  Now that I've shown you my little trick with the "Dog Bone" punch below, you'll know how I created the double layered Modern Label punch.  I used the "Party This Way" stamp set for the greeting, it's my current "go to" birthday sentiment.  All done, and the recipient was happy too :)  It's been CASE'd a few times by my regular crafting ladies, so I hope you like it too!

Friday 29 October 2010

Punch Art Blog Hop - tutorials and samples galore!

Hello and welcome to the inaugural South Pacific punch art blog hop!!!


We are a bunch of Stampin Up demonstrators from New Zealand and Australia who love our Stampin' Up! punches. We have gotten together to showcase a selection of the punches you can purchase from Stampin' Up!. We know we will inspire you and encourage you to use those punches in new and beautiful ways. Please leave a comment and let us know what you think to go in the draw to win some yummy scrummy punch art blog candy (sorry, offer not available to su demos, but you're most welcome to leave a comment!).

Here's the list in case you get lost, you can start wherever you like, but to enter the Blog Candy Draw you must comment on all 15 blogs.

1. 2-step Bird  and Word Window - Karen Southwell - http://www.kareniescrafts.blogspot.com/ 


2. Petal card Double Punch - Carol-Ann Torrie http://queen-of-scraps.blogspot.com/

3. Fancy Flower - Sally Williams - http://www.sallycancraft.com/

4.  2 step Owl - Julia Leece - http://www.juliascards.blogspot.com/

5 XL Tag - Amy  http://ladybugsanddaisychains.blogspot.com/

6 Round tab  - Melissa Davies http://beedevinedesigns.blogspot.com/

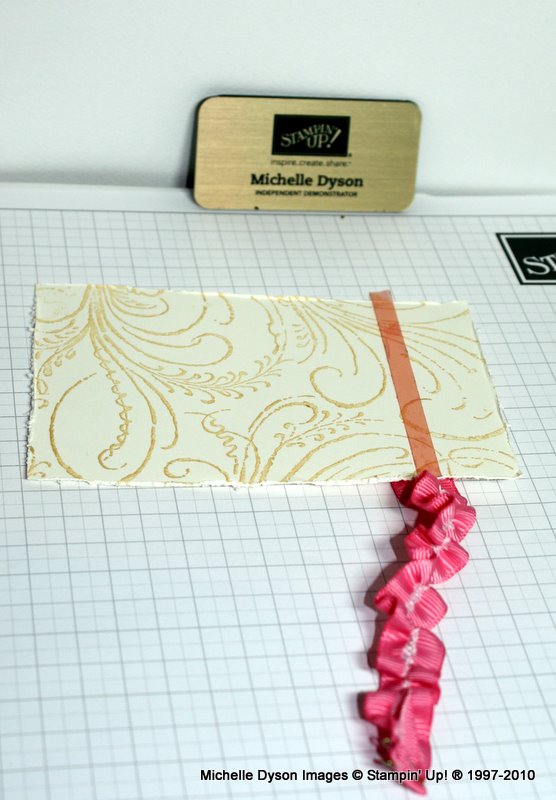
7 Modern Label  - Michelle Dyson http://stampinkpaper.blogspot.com/2010/10/punch-art-blog-hop-tutorials-and.html

8 Jewellry tag medium, Boho Blossoms, 5 petal flower- clare mcilhatton http://www.crafty-cow.com/

9 Heart small , Scallop Square, Heart to Heart , Full Heart- Lisa Bullock http://daffyscrapper.wordpress.com/

10 Ovals - Pauline Bennetts - http://www.paulinebennetts.com/stampede

11 Butterfly - Tia Routledge  http://craftingwithtia.weebly.com/my-blog.html

12  Circle punches -  Emma Kirton  - http://www.emmakirton.blogspot.com/

13 Ornament - Angie Jones - http://angiescraftfusion.blogspot.com/

14 Scallop trim border and corner- Andrea Buckland http://creatingcardswithandrea.blogspot.com/
15 Eyelet border - Steph Gray http://stampinsteph.wordpress.com/


OK, I'm No 7 on the list, Michelle Dyson. You may have come here from Melissa Davies' blog or just be stopping by here randomly.  I've chosen the delectable "Modern Label" punch, which I affectionately term the "dog bone" because of it's shape.  Like the Word Window punch, it's a must have for adding sentiments neatly, but it's even more useful for the slightly larger and longer sentiments that can look a bit squished in the Word Window.  But hey, you *need* both of them anyway!! LOL :)  My projects also use a few other punches you may recognise, and will probably see more of as you hop through the tour! 

Here's my project, and a little tutorial about a neat trick using the Magnetic Movers and Shapers Moveable Pieces to co-ordinate with your punches.


Many of our Stampin' Up! punches can be used to create pretty 3D layered flowers, but this one has a nice cottage-y look, reminding me of a paeony flower.

The first step is to punch multiple Modern Label shapes from cardstock of your choice.  I have used So Saffron and Regal Rose, but you can stick to a single colour, or choose any other you like.


Next, I've folded them in half and used my Paper Snips to cut little diagonal snips from the middle fold, to give the 'petals' a waist, so to speak.  I've also punched a Circle Scallop to use as the base of the flower, this helps to keep it all together.

Next step is to make the cardstock flexible enough to split apart into layers, the "suede-ing' technique.  You can scrunch by hand, but that takes a while. If you have a Crimper tool (sort of like a punch in it's usefulness!), you can soften multiple punched shapes at once, and it's much easier on the hands too.  Roll the punchies back and forth through the Crimper, not quite all the way so they fall out.  Then eject them and put them back in at a 90 degree angle, and repeat.  This is breaking down the paper fibres and before long you will see the layers of paper making up the cardstock start to separate, like below.


Now it will be quite easy to peel apart the layers, producing two sides, with a soft, suede-like surface.
   It's a good idea to make lots, as there will be some casualties during the separation process.


I used my paper piercing tool and Mat Pack foam mat to poke a hole in the centre of each petal, and threaded them onto a Flower Brad.  You can twist the petals around gently to arrange them how you like once they are on the brad spike. 

Almost finished flower, with ruffled petals.

I did a little tutorial a few posts ago on this blog, showing how easy it is to create your own shimmer mist using our Shimmer Paint.  I tracked down some unscented Isopropanol (Rubbing Alcohol, Isocol) from my local pharmacy, good news for those of us with sensitivities to perfume!  I used the Champagne Mist colour to spray my flower.  The alcohol evaporates very quickly, but while it is damp you can shape and mould the flower

 Ta-da!!!  You can see the dampness and the shimmer.
 Here is another little trick, making ruffled ribbon.  It works with most ribbons, this one is wide grosgrain.  Make a small snip in the centre of one end, and draw out a thread (only one or two strands, or it will be too hard to pull on)


It helps if you fold over the other end, and either stitch or staple it, to help prevent the thread pulling all the way out.  Ease the ruffles along the length.  You will need to start with a length of ribbon at least two and a half times the finished length you want.
Use Sticky Strip tape to secure the ruffled piece on the card, and press down to hold in place. No need to remove the staples, they'll be hidden on the back.

So, here are the tools I used and the finished project.  That little purple and black block is the Movers and Shapers piece that matches the Modern Label punch, see below for the cool (and economical!) trick!
 
The card base is Soft Suede, and I used the Decor Stampin' Around wheel to roll Soft Suede ink around the perimeter.  Next there is a layer of Regal Rose with sponged edges.  Then, a layer of So Saffron, which I rolled through the Crimper in both directions to echo the distressed flower.
The top layer is Very Vanilla, stamped in So Saffron using French FIligree background stamp, and I used the Cutter Kit distressing tool to roughen up the edges.
The leaves for the flower are made from the Scallop Oval punch, in River Rock cardstock.  I could have used Pear Pizzazz I guess, but didn't want to add another colour.  They are also crimped, and this makes them soft and flexible enough to fold and 'smoosh' into a leaf.  I used Mini Glue dots to attach.  The flower was attached with Sticky Strip, since it needs to STAY there!  The sentiment is stamped in Soft Suede on So Saffron, with the Curly Cute stamp set. 
 
But wait, you say, there's another layer under there?  How did you do that??  Ah HA!!
 
Here's what you need:  2 x clear cutting plates, and either a third cutting plate or a black "Texturz Impressions" pad  - this is simply to adjust the thickness to compensate for the lack of the Movers and Shapers base die.
The shapes in the Punch Windows set can be seen there, the Scallop Oval, Large Heart, Modern Label and Large Star.  All will result in a shape that is just slightly larger than the punched shape, so you can layer them!!
The little square block  is an optional extra, it's a "Magnetic Ejection Blank" and just helps to get the cardstock off the shaper piece.


 Layer as follows:  Clear plate (non cutting if you save one plate for cut marks like I do)
Mover and Shaper piece, foam up
Cardstock over the top (hold in place with a little Dotto if needed)
Second Clear Plate (cutting)
Third clear plate or Black Impressions pad
Roll through!
 Ta Daaaaa!
Cool hey!!
The best part is that the set of 4 pieces is just $54.95.  Essentially, that makes 4 punches.  Great if you don't have the punch as an alternative, and even greater if you have the matching punch to layer with!
 
I hope you've enjoyed my tutorials, please say HI! and feel free to ask any questions you might have.
Next Stop on the Blog Hop is my super-dooper talented downline, Punch Art Queen Clare McIllhatton, whose idea this hop was :)  Enjoy!!

Monday 25 October 2010

We Stamp for Lara - starts November 1st, please help!

Please get behind me and many other Stampin' Up! Demonstrators in our support for a fellow demo, Madonna Dunn.  Madonna's youngest daughter, Lara May, was unexpectedly born with the most severe form of Cerebral Palsy, and will need ongoing treatment, therapy and extensive support for her lifetime.  As with anything medical, special needs means especially expensive.  Essential items that we take for granted such as chairs, strollers and car seats are available, but at a cost of many thousands of dollars.  To this end, Madonna and the members of the wider Elite team have organised a project, We Stamp for Lara.  This is a month-long event, to which you can subscribe for a cost of $25.00.  Entry into the event gives you access to a wonderful selection of tutorials, challenges and daily prize drawings, as well as a gallery and forum.  Everyone involved has donated their time and skills to ensure that every cent raised will benefit Lara.  Madonna, angel that she is, has also arranged to donate any outgrown equipment to the Xavier Children's Support Network for the use of other children like Lara, so your participation will benefit others for years to come.

There is just a few days before the event begins, so please share this information with your crafty friends, and have a great time doing something GOOD.  Payment is via Paypal, and you can click on the button at the right hand side to sign up NOW!

Thank you!

Wednesday 20 October 2010

Intensive Beginner's All Day Class - Saturday 13th November


Saturday 13th November, 2010
Cherrybrook, North Western Sydney
10am - 4pm Intensive Cardmaking and Stamping Class

If you've dabbled around the edges of cardmaking, or are a scrapper at heart who'd like to branch out, then this class is for you!


We'll be starting from scratch, and covering all the essential information and techniques you'll need to start creating your own professional-looking cards.

There is no prior knowledge assumed, but even if you've been making cards for a while, I PROMISE you'll learn lots of tips to make your cards look even better.  I can pretty much guarantee you'll be saying "I didn't know that!" and/or "ahhh, so THAT's how it works!" throughout the day!

We'll be starting with the material I cover in my usual 2 hour beginner's class, and add as many more techniques as we can fit into a 10am -4pm day. You'll go home with a selection of finished projects and technique samples, and all the confidence you need to dive into this most rewarding craft.

To ensure individual attention, the class is for a maximum of FOUR students, and I have ONE space available for the upcoming date. I'm happy to take names and organise future dates for this class, so don't hesitate to get in touch.

Class Cost: $50.00 per person, includes all materials, comprehensive notes, coffee and cake. Lunch is available at local shops a few minutes walk away, or BYO.

Things to bring: Bone folder and paper trimmer (if you have them). A selection of adhesives including a SNAIL or similar tape runner, double sided tape and foam dimensionals.

To book, please call me on (02) 9484 9447 or 0403 175790, or contact me via email at michelle.dyson@bigpond.com

Ooohhh! FREE Ribbon! Christmas Bundle Promotion ON NOW


OK, back to scheduled programming now that Blogger Image upload is functioning again, I hope the"Test Pattern" I have just taken down has piqued your interest!  Ta daaaaa!  Purty picture installed!

(!!!  Sorry, these kinds of technical glitches seem to happen with notorious regularity, right after I have managed to do something a little bit "WOW" (for me, anyway!!)  !!!)

So - on to the nitty-gritty written details about the pretty promotion we have running right now!
There's a selection of bundles designed to get you right on top of your Christmas Creating tasks, and the deals have been sweetened with some delicious FREE ribbon rolls! Choose any of four different ribbon packs with each purchase of a bundle.  Or, host a workshop with sales of $550 to choose a free ribbon roll.  And, should there be bundles in that workshop order, then they get ribbon too!
The ribbons are not currently available in our catalogues, and there's a choice of 4 styles -
Mistletoe Ribbon pack - bottom roll on composite image above - I am having an educated guess at it being a roll of Old Olive taffeta ribbon and a roll of red-stitched white grosgrain .

Or, choose Real Red 3/4" polka dot ribbon - this was a fave in a mini recently, so take a second chance to nab some while you can!

Or, choose Riding Hood Red wide stripe grosgrain ribbon, matching the other colours in this style in our current catalogue, but in the most gorgeous Christmas red and vanilla.  Yum!

Or, a twill style stripe ribbon in vanilla, olive and red, the Sleigh Bells ribbon, shown at the left of the top image with the little spotty box.

But wait!  There's more!

One of the bundles is a delicious combo of the "Welcome Christmas" stamp set with a brand new paper pack, Christmas Cocoa Specialty paper.  This paper has a selection of patterns in Real Red, Soft Suede and Crumb Cake, and features flocked and metallic accents!  Pic is above, but I can't wait to get my hands on it, since it is reputed to be even more appealing 'in the flesh'

OK, so the bundles are:

Gifted Bundle:  Gifted Stamp set  and Jolly Holiday DSP - p21  $66.90 in Wood mount, $56.90 in clear
This stamp set has images ideal for making quick tags, but three of the five stamps are also ideal for making accent panels for your card fronts.  So versatile!  The Jolly Holiday paper features the delicious Cherry Cobbler colour, Old Olive, and Very Vanilla. These items have been specially selected to co-ordinate as one of the themed 'suites' in our catalogue this year, "Traditional Christmas"

Welcome Christmas Bundle:  I described this above, couldn't help myself!  $69.90 in wood mount, $59.90 in clear mount.  See the set on p26, it's the one with the beautiful wreath and label greeting on the red card at the right of the top image.  It's also got a large JOYstamp, and a sledding and tree decorating silhouette image.  My pick of ALL the Christmas stamp sets this year!

Season of Joy Bundle: $67.90 in wood mount only, comes with the set and the matching So Swirly jumbo wheel as the bundle.

Delightful Decorations Bundle:  If you haven't already succumbed to the wonderful Ornament punch, then take this great opportunity to get some extra value with the bundle of the punch and matching "Delightful Decorations" stamp set.  $72.90 in wood mount.

To order, just give me a call on (02) 9484 9447 or email me .  Your order can be delivered anywhere within Australia for just $5.95 or 5% of your order total (whichever is higher)  Only about 8 weeks to go.....!!

Tuesday 12 October 2010

Sneak Peek... FAST Christmas Card Stamp-a-Stack THIS FRIDAY


Three card designs, five of each.  One class.  THIS FRIDAY evening OCTOBER 15th.  Doors open 7.15pm for a 7.30pm start.  $25 class cost, including Stampin' Up! envelopes and all materials provided, just come along, stamp and assemble!  Limited seats available, call 0403 175 790 or email to book...

Tuesday 5 October 2010

I am in LERVE! DIY Glimmer mist with SU! Shimmer Paint Tutorial

Oooh, I just looked at my hand, it's all sparkly!!
I'm so excited, I have just had a play with a new product in our catalogue, Shimmer Paint - available in three colours, Frost White, Platinum and Champagne Mist.
When I first saw the catalogue I was a little disappointed that we didn't get the Smooch Spritz products that the US have in their catalogue, but not any more, cos these are BETTER!  More versatile, and more economical to boot!  Yay!  I love it when things turn out like that :)  It's called Shimmer Paint, but that's really not the best name, as it's an ink really.  It can be used on fabric (heat set with an iron to make it permanent and washable), it can be daubered onto a stamp directly, it can be painted onto a pre-stamped image, and, using this method, spritzed over things to make them all glittery!  There's no doubt more applications, but these are a good enough reason to get some already, anything else is just a bonus!


OK, what do you need - it's dead easy to do, so don't hold back!
*Bottle of Shimmer Paint - teeny tiny bottles of 14grams, but they'll go a LLLOOOONNNGGG way using this technique, $11.50 each, find them on page 143.
*Some Rubbing Alcohol (aka Isopropyl Alcohol, Isopropanol, Isocol) from your local supermarket or pharmacy.
*An eye-dropper, you just want to be able to add the ink dropwise.  I've used a transfer pipette since I happened to have one (insert whistling innocently smilie HERE ;))  A baby panadol doser is probably rattling around most homes, would probably work fine.
*A small spray bottle.  I've used a mini mister from Ranger as I like the superfine mist, but any small spray bottle will do.

1. Fill the spray bottle almost to the top (about 1cm head space) with Isopropanol
2. Shake the Shimmer Paint bottle well, it has a ball mixer in there, so you should hear it rattle
3. First wet the inside of your dropper with Isopropanol, by sucking some in and then ejecting, this will stop too much of the ink from clinging to the inside.  Then carefully suck up a tiny amount of Shimmer Paint, about 10 drops worth and add to the misting bottle, rinse the dropper by sucking up and down until all the paint is gone from the dropper, close the bottles!
4. Shake well before each use, then simply spray onto your cardstock and let it dry.

That's it - too easy.  The Isopropanol evaporates very quickly, so it won't take long to dry.  If you want more shimmer, you can either add a second/third spray, or add a few more drops of paint to your misting bottle.  If you're like me, you'll be digging through your scraps box to test it out on all kinds of cardstock and thinking of all the possibilities!

Here's what it looks like, although it is the devil to capture photographically!  The best photo was on dark cardstock, Basic Gray, but the effect was equally beautiful on both Rose Red, Whisper White, and looked especially pretty on a pre-embossed piece of Very Vanilla, using the Vintage Wallpaper folder.

As you can see, it has turned Basic Gray into something more like "Dazzling Pewter", it's quite like a car pearl metallic paint finish, but matte.

So cool, hope you like my instructions, please come back and tell me how you went with your attempts, I'd love to see what you come up with!

Monday 4 October 2010

Quick, Clean and Simple Christmas Card Stamp-a-Stack FRIDAY OCTOBER 15th

Christmas Card Stamp-a-Stack - Quick, Clean and Simple
Friday 15th October, 7.30pm till around 10.30pm


The next Christmas Card Stamp-a-Stack is all about making cards suitable for fast, easy construction, but maintaining a hand-crafted and elegant style.  Just what you need when you have a long list of friends and family and are short on time (isn't that everyone?)
It will be held on the evening of Friday 15th October. It's a fantastic opportunity to get started on your stash of Christmas cards for the year with much of the hard work done for you. You'll make 15 cards, 5 each in three different designs. Stay tuned for some sneak peeks when I've finalised the samples. Everything is provided for you - pre-cut cardstock, all materials and embellishments, adhesive and beautiful Stampin' Up! envelopes to match. The class will be set up so you can construct the cards in an assembly-line format, with full instructions to create more later if you wish. The cost of the class is $25 and places are limited to ensure individual attention. Please give me a call if you'd like to book a seat, on 9484 9447 or 0403 175 790, or email me.

New In Colors and Printed Petals for Charlotte


Here is a card I made a week or two back, for a special 5 year old, Charlotte!  I've used several of this year's In Colors, Blushing Bride, Concord Crush and Pear Pizzazz, combined with crisp Whisper White.  I stamped the base card with Blushing Bride (I can see that I will be abbreviating that to BB before too much further into the year!!)  Then I edged a panel of luscious Concord Crush with the Scallop Trim border punch.  I then played around with some strips of Pear Pizzazz, and gave them the Scallop Trim treatment too.  I was comparing length so I'd know where to chop, when it occured to me that it looked pretty good if I offset the Pear just behind the Concord, to create a double layer. 

The Whisper White panel I stamped with all of the Printed Petals smaller stamps, in the three colours.  Then I whipped out my favourite new tool of the catalogue, the Versamarker Pen!!  This magic pen allows you to create embossed accents wherever you'd like, create embossed handwriting, and lots more.  I sprinkled clear embossing powder over, and heated with the heat tool, leaving the shiny areas to highlight the flowers.

The large flower I created using the Emboss Resist technique, by stamping onto Whisper White using Versamark ink, which I clear embossed.  I then used sponges and daubers to add areas of colour to the open areas of the flower.  To finish, I used some of the beautiful stitched poly ribbon in Pear Pizzazz, and added a Modern Label punched sentiment from the "Party this Way" stamp set.

In other news, I got a lovely surprise yesterday when I was given a blog award! Thanks Angie!
I'm to share three things about myself, and pass on the award to 5 more bloggers who's work I admire for offering that little bit extra!.

1. I'm left handed
2. I have three cats, two Burmese girls and a big boofa British Blue boy
3. I have a PhD in molecular biology, although that seems like a lifetime ago!

The five lovely ladies I'm bestowing this award upon are...
1. Amanda
2. Clare
3. Lisa
4. Beth
5. Vanessa

Off to bed with me, daylight savings has begun and I always make the mistake of staying up too late, luckily there is no-one else here to wake me up in the morning!!

Wednesday 29 September 2010

Launch Party Winner and a Make and Take with "Friends Never Fade"

Congratulations to Vanessa J of Castle Hill for being the winner of the Lucky Door Prize at my New Catalogue Launch party a week or so back.  Vanessa has won a new stamp set, "Perfect Punches", a sampler pack of new colour cardstock, and some ribbon lengths.  The draw was based on attendance, but with a bonus ticket for each $50 in orders placed at the Launch Event.  Well done Vanessa, I hope you enjoy your new goodies and your prize!

Above is the card I designed for my Make and Take at the launch.  You can see the one designed by Carolyn Gibbs HERE, using "Morning Cup".  Carolyn Campbell-McLean had designed a cute 3D bauble using the "Delightful Decorations" set, I must ask her to post all the info!

My card uses the "Friends Never Fade" stamp set, one that jumped out at me from when I first laid eyes on it in the new US catalogue when it came out over there in July.  Thankfully, because of the catalogue realignnment, us downunder folks don't have to wait long at all!!  My review - it's a versatile set, with both bold and more delicate images.  The style is reminiscent of Art Nouveau, particularly the abstract flower. You can find it on page 71, and it's just $31.95 in wood mount!  It's shown in the catalogue in Peach Parfait orange, because it's one of the sets co-ordinating with the themed suite, "Graphic Botanical"  That means there is co-ordinating goodies and Designer Series Papers available, and it's a great way to theme an album or event.

I've based my card around the colours in one of the other Designer Series Papers, Elegant Soiree -  Baja Breeze, Soft Suede, Crumb Cake, Very Vanilla and Basic Gray.  This sample card uses the standard scallop edge punch, as I was waiting for my Scallop Trim punch to arrive - taking this photo I realised that I didn't take a photo of the real deal!!   Then there is a strip of Elegant Soiree paper, that has all the colours in a fine stripe pattern.  The card base is Basic Gray, and I have stamped around the edges with the abstract flower in Basic Gray ink.  The panel is Crumb Cake, stamped with matching Crumb Cake ink  (Yay!!  No more 'making do' with Sahara Sand ink as a Kraft substitute!) with the flower branch design.  I think it might be a Honeysuckle, at least that's what it reminds me of!  The motif is stamped in Baja Breeze, with touches of Early Espresso ink added with the matching marker, then mounted onto a Scallop Circle of Early Espresso.  I then layered it onto a Fancy Flower punchout in Baja Breeze, and there is a Stampin' Dimensional or two in there for some lift.  The sentiment is from my favourite Level 1 Hostess set, "Afterthoughts", stamped in Early Espresso.  To finish there is a simple knot of Early Espresso narrow grosgrain ribbon, attached with a mini glue dot.  Tell me what you think!

Wednesday 22 September 2010

Friends Never Fade - Team Weekend Swap

This card is the one that I designed for the Card in A Box swap for the "INKlings" team retreat in August.  It uses a few of the new goodies in the new 2010-11 Idea Book and Catalogue.
I chose the colours from my favourite Designer Series Paper, Elegant Soiree, although it wasn't available to purchase at the time.  The card base is Baja Breeze, back with us for good now that it is a Core Colour!
I ran the card front through the "Vintage Wallpaper" embossing folder in my Big Shot machine, isn't it pretty!!  The next layer is Basic Gray, and I tore the lower half and rolled and distressed the lower edge, and did a bit of sponging also.
The greeting is stamped in Basic Gray ink, using the "Thank you Kindly" stamp set.  The stamped panel is Very Vanilla, and I stamped the gorgeous stylised flower in Soft Suede, Baja Breeze and Sahara Sand.  To add some dimension, I used the lovely new "Beautiful Wings" Embosslit die to make some pretty little butterflies from various colours, this card has a Vanilla and a Basic Gray creature fluttering above the flowers.  I attached them with mini glue dots, and bent the wings up a little.
To finish, I made some paper ribbon.  I cut some 1cm strips of Soft Suede cardstock, and ran them through my crimping tool to soften the paper fibres.  A few goes passing the strips in and out, and the cardstock ends up being soft and flexible, just like real ribbon.  I used Sticky Strip to pleat the paper ribbon across the join, being deliberately messy about it, to echo the torn bottom edge.  All done!  I might try something similar now that we have the Elegant Soiree paper to match the colour

Tuesday 21 September 2010

A Father's Day flashback


Another sign that I haven't posted in far too long (and that my Septembers are far too busy!) is that I haven't shown the Father's Day card I made for my dad at the recent Team Weekend away.  It was a quick and easy one, using a set I love but have neglected for quite a while - All in the Family.  My dad has a loving tribe of four dogs, Tully, Wally, Nola and Brownie (shown in this card from left to right).  They follow him everywhere, so the stamped image is pretty much autobiographical.    The nuts and bolts stamp is from the Lots of Bots set, and the oddly unattached hardware at the top is a reference to the numerous bits of metal usually found about Dad's person.  The card base is Old Olive, and the stamped panel is Confetti Cream.  There's a slip of Crumb Cake and Chocolate Chip to bring out the colours in the stamped image, authentically roughed up with some paper piercing and the distressing tool from the Cutter Kit. All done, and he liked it.  Hope you do too!

Monday 20 September 2010

Gosh, it's been all action around here!

Sorry, sorry!  It's been so long since I last posted here, I've been pretty flat out getting ready for the biggest party of the year!
Saturday was my Stampin' Up! New Catalogue Launch, and it was a great day.  Thanks SO much to my helpers Ryn and Caz, who made this busy day a big success.  There's lots more I have saved up to show you, so I hope to be back tomorrow with some more!  For now, here are some images from the goody bag treats and the action on the day!