Showing posts with label bigshot. Show all posts

Monday, 4 August 2014

Gotta get your BigShot Bundle!

This is the best promo in ages!  With every purchase of a Big Shot in August, you can choose one of five free stamp set/Framelits bundles.  That's up to a $100 AUD value, which means you're getting the machine for less than $50!  The choices include several new sets with matching framelits and even a set from the yet to be released Holiday Catalogue.

http://www.mediafire.com/view/tzubno703l4n1a6/Flyer_BS_Demo_8.1-31.2014_SP.pdf


This is an ideal opportunity to add a BigShot to your tool collection, or upgrade from another type of diecutting machine.  If you already own one, you can still choose any or all the bundles at 15% off the normal prices.  Contact me to find out more, or shop online here

Wednesday, 31 October 2012

Christmas Ornament Class - Tuesday 6th November

 +
+
 +
=

The stunning ornament from the front cover of the current "Holiday Catalogue" is not difficult to make, when you are shown how!  Come along to my class next Tuesday 6th November and make one to take home.  These make a great 'more than a card' gift, and I'll show you how you can make it into a gift or bottle tag that can then go onto your lucky recipient's tree!

Class:  Tuesday 6th November, 7.30 -9.30pm
Cost:  $15 includes tuition and materials, and use of my tools and equiment to complete at least one large ornament.
Bring: yourself!

Ideally, eat dinner before you arrive, but I hope to find time to bake some Christmas themed yummies as well.

Places are limited, so please call me 0403 175 790 to book a spot.  For attendees of the class, I will have a special offer on the purchase of the Holiday Keepsakes bundle so you can go forth and make many gorgeous ornaments, wreaths, place markers, cards and more!


Sunday, 1 July 2012

Today's Goodies! Want some? Read on...

Here's a pic of the collection of items I have created for today's Party at Vanessa's.  The two cards at top and right are our Make and Takes, and the lower card and treat tube are demonstrations and will be gifts for lucky attendees, amongst other stuff.

Vanessa's friends will be learning a few new techniques and will each get to take home at least 2 completed cards.  Sound like fun?  Want goodies for yourself?  I can show your friends how to make beautiful cards at your own Stampin' Party - within ~ 1hr travel time from Cherrybrook, North Western Sydney.  Call me, 9484 9447 or email to book your date - Extra Hostess dollars promotion runs until 31st July - best time to book for maximum goodies!

Best finish packing!

Friday, 11 May 2012

Framelits and Flowers

Everytime I pick up Razzleberry, my hand gravitates to Very Vanilla and Crumb Cake as well - it's sort of become my signature combination.  These two cards I made together, and made some very minor variations for  the second card.  The base is Rich Razzleberry, and there is a panel of First Edition Specialty newsprint paper on the left side.  The gorgeous label shape is one of the new Labels Collection Framelits, as is the sponged Vanilla layer behind the flower on the left card and the smaller sentiment label on the right hand card.  I used the "Mixed Bunch" stamp set and the matching Blossom punch to cut the flowers and centres, and finished off with some Razzleberry Satin ribbon and some Basics adhesive pearls.  For the card on the left, I used a greeting from the "Apothecary Art" set, and for the right the cute little "Kindness Matters" set.  The layers have been popped up here and there with Stampin' Dimensionals.  All done, quick and easy!

Thursday, 3 May 2012

Update...

It's been a little while, life has been somewhat hectic, in a creative way though!
I hope to get back to regular posting very soon, but in the mean time I have a little rush of catch-up posts to make up for my slackness.

 These are the fastest, easiest easter treats for my kids to hand out to their classmates!  I was a bit over chocolate, even before easter got here (did I actually say that?? ).  I had also found a mega jar of Jelly Belly beans at Costco that if I didn't parcel them up and ship them out, would have found their way into my tummy...  (maybe it was sugar I was over rather than chocolate?  Yeah, that sounds better!)  50 something packs of beans made short work of the jar, so that worked out really well.  I used skinny cello self seal bags, and had an idea to use the new Sizzix Framelits Labels Collection from the Autumn Winter mini as a topper for the bag.  Just like the fabulous "Top Note" Sizzix Bigz die we've had for ages, the Framelit shapes are symmetrical, and can be folded in either portrait or landscape to form a bag topper.  The best thing?  The SIZES!  I had no idea until they arrived that the largest Framelit shape is much bigger than the usual nested dies, big enough to use as a decent sized card.  So, there was a die size for pretty much any bag, including the mini bags I was using.  I was able to cut the label Framelits three sheets of cardstock at a time (pretty amazing) on the Bigshot, and was able to use up lots of scrap cardstock.   You can check out the Framelits on page 18 of the mini catalogue, $49.95, 125598.  The Designer Label punch was perfect for the front label, and I whizzed up a batch of those using the chick stamp from the "Best of Everything"set, 124946 $47.95.  I inked up in Daffodil Delight ink, but then I rolled the edges of the inked stamp onto a Peach Parfait inkpad, to get more contrast for the edges against the sharp white label.  A little greeting from good old "Teeny Tiny (something for everything) Sentiments" and a dab of SNAIL, and they were done!  I did gather them all together for the pics above, because they looked so cute and colourful.  They went down a treat apparently, so all was good there. 

Here I am, at my car boot sale stall, just after the completion of set up.  I managed to sell a few of the retired sets on offer, and quite a few cards from the donation box were purchased to benefit the Dural Rural Fire Brigade.  Thanks so much to the lovely customers who were able to drop by for a visit.  Unfortunately, the drawcard, car stopper of a Jumping Castle for the kids was a last minute no-show, so traffic was a bit lighter than expected.  I did manage to make quite a few swap cards, so it worked out to be a fun day.  Off to find more neglected pics in my blog folder!

Tuesday, 28 February 2012

Craft Room organisation - Die-cutting heaven

I've been busy again re-arranging my craft room, to try and make it as friendly for my uni/teaching work as well as my stamping.  So far,  I think I have managed to improve both!

When I tidy up a bit (cos I've already messed it up doing some assignments), I'll take a pic of the new layout, but for now I wanted to show you my new solution for all my die-cutting gear that came about because of the room reshuffle.  This is a bit of an epic story, but I hope it explains my thinking process about my room, and how you might apply the same principles to better arranging your own space.

A few years back, I bought a butcher's trolley from Aldi, and this same trolley was in last Saturday's catalogue too, $149, so if you like the idea it would be worth giving your local Aldi's a call to see if they have any left.  It was tucked in a corner before, and held all manner of bits and bobs on the shelves underneath, as well as the drawers and providing a handy worksurface to boot. But, it wasn't exactly mobile, and I could only access the shelves from the front side.

As part of the room reshuffle, I wanted to get an inexpensive glass top desk to fill in a 'dead corner' where all my bags and totes were stored, the bags would still be underneath it and visible, but there would be a work surface over the top that would effectively extend my desk into a U shape around three sides of the room..  At Officeworks, I found a glass desk that fitted the bill, just $55, but when I went to get it, I spied another variant, with twice the surface area, designed as a corner desk but able to be assembled as two individual desks as well.  At $68, it was a bit of a no-brainer to get that instead.    Because of this unexpected extra surface, something had to give, so I stripped the butcher's trolley bare and had it in the centre of the room waiting to be moved elsewhere.  While preparing for my Stampin' Crop day last Friday, I moved the various equipment onto the trolley to wheel it out and it dawned upon me that I could  free up quite a few of the cubes in my Ikea Expedit bookcase by having all my big shot, sizzix and other die cutting stuff stored on the butcher's trolley itself.  It also occurred to me that it would save a bit of setup time for my Stampin' Crops - just wheel the fully laden trolley out, ta da!  While not in use, it lives against my Expedit, and provides a work surface for my uni/teaching stuff, since the Big Shot fits underneath on the racks.

Phew!  Did you get that far?  Can you picture what I've done yet?
Here's the trolley:
On the bottom shelf are my Sizzix original dies and embossing folders, alphabets etc, and on the upper shelf are my gorgeous Stampin' Up! die storage boxes - a very neat fit for 2 x medium and 2 x large boxes.  In the drawers I have all the cutting plates and shims and my spare trimmer etc - things I use on the work surface.

Hope you find it inspiring, check back in a day or two to see the rest of my revamped space!

Monday, 10 October 2011

Hair ties with Fun Flowers and Flower Folds Dies + Flirtatious!


These were so much fun to make!!  Another project using our beautiful new fabrics, this time the "Flirtatious" collection that goes with the Delicate Doilies stamp set and Flirtatious specialty Designer Series Paper.  I've used the new Fun Flowers die for the flower in the top photo, simply layering several of the different shapes on the die, cut from each of the three fabrics in the pack.  I've stitched through a Melon Mambo button and onto a thick, snagless hair elastic, so they should last quite well.  I've given them a spray with a fabric stiffener to ensure they don't fray.  Miss 6 and a bit is coveting these, so I'm not sure they'll be mine for long!  The one in the bottom photo was made with the Flower Folds Bigz XL die, in exactly the same way. There are several sizes of flower on this die, and I used the smaller ones - you could make a dramatic race-day statement with the largest if you wanted!  I hope you are inspired to get out your Bigshot dies and discover their versatility.

Monday, 3 October 2011

Wisteria Doilies and Butterflies

This card was made for a sketch challenge entry at the INKlings team weekend.  The inspiration card had a flower, but I have substituted a butterfly cut from a scrap of picture framing matboard using the Sizzix Big Shot Beautiful Butterflies die.  I love love LOVE how the steel-rule dies cut this material, it's got all the benefits of chipboard, but is acid free with a white (or coloured) core, which makes decorating a cinch.  I've stamped the butterfly with the Delicate Doilies stamp set in Melon Mambo, and also in Versamark, so I could add some Heat and Stick powder and a generous dose of Dazzling Diamonds glitter - hard to see in the photo, but it gave the butterfly a lovely texture and glimmer.
Behind the butterfly is a torn embossed panel of Melon Mambo, and a strip of Flirtatious Specialty DSP bordered with some Elegant Eggplant Scallop border trim.  The card base is another of the new In Colors for 2011-13, "Wisteria Wonder"  For those of you (and there were many!) who lamented the demise of the purples in the SU colour range, weep no more, this colour is just so pretty!  Finishing touches include some Organza Satin ribbon and a Triple Layer Doily punchie with a rhinestone.  Very girly :)

Thursday, 15 September 2011

Fancy a Big Shot for $75? Read on to find out how!

It's true! You could even get one for $50 instead. Or, how about FREE, with an extra $10 or more in freebies on top? Stampin' Up! have introduced a fabulous new system of Hostess rewards to replace the previous Levels system. A hostess now earns 'Hostess Dollars' to spend on either specially priced Hostess merchandise, or she can use it towards ANYTHING in the catalogue instead! As before, Hostess Benefits start at an easily achievable $300 in workshop sales, where you receive $50 in hostess dollars. Under the previous system, you earned a choice of Level 1 stamp sets, and $30 to spend in the catty. The new system allows you to choose even the most expensive set in the Hostess section, and still have some left over. That's like getting a Level 3 stamp set! (earned with a $1000 workshop in the old catty) But wait, there's more (again)... When your workshop sales reach $600, you receive $100 to spend, AND your choice of 1 item at HALF PRICE! See, that's where the $49.95 or $75 Big Shots come in - the choice is yours how you spend your Hostess Dollars. Want your Big Shot FREE? Just host a workshop with sales of $1000, and Stampin' Up! will throw in another $10 to spend. Got a Big Shot already? Then you can add some of our fabulous exclusive dies to your collection instead, or the box of Many Marvellous Markers! Or, the ink Inkpad caddy - the choice is yours! A workshop is a great way to get an introduction to stamping, or to learn a new technique or two. It's lots of fun, and as the products sell themselves, there's no need for pushy tactics. Invite some friends around for a few hours of 'me time' and share what you love, with others. Not local to me? You can host a 'Party in a Box' from anywhere in Australia, collecting orders from family and friends by showing the catalogue around. Contact me to find out when you can schedule YOUR event, I look forward to helping you discover your creativity.

Tuesday, 23 November 2010

Vintage Letterpress with Artistic Etchings

Here's one of the first cards I made with the Artistic Etchings set.  As much as I loved it when I saw the beautiful vintage elements, I wasn't sure how easy it would be to create with, but I was pleasantly surprised to find my 'vintage groove' straight away, and I've been enjoying the collage/quirky style very much!

I think the original layout came from a sketch challenge at our recent team weekend, but of a very different clean and simple style of card.  Not for long once I got hold of it!

Card base is Crumb Cake, and there is also Very Vanilla, Soft Suede and Basic Gray.  I've layered, I've distressed, I've asymetricked (yes, I know that's not a word, maybe it should be?), I've crimped, added metal embellishments, and all together it gives the vintage look.

One thing that was a bit of an experiment was using the Vintage Wallpaper embossing folder for the Big Shot machine to apply ink to the Debossed sections of the cardstock.  Here I used Baja Breeze ink, and swiped it over the smoother pattern side before running through.  You get a reverse type effect when you run the ink over the raised side.  This "letterpress" style is quite popular at the moment, and there are several newish tools on the market to make invitations with.  I think it's nice that you can take tools you already have and achieve a similar effect.  And if you don't already have the tools, then it's another reason to NEED them!! 

Speaking of NEEDS, there is a short while left on the Dressing Up Christmas Promotion, running until the 30th November.  The Ornament Punch bundle is currently unavailable however, due to a technical issue with the punch which is being worked on right now.  There are still three other bundles to choose from to get FREE RIBBON, including the Welcome Christmas bundle with very pretty Christmas Cocoa specialty paper.  Give me a call on 0403 175 790 to order.

For those of you who's significant others need some prodding and direction in the Christmas Gift department, stay tuned for details about my "Christmas Gift Wishlist" system, which makes it so easy for them to get you what you want!! Later today, hopefully, if I can get a few more things crossed off my to do list!

Friday, 29 October 2010

Punch Art Blog Hop - tutorials and samples galore!

Hello and welcome to the inaugural South Pacific punch art blog hop!!!


We are a bunch of Stampin Up demonstrators from New Zealand and Australia who love our Stampin' Up! punches. We have gotten together to showcase a selection of the punches you can purchase from Stampin' Up!. We know we will inspire you and encourage you to use those punches in new and beautiful ways. Please leave a comment and let us know what you think to go in the draw to win some yummy scrummy punch art blog candy (sorry, offer not available to su demos, but you're most welcome to leave a comment!).

Here's the list in case you get lost, you can start wherever you like, but to enter the Blog Candy Draw you must comment on all 15 blogs.

1. 2-step Bird  and Word Window - Karen Southwell - http://www.kareniescrafts.blogspot.com/ 


2. Petal card Double Punch - Carol-Ann Torrie http://queen-of-scraps.blogspot.com/

3. Fancy Flower - Sally Williams - http://www.sallycancraft.com/

4.  2 step Owl - Julia Leece - http://www.juliascards.blogspot.com/

5 XL Tag - Amy  http://ladybugsanddaisychains.blogspot.com/

6 Round tab  - Melissa Davies http://beedevinedesigns.blogspot.com/

7 Modern Label  - Michelle Dyson http://stampinkpaper.blogspot.com/2010/10/punch-art-blog-hop-tutorials-and.html

8 Jewellry tag medium, Boho Blossoms, 5 petal flower- clare mcilhatton http://www.crafty-cow.com/

9 Heart small , Scallop Square, Heart to Heart , Full Heart- Lisa Bullock http://daffyscrapper.wordpress.com/

10 Ovals - Pauline Bennetts - http://www.paulinebennetts.com/stampede

11 Butterfly - Tia Routledge  http://craftingwithtia.weebly.com/my-blog.html

12  Circle punches -  Emma Kirton  - http://www.emmakirton.blogspot.com/

13 Ornament - Angie Jones - http://angiescraftfusion.blogspot.com/

14 Scallop trim border and corner- Andrea Buckland http://creatingcardswithandrea.blogspot.com/
15 Eyelet border - Steph Gray http://stampinsteph.wordpress.com/


OK, I'm No 7 on the list, Michelle Dyson. You may have come here from Melissa Davies' blog or just be stopping by here randomly.  I've chosen the delectable "Modern Label" punch, which I affectionately term the "dog bone" because of it's shape.  Like the Word Window punch, it's a must have for adding sentiments neatly, but it's even more useful for the slightly larger and longer sentiments that can look a bit squished in the Word Window.  But hey, you *need* both of them anyway!! LOL :)  My projects also use a few other punches you may recognise, and will probably see more of as you hop through the tour! 

Here's my project, and a little tutorial about a neat trick using the Magnetic Movers and Shapers Moveable Pieces to co-ordinate with your punches.


Many of our Stampin' Up! punches can be used to create pretty 3D layered flowers, but this one has a nice cottage-y look, reminding me of a paeony flower.

The first step is to punch multiple Modern Label shapes from cardstock of your choice.  I have used So Saffron and Regal Rose, but you can stick to a single colour, or choose any other you like.


Next, I've folded them in half and used my Paper Snips to cut little diagonal snips from the middle fold, to give the 'petals' a waist, so to speak.  I've also punched a Circle Scallop to use as the base of the flower, this helps to keep it all together.

Next step is to make the cardstock flexible enough to split apart into layers, the "suede-ing' technique.  You can scrunch by hand, but that takes a while. If you have a Crimper tool (sort of like a punch in it's usefulness!), you can soften multiple punched shapes at once, and it's much easier on the hands too.  Roll the punchies back and forth through the Crimper, not quite all the way so they fall out.  Then eject them and put them back in at a 90 degree angle, and repeat.  This is breaking down the paper fibres and before long you will see the layers of paper making up the cardstock start to separate, like below.


Now it will be quite easy to peel apart the layers, producing two sides, with a soft, suede-like surface.
   It's a good idea to make lots, as there will be some casualties during the separation process.


I used my paper piercing tool and Mat Pack foam mat to poke a hole in the centre of each petal, and threaded them onto a Flower Brad.  You can twist the petals around gently to arrange them how you like once they are on the brad spike. 

Almost finished flower, with ruffled petals.

I did a little tutorial a few posts ago on this blog, showing how easy it is to create your own shimmer mist using our Shimmer Paint.  I tracked down some unscented Isopropanol (Rubbing Alcohol, Isocol) from my local pharmacy, good news for those of us with sensitivities to perfume!  I used the Champagne Mist colour to spray my flower.  The alcohol evaporates very quickly, but while it is damp you can shape and mould the flower

 Ta-da!!!  You can see the dampness and the shimmer.
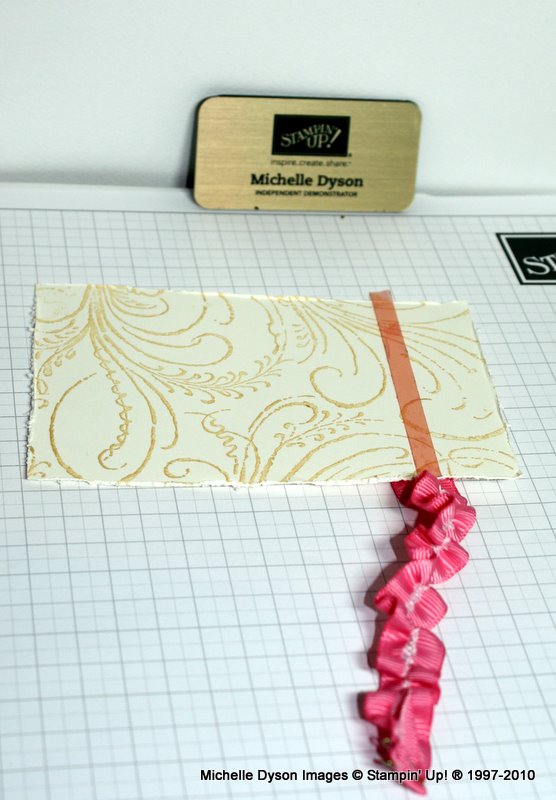
 Here is another little trick, making ruffled ribbon.  It works with most ribbons, this one is wide grosgrain.  Make a small snip in the centre of one end, and draw out a thread (only one or two strands, or it will be too hard to pull on)


It helps if you fold over the other end, and either stitch or staple it, to help prevent the thread pulling all the way out.  Ease the ruffles along the length.  You will need to start with a length of ribbon at least two and a half times the finished length you want.
Use Sticky Strip tape to secure the ruffled piece on the card, and press down to hold in place. No need to remove the staples, they'll be hidden on the back.

So, here are the tools I used and the finished project.  That little purple and black block is the Movers and Shapers piece that matches the Modern Label punch, see below for the cool (and economical!) trick!
 
The card base is Soft Suede, and I used the Decor Stampin' Around wheel to roll Soft Suede ink around the perimeter.  Next there is a layer of Regal Rose with sponged edges.  Then, a layer of So Saffron, which I rolled through the Crimper in both directions to echo the distressed flower.
The top layer is Very Vanilla, stamped in So Saffron using French FIligree background stamp, and I used the Cutter Kit distressing tool to roughen up the edges.
The leaves for the flower are made from the Scallop Oval punch, in River Rock cardstock.  I could have used Pear Pizzazz I guess, but didn't want to add another colour.  They are also crimped, and this makes them soft and flexible enough to fold and 'smoosh' into a leaf.  I used Mini Glue dots to attach.  The flower was attached with Sticky Strip, since it needs to STAY there!  The sentiment is stamped in Soft Suede on So Saffron, with the Curly Cute stamp set. 
 
But wait, you say, there's another layer under there?  How did you do that??  Ah HA!!
 
Here's what you need:  2 x clear cutting plates, and either a third cutting plate or a black "Texturz Impressions" pad  - this is simply to adjust the thickness to compensate for the lack of the Movers and Shapers base die.
The shapes in the Punch Windows set can be seen there, the Scallop Oval, Large Heart, Modern Label and Large Star.  All will result in a shape that is just slightly larger than the punched shape, so you can layer them!!
The little square block  is an optional extra, it's a "Magnetic Ejection Blank" and just helps to get the cardstock off the shaper piece.


 Layer as follows:  Clear plate (non cutting if you save one plate for cut marks like I do)
Mover and Shaper piece, foam up
Cardstock over the top (hold in place with a little Dotto if needed)
Second Clear Plate (cutting)
Third clear plate or Black Impressions pad
Roll through!
 Ta Daaaaa!
Cool hey!!
The best part is that the set of 4 pieces is just $54.95.  Essentially, that makes 4 punches.  Great if you don't have the punch as an alternative, and even greater if you have the matching punch to layer with!
 
I hope you've enjoyed my tutorials, please say HI! and feel free to ask any questions you might have.
Next Stop on the Blog Hop is my super-dooper talented downline, Punch Art Queen Clare McIllhatton, whose idea this hop was :)  Enjoy!!

Wednesday, 21 July 2010

Pretty Cute Owls


I was given a printout by a friend, of a card she found on Splitcoast that she thought I would like, and I mot certainly did!  I can't find the piece of paper right now, but will come back and credit the creator of the inspiring card when I unearth it amongst the rubble that is littering my crafting room...  The card base is Pink Pirouette, sponged with Pretty in Pink ink.  The next layer is Pretty in Pink, stamped with Pretty in Pink ink with a little sprig stamp from the "Tiny Tags" set, and sponged heavily with Pretty in Pink ink (starting to sound like Dr Suess here...)  I cut a circle using my Circle Scissor from Confetti White to make a 'moon', and edged it with Melon Mambo ink.  The two little owls were stamped using "Fox and Friends" onto Soft Suede cardstock in matching ink, then cut out.  The inspiring card used the owl from "Animal Stories", so I substituted with a set I owned, you could also pop in one or more of the little line-art owls from "Owl Together Now".  I cut two sets of "Little Leaves" sizzlit dies from Old Olive textured cardstock on my Bigshot, then trimmed them down a little to remove some of the leaves, giving the birdies somewhere comfortable to perch.  I was at a crop night when I made this, and had left my little heart punch behind,so I improvised by cutting out stamped hearts from the "Tiny Tags" set, in Pretty in Pink and Bashful Blue.  The sentiment is from my go-to set, "Teeny Tiny Sentiments" - very compact way to cart around a set with a sentiment for just about every occasion there is!  The ribbon is non-SU - I had also forgotten my ribbon pouch, so was tempted by the wall of ribbon at the crop location....  This one screamed "PERFECT" at me, despite being the most expensive ribbon per metre in the shop.  The things we do for our art, eh?  The flowers  are Felt Fusion, with a rhinestone brad in the middle.  All done!  I then went ahead and made a few other variations in colour and sentiment (to maximise the utilisation of said ribbon), so when I get them all done I'll pop them in here for you to see.

Ho hum, off to do a spot of iron shopping, since I killed ours yesterday by knocking it onto the floor.  I'd rather be stamping!

Thursday, 8 July 2010

It's the INKlings "Christmas in July" Blog Hop!!

Welcome to The INKlings’ Team’s Christmas in July blog hop. You may have arrived here from Carol Dunstan's blog or just be visiting my blog, whichever way once you’ve checked out my creations you can continue the hop through the link at the end of this post to the next team member.

The year is flying by, and it's time to start thinking about your Christmas cards and projects! The INKlings team has been busy getting some inspiring projects together to get you off to a flying start, so we're hosting a Christmas in July blog hop. You'll find lots of great ideas as you hop through the chain of 17 different team members’ fantastic blogs.  Why not add my blog to your "follow" list, or subscribe to my newsletter for info about my upcoming Christmas Stamp-a-stack classes.

Want to win some Blog Candy? Simply leave a comment on each blog and then email Christie Wallace and let her know you’ve done so and you’ll be in the running for a fantastic prize of handmade cards plus other goodies from each of the 17 participants.

(Sorry Blog Candy prize not available to SU! demonstrators but you're more than welcome to leave us a comment! )


My projects use the new Stampin' Up! exclusive design cutting die for the BigShot, the Pennant Die. At first glance at the catalogue line-art, you'd be thinking "what on earth would I need that for??" Pretty much my first reaction too, until I saw a few different projects using various components of the die. Once I had it in my hot little hands, I immediately saw the potential for making the small and large Christmas trees below.


They are both made in the same way, by cutting folded cardstock placed onto the die base and run through the BigShot machine.  I made several of each size in both Riding Hood Red cardstock and Designer Series Prints paper and Kiwi Kiss cardstock and Designer Series Prints paper.  I stamped the several of the snowflake images from the "Snow Swirled" set in matching ink all over the plain cardstock, and sponged the edges.  I alternated the colours, and stitched the layers together at the 'spine' with a piercing tool, needle and thread.  The bases are made from a Scallop circle cut from the Bigz Bigshot die (small tree), and from a circle cut using the Circle Scissor (large tree).  The small tree has been sprinkled with Supernova glitter using a 2way glue pen, and 1/2" circle punchies were glittered up to make some baubles for the large tree.  The stars were made from the small and large star punches, folded and glued together.

Now, as you can see from the die line-art, there are also some large scalloped circles - so I applied the same principle to make a paper bauble.


The circles are pre-scored, so all you need to do is to fold in the centre and join them in alternating colours using Sticky Strip tape.  You can make them as full as you like, mine has 8 folded circles.  To decorate, I threaded some Pretties Kit beads, punched and Felt Fusion flowers onto some fine nylon thread, passing it through the centre hole of the bauble. A tie of Kiwi Kiss satin ribbon and a loop of Riding Hood Red taffeta is the finishing touch.

And, there's more!  I also found a great tutorial by Arielle Gordon using this die to make a cute little box!  I've made one here in matching colours to the trees, and I think it would make a nice table place favour.  This one uses four small pennants, and makes a box about 3 inches square.  I plan to have a go at making a larger box with the large pennant.  It is constructed using Sticky Strip, and decorated with some of the spare scallop circles in Designer Series Paper folded over the corners, and a scallop circle with a monogram stamp in the centre from the Schoolbook Serif alphabet.  A tie of gingham ribbon, some tissue paper and some choccies complete the box.


Well that’s three things you can make with the Pennant Die, and we haven't even touched on actual PENNANTS yet!  Next stop on the INKlings’ Team Blog Hop is Jayne Mercer. Have fun and don't forget to leave a comment on each blog to win some great Blog Candy
In case you should get lost along the way, here is the full list of participants and their blog links.


1. Christie
2. Dani H
3. Carol 
4. Michelle D
5. Jayne
6. Kylie S
7. Kari
8. Dani F
9. Beth
10. Nicky A
11. Clare
12. Amy
13. Fiona
14 . Michelle Frost-Stevenson
15. Fiona Poirier 
16. Divya Rao 
17 Rachel Jackson 
 
Thanks very much for visiting, come back soon for some more Christmas themed projects!

Wednesday, 19 May 2010

Mark II - Scallop Circle + Fox and Friends + Medallion = Quick and Easy!

Here is Mark II in my series, and I hope you'll agree it's a slight refinement on the original prototype below!!??

The card base is Close to Cocoa, and I cut the base in the same way, using the Scallop circle bigshot die to cut a card from a folded piece of A5 cardstock.  I stamped the Medallion background using Close to Cocoa ink - it's a match made in heaven size wise!!  And if you were thinking a little more deeply than I was at the time, you could probably line up the points on the Medallion with the bumps on the Scallop much better!!

Over this, I have cut a 3" circle out of Kiwi Kiss cardstock, and sponged the edges.  A slightly smaller circle of Really Rust was also cut on the circle Scissor, 2 3/4"  - also sponged.

I had a thought of using the 1 3/4" circle as a "moon" backdrop for the cutest little owl, from the "Fox and Friends" stamp set.  He's inked up simply in plain Chocolate Chip, and is perched on a branch cut from Old Olive using the 2 Step Bird punch.  A snippet of Kiwi Kiss striped grosgrain was the finishing touch.  I didn't add one to this card, but a sentiment from the "Teeny Tiny Sentiments" set would look just fine under the branch.

Hope you like it, there's another to follow that I like even more, still working on lots of Mark III for my Convention Swap - only one more sleep before I head into the city to stay at a hotel ready for a bright and early start on Friday morning!!

Monday, 17 May 2010

A prototype... Fox and Friends, Bigshot Scallop circle and Bird Punch +

What do you make when you've forgotten there is a child's birthday party happening later that day, and you're already knee-deep in other tasks?  It's the 'less than 10 minutes' card!  I don't know what possessed me to try something that I haven't done before, but despite this being the prototype, it worked out very well. 

I chose colours of cardstock that are going to be retiring, both to use them up from my stash, and remind you what they look like because I've not often used them!!  The card base is Brilliant Blue, and is made from an A5 sheet, scored and folded as for making a standard, landscape orientation card.  Next, I positioned the cardstock on the upturned Bigshot Circle Scallop die so that the long open edge was just overhanging the base to be cut  as normal.  The fold is positioned so that the top few scallops are ABOVE the fold, the width of fold below the cut lines will form the spine of the card.  What you end up with is a cute, almost circular, scalloped edge card.

For the circles on the front of the card I have used the Circle Scissor to chomp some quick circles from Gable Green and Whisper White.  Well, actually, I grabbed a left over white circle from my last workshop and just cut the one from green...  (note to self - precut a batch of 2 3/4" and 3"circles to have on hand for such future occasions...!)

On the Whisper White circle, I stamped the cute little owl from the Fox and Friends, inking her up with Brilliant Blue and Gable Green markers with Summer Sun eyes.  The branch is from the fantastic new 2 Step Bird Punch.  To finish, I stamped a birthday greeting in Gable Green from another owl set, Owl Together Now.  I decided that the owl eyes needed some definition, hence it became a she with the addition of some Brilliant Blue eyeliner.  A stretch of celery twill ribbon added a final touch. 

I made a more, um, considered version of this card today, which I was pleased with - stay tuned for the first production model!