Showing posts with label christmas. Show all posts

Thursday, 4 December 2014

Stamp-a-Stack Class Thursday 11th December


Next date for this class is Thursday 11th December at 7pm, at my home in Cherrybrook. 

 Complete a batch of special cards just in time for posting. 

 Class duration will be approximately 3 hours, so please have a bite to eat before arriving.  Coffee and cake supper will be served during the evening.

 Please call Michelle on 0403175790 to book your seat.

Monday, 20 October 2014

Christmas Card Stamp-a-Stack

 I have planned the first in a series of Christmas Card Stamp-a-Stack classes for the year, to be held on the evening of... VERY SOON!  It's a fantastic opportunity to get started on your stash of Christmas cards for the year with much of the hard work done for you.  

You'll make 12 special cards, 4 each in three different designs.  Each of the designs features elegant stamping and embossing, with lots of layers and detail, the sneak peek above should give you an inkling.  Everything is provided for you - pre-cut cardstock, all materials and embellishments, adhesive and beautiful Stampin' Up! envelopes to match. 

The class will be set up so you can construct the cards in an assembly-line format, with full instructions to create more later if you wish.  

The cost of the class is $25 and places are limited to ensure individual attention.  Please give me a call if you'd like to book a seat, on me to discuss dates.  Get a group together of four or more, and I can come to you for an evening of your choice (subject to availability)

Fantastic Good Greetings Stamp set - yours free for a very limited time!

http://www3.stampinup.com/ECWeb/CategoryPage.aspx?categoryid=1031&dbwsdemoid=4000986
There are ELEVEN more days to earn an exclusive new Hostess Set called Good Greetings.  On top of the $50 in hostess benefits you receive with a $300 order, you get this versatile and appealing sentiments set FREE of charge.  It's an ideal time to spoil yourself, or get started on some Christmas shopping from the Annual Catalogue, Holiday Catalogue, Holiday Supplement Catalogue and not forgetting the Clearance Rack and My Digital Studio offerings.
Here are some excuses REASONS to place an order today...
1.  Teacher Gifts - very important - Term 4 will fly by!  I may be biased, but I think a good teacher deserves something with a bit of thought and effort put into it after a year of educating your children.   Rotary Stamps?  Card Kit?  MDS Printables? Something relaxing to make over the break?
2. Christmas Card Supplies - start now and you will have time to make your own cards, with love and care to go along with your end-of-year salutations.  Choose your colours, grab your cardstock and envelopes - maybe with a new stamp set to match?
3. Stocking treats - the Clearance Rack is a great place to start for Christmas sack bits and bobs - there are many versatile ideas hiding there just waiting to be turned into creative genius by kids of all ages - mini albums, customisable Simply Adorned jewellery and more.
4. Halloween - it's coming, and it's getting bigger every year!  Make some cute tags with a punch and a Halloween themed stamp set, attach to a lollipop and you'll score some serious playground Brownie Points.  Thinking of Halloween, the same applies for those end of year classmate treats.  Heaps of ideas await on Pinterest.

So, what are you waiting for?  It's the perfect time!  Click any of the text links, or the photo to Shop by Solution.


Christmas Bonus Catalogue Supplement starts TODAY!

There's never too much of a good thing - especially when we're talking about stamps and goodies for Christmas crafting.  Stampin' Up! have released a special supplement catalogue with extra products, available from 20th October.


https://www.mediafire.com/?kegag15dxjwkk82
Click the cover image to download your own PDF from my Mediafire Library, or visit my online store to shop - link here ONLINE SHOP

There are kits and gift ideas, as well as stamps and cute packaging solutions - time to get creating :-)

Sunday, 24 November 2013

Available for purchase - MDS Christmas Class - Learn and Create at the same time!


 The three cards shown here are all made with Stampin' Up!'s My Digital Studio Software, and were designed by me to include a range of different techniques, exploring the functionality of the program.  The cards use only the stamp sets and contents of the standard installation of the MDS software.  The class includes full written instructions to create each of these cards step by step, along with instructions for printing them to create an A4 page of each containing 4 card fronts.

You'll learn to use the program as you create, and will soon be zooming off to customise and modify, making new projects of your own.
The cost of the tutorial is just $15, and you'll be sent a file with the instructions after your payment has been received.    If you don't already own the software, are located within Australia and purchase it via my online store at this link HERE , I will post you a package of cardstock and envelopes to complete two of each card (six cards in total), with instructions for embellishing the cards for a handmade touch.

Payment can be made via Paypal with the address michelle.dyson@bigpond.com
Any questions?  Just email me at the same address!

Tuesday, 16 July 2013

Where has all the Christmas gone?

If you have been browsing the new 2013-14 Annual Catalogue, you might have noticed a distinct absence of all things Christmas-themed.  Never fear!  There are a range of stamps still available to order from the Autumn-Winter Catalogue (with the amazing ornament on the cover).  If you click on the image above, you will be taken to my Mediafire PDF page, just click the 'view' button, or choose 'download' to save to your computer for printing etc.  These will tide you over until we get our new Holiday Catalogue, which starts on August 29th, right in time for cranking up Christmas card production!

 There are two reasons for this move - firstly to make room in our main catalogue for a greater range of stamps and accessories for year round use, and secondly, to offer a wider selection of seasonal and holiday themed items in a separate catalogue.

There's more Halloween goodies inside, as we now have exactly the same selection as the USA.  Love it, or hate it, Halloween is growing in popularity here in Australia.  And, if you would rather make some cute treats hand-stamped with love rather than contribute to plastic commercialism and mass sugar overload, well now you can!  Hate it passionately?  No problem - many of the products make great masculine cards and gifts with a bit of a twist, which is always a good thing.

There's also a range of Thanksgiving-themed items.  I do wish that this tradition of being grateful for what we have, and gathering with friends and family to enjoy each others company WOULD take off in Australia!  It's a unifying occasion, something our multicultural society would benefit from.  We're also an agricultural nation, and would give us all an occasion to recognise the efforts of Australian farmers in providing us with such a bounty.  We're a lucky country, and a dedicated day to express our gratitude ahead of the avalanche of consumerism that Christmas has become would be welcome, in my opinion.  I also like the idea that Thanksgiving gifts, to friends, neighbours, volunteers etc are traditionally home-made, crafts of all kinds and baking.  I think we could all benefit from more of this!  Perhaps you'll join me, starting this year, in expressing our gratitude to those that fill our lives with happiness of all kinds.  Tell me what you think - I welcome your comments and observations below.
Thanksgiving is the great American unifier of holidays because unlike Christmas or Easter, it is something everyone can appreciate and participate in, precisely because it is not faith-based. It is also a holiday that has its roots in the acceptance of those with different religious views, as the settlers used the help of the non-Christian Native Americans in learning to work and harvest the land in this new country.  - See more at: http://secular.org/blogs/Lauren%20Youngblood?page=2#sthash.J2rOV9u5.dpuf

Saturday, 9 February 2013

It's BACK to SCHOOL time!


Yes, I know it's been a week or so now, but it's a busy time of year so I didn't post earlier.  Both my kids are happy back at school, Year 5 and Year 3 (oh no, it's DOUBLE NAPLAN this year)
I have also cleaned off lots of SD cards from my camera, and uploaded some pics - here's a couple of the "Teacher's Survival Kit" gift I made for one of my kids' teachers at the end of last year:
I 'upcycled' an old cricut cartridge box and used some mixed media type tricks to paint and alter it with patterned papers, paper napkins, shimmer sprays and more (Lou Nelson and Kate Mason would be proud of me I hope!)  It had a magnetic closure already, but by the time I added linings and layers of paper napkin, it wasn't working too well anymore!  So, I turbo charged it using a pair of incredibly small, incredibly STRONG magnets designed for holding corsages in place on clothing or glass vases.  I hid the one on the outside, using a Filigree designer brad (sadly retired now), and the partner was hidden away on the inside.

For the box contents, I drew upon my experience as a student teachers, and added the following:
Bandaids
Panadol
Vapordrops
Merit stickers
Erasable pens
Whiteboard markers
Opaque Marker for drawing on glass, desks, whiteboards etc  (removes with water!)
Rubber merit stamp
Stampin' Spot for inking up the stamp.

I also made a matching ornament using the same colours and papers:
 And the teacher in question liked it all :)  I guess it makes a nice change from mugs and chocolates?
Hope you like it!

In other news, I have set the date for the next Stampin' Crop - Saturday 23rd February from 10am-5pm.  Call 9484 9447 or text me 0403 175 790 to book your spot.

Monday, 17 December 2012

Stampin' Up! Cookie Stamps - A foolproof tutorial!


The fabulous Cookie Stamps in the Annual Catalogue and the Holiday Mini are lots of fun to use, and with a few little tips and tricks, anyone can create a perfect batch, first time!

Firstly - the recipe:
It's important to have a recipe that won't puff up too much during baking, as this spoils the imprint.
The cookie set comes with two recipes, and with a little tweaking I'm sure they are great.  However, who needs to be mucking around with conversion from sticks of butter to grams at this frazzled time of year?
Luckily, the recipe I tried first was a real winner, and here it is (with a few modifications from the recipe I found at Lovely Living)

Sugar Cookie Recipe - Australian Metric Measurements

250g of soft butter
1 cup white sugar
2 eggs
1 teaspoon of vanilla extract
3 1/4 cups  plain flour
1/2 teaspoon  baking powder
1/2 teaspoon  baking soda

 Cream the butter and sugar until light and fluffy using an electric mixer.

Add vanilla extract

Add eggs one at a time, mix well after each egg is added.

Sift flour, baking powder and baking soda in a separate bowl

Add sifted flour mix to the butter/sugar mix about half a cup at a time 

Continue mixing until the mixture forms a dough

Turn out of bowl and knead until smooth.

 Bag the ball of dough and refrigerate  - the fresh soft dough is too sticky and soft to work with

(amount of time varies with how rushed you are...  30 min at least, you can speed the process up a bit by flattening the ball and popping in the freezer a few minutes... )  Now is a good time to preheat the oven to 200degC, a little less for a Fan Forced oven.

 Pinch off balls of dough about the size of a 50c piece, place on tray covered with baking paper

Prepare a saucer of about half icing mixture and half cornflour

With the handle attached, grind the chosen stamp into the saucer, then flick the rim of the stamp to remove excess.  A bit messy, but saves lots of frustration!

Holding the stamp directly above the ball, centred as well as you can, smoosh it down firmly until the edges of the dough appear at the sides of the stamp

Use a finger to help separate the stamp and flattened cookie if needed.

Re-dust, repeat! 

The cookies do spread a little during baking, so be sure to allow some room.

Bake at 200degC for about 5 minutes, or slightly longer - you are aiming for golden on the edges without too much browning.

Cool on tray a few minutes then transfer to a wire rack to cool

Package up in gorgeous little bags like those in the Holiday Mini, and watch tummies rumble as you hand out these delicious gifts.


In a real hurry?? (like your daughter tells you she needs a plate to take for party day at 9pm the night before...)

Here's the quickest way to whip up a batch:  ALDI Christmas Gingerbread Cookie Mix (a whopping $1.99 if I recall correctly)


I got some of this to try for quick gingerbread men, but thought it was worth a try given the short time frame.  I decided to be scientific in my approach and just leave the recipe completely unchanged - all that needed to be added was an egg and a tablespoon of water, mix, then knead into a dough, ball up, and repeat as above with the cornflour/icing mixture.  Perfecto!  Good to know!


I hope that helps solve some of the kitchen dramas I've heard about, these stamps are so much fun they are worth a second try.  Let me know if you've got any other suggestions we can add to this tutorial.  Happy baking!

Tuesday, 11 December 2012

Stampin' Crop Day - the final one for 2012

Just a quick post to let you know the last Stampin' Crop Day will be held THIS SATURDAY 15th December
Time:  10am-5pm
Where:  My place @ Cherrybrook
Cost: $15 for the day including bottomless tea/coffee, grazing lunch, use of my stamps, tools and casual instruction.
What to bring:  A plate of Christmas goodies if you feel so inclined (optional!), your basic stampin tools such as trimmer, any projects you've got in progress


RSVP:  Essential!  Please call or text me at 0403 175 790 so I can prepare enough spaces and treats!

The rush of pics is the set of 5 cards we made in the last Card Class, simple and fast!  Don't you wish you came now??  LOL :D 
Also, the final pic is to remind me to tell you about my find at Aldi.  The gingerbread man mix they have there (I think it's a whopping $1.99) makes PERFECT Stampin Cookies, as per pack instructions.  I think there was one egg and a tablespoon of water, then mix into a dough.  The patterns came out sharply, and stayed after baking,  not to mention they tasted pretty yummo too!  Super fast and easy - and we can all do with some of that this time of year...

Wednesday, 31 October 2012

Christmas Ornament Class - Tuesday 6th November

 +
+
 +
=

The stunning ornament from the front cover of the current "Holiday Catalogue" is not difficult to make, when you are shown how!  Come along to my class next Tuesday 6th November and make one to take home.  These make a great 'more than a card' gift, and I'll show you how you can make it into a gift or bottle tag that can then go onto your lucky recipient's tree!

Class:  Tuesday 6th November, 7.30 -9.30pm
Cost:  $15 includes tuition and materials, and use of my tools and equiment to complete at least one large ornament.
Bring: yourself!

Ideally, eat dinner before you arrive, but I hope to find time to bake some Christmas themed yummies as well.

Places are limited, so please call me 0403 175 790 to book a spot.  For attendees of the class, I will have a special offer on the purchase of the Holiday Keepsakes bundle so you can go forth and make many gorgeous ornaments, wreaths, place markers, cards and more!


Christmas Quickies Card Class - tomorrow night

 +
 +
=
??????

We'll be making 20 cards with envelopes, using the Whisper White Notecards pack, half a pack of Letters to Santa Quick Accents adhesive diecuts, sections of Letters to Santa Designer Series Paper, and ribbon and cardstock for embellishment.  The cards are designed to complete quickly, for a clean and uncluttered look - just the ticket for the crafty but time-poor!

Class:  Thursday 1st November, 7.30pm - 10pm
Cost:  $30 includes tuition, all materials and adhesives
Bring: Your favourite trimmer if you have one 
(less frustrating than figuring out someone else's, but not essential - there are several here)
Ideally, eat dinner before you arrive, but there is sure to be snacky food on hand when the munchies strike!)
There are two places left available in the class, so call me 0403 175 790 to book if you are interested!  
 

Monday, 15 October 2012

Stampin' Crop Days and a Christmas Quickies Class


There are three new events in the StampInkPaper calendar!
After almost two months without a formal Stampin' Crop due to pesky and time-consuming uni/teaching stuff, we're all set to go again for October and November.  I've also scheduled the first of my Christmas classes for the year. 

Details for Stampin' Crops are as usual -
Bring your own basic tools and projects to work on - anything you've got on the go.
Bring a plate to share if you like!  (optional of course)
Any time from 10am-5pm
Cost is $15 which includes use of my stamps, Bigshot, extensive selection of dies, punches, bottomless tea and coffee and casual instruction.

Final details such as design sneak peeks and cost are yet to come, but save the date for Thursday 1st November, 7.30 - 10pm.  We'll be making a big batch of cards using the Letters to Santa DSP and matching Quick Accents adhesive diecuts from the last catalogue, with Whisper White notecards and envelopes as a base.  Cost for the class will include tuition and all materials including adhesives.

Also, I'm planning a class showing you how to make the fabulous ornament from the front cover of the Holiday Mini - it works beautifully as that "more than a card, but not an all-out gift" occasion.  They can be used as a bottle tag, and then go onto the tree!   Please reply below if this sounds like something you'd like to do.

Finally, check out the looooongggg list of stamp sets for sale below, and also my stamped sugar cookies at the top!  This was my very first attempt at baking with the new Cookie Stamps - it was so easy, and so much fun!  There are a few tricks I can share about making them, so if you would like a copy of the recipe I used and a cheat sheet for great results, sign up to my newsletter on my DBWS and put "mmmm  cookie... nom nom" in the comments box!  Yes, Cookie Monster is my all-time favourite Sesame Street Character :)  The card below the edible cookies was made by my talented team member, Clare McIlhatton - so cute!

Thursday, 9 August 2012

Still plenty to choose from, but some items are gone gone gone - don't delay!

Stampin' Scrub Replacement Pads
Peach Parfait ink refill
Dotto refill
Concord Crush ink refill
More Mustard Marker
3/16" Gold Brads
Pear Pizzazz ink refill
Poppy Parade ink refill
Stack & Store Containers
Circle cutter replacement blades
Christmas Greetings stamp
Confetti White CS A4
Blushing Bride ink refill
Blushing Bride CS
5-petal flower punch
Color Caddy Extender Kit
Stampin' Around Wheel Storage - Standard size

Super dooper bargains - Selected fabric packs - Candy Cane Christmas and Deck the Halls are just $4.99 each - save 75%!  Make a quilt, make pencil cases, make a twirly skirt for a little girl in your life!  Lots of fun projects out there - just like the stamp sets you can even google with the fabric name to get ideas galore - here are just a couple of ideas I found in a super quick look today.  Shh, supposed to be working right now, but given I was up until midnight making beautiful lesson plans, I think 5 minutes is warranted!!


Wednesday, 19 October 2011

French Foliage and some Rock n Roll

Well, not exactly rock n roll for the recipient, he's just turned 80, but I did use the technique on the card here to achieve a multicoloured autumnal effect on the leaves.  I started by pulling out the Cajun Craze, More Mustard, and every shade of brown in the caddy from Sahara Sand to Early Espresso.  Starting with the palest colours of each, I then daubered or rolled the stamps onto the other colours to add highlights.  The base is Crumb Cake with the fantastically useful water splodge stamp, followed by a Confetti Cream layer stamped with the script background.  This is shredded a bit with the Cutter Kit distressing tool.  Next after that there is a scrunched up and shimmer-misted piece of Early Espresso and then a layer of Very Vanilla for the stamped panel.  A bit of hemp twine and Early Espresso grosgrain finish it off, along with a sentiment from Teeny Tiny Sentiments on a Modern Label punchie.  Some layers of the stamped panel have been popped up as a second layer with Stampin' Dimensionals and I have also added some drips of Crystal Effects on the leaves to give the effect of water droplets but these are a bit hard to see!

Off to find the other SD card with more pics on it - why do they have to make those things so gosh-darn small !  It's on my desk, somewhere!  I do need to declutter away the research papers on dyslexia and metamemory, having submitted the last of my assignments for the year (woohoo!) - just 2 exams to go and then from the beginning of next year I'll be on prac placement (watch out kids!) so maybe I'll uncover it shortly...

As I have a little time a little free-er than usual, I am hosting a "Get Ready for Christmas" Stamp-a-Stack event at my house on Saturday 22nd October.

10:00 AM - 5:00 PM  (AET)

 Mega Christmas Preparation Event!
A great opportunity to get started on your stash of Christmas cards for the year with much of the hard work done for you. You'll make 12 cards, 6 each in two different designs, and a set of 12 gift tags.
Everything is provided for you - pre-cut cardstock, all materials and embellishments, adhesive and envelopes for the cards.
The class will be set up so you can construct the cards in an assembly-line format, with full instructions to create more later if you wish.
The class runs for the whole day, so you can choose to come in the morning or the afternoon, or stay all day and make more Christmas projects of your choice.
The cost of the class is $25 and places are limited to ensure individual attention. Please give me a call if you'd like to book a seat, on 9484 9447 or 0403 175 790, or email me.

There are one or two spots free, please  ASAP call if you'd like to nab one!

Saturday, 1 October 2011

Christmas Events Galore!

It's a Christmas Countdown - Click on the image below if you dare!  (eeeekkkk!)


I'm determined to be ready this year - really, I am!!  (I think I say this every year but still somehow manage to have it sneak up on me - really, how DID it get to be October already??)

Here's the go - several events for your diaries, feel free to make one or all of them!

STAMPIN' CROP DAY


8 OCT 10:00 AM - 5:00 PM (AET)

Great timing for Christmas Preparation - come along to my Stampin' Crop day NEXT Saturday, 8th October from 10am-5pm (or any time inbetween to suit you!)

Cost is $15 for a day of crafting with great company, lots of tools and stamps and inspiration galore. Includes bottomless tea, coffee and a light snack style lunch.

Pre-order your requirements now, or bring your projects you wish to work on!


CHRISTMAS PREPARATION STAMP-A-STACK #1


22 OCT 10:00 AM - 5:00 PM (AET)

Mega Christmas Preparation Event!

A great opportunity to get started on your stash of Christmas cards for the year with much of the hard work done for you. You'll make 12 cards, 6 each in two different designs, and a set of 12 gift tags.

Everything is provided for you - pre-cut cardstock, all materials and embellishments, adhesive and envelopes for the cards.

The class will be set up so you can construct the cards in an assembly-line format, with full instructions to create more later if you wish.

The class runs for the whole day, so you can choose to come in the morning or the afternoon, or stay all day and make more Christmas projects of your choice.

The cost of the class is $25 and places are limited to ensure individual attention. Please give me a call if you'd like to book a seat
 
CHRISTMAS PREPARATION STAMP-A-STACK #2


12 NOV 10:00 AM - 5:00 PM (AET)

Another Mega Christmas Preparation Event!  Come along for a DIFFERENT set of cards to make!

A great opportunity to make more Christmas cards for the year with much of the hard work done for you. You'll make 12 cards, 6 each in two different designs, and a set of 12 gift tags (different designs from last month's Stamp-a-Stack)

Everything is provided for you - pre-cut cardstock, all materials and embellishments, adhesive and envelopes for the cards.

The class will be set up so you can construct the cards in an assembly-line format, with full instructions to create more later if you wish.

The class runs for the whole day, so you can choose to come in the morning or the afternoon, or stay all day and make more Christmas projects of your choice.

The cost of the class is $25 and places are limited to ensure individual attention. Please give me a call if you'd like to book a seat, on

Free stamps and punch! Book your Christmas Prep workshop NOW!


What a great promotion, and what great timing!
Everyone wins with the latest treats from Stampin' Up!
Firstly, you can purchase the Stitched Stockings stamp set and the co-ordinating Stockin Tag punch, which will be appearing in the upcoming Summer Mini catalogue, EARLY!  Just in time for getting those Christmas cards made!  The Summer Mini doesn't start until December 1st, so don't miss the opportunity!  You can click on the image above to see the PDF of the offer, with prices and codes.  I've already seen quite a few other ideas for this punch, from sock puppets to Hobby Horses and reindeer, and it also makes the quickest and easiest Christmas Gift tags you can imagine!

Or - get the festive season off to a great start with you and your friends at your very own Get Ready for Christmas workshop - and earn the stamp set AND the punch, for FREE!  with workshop sales of just $450.  That's up to $92.30 worth of products, free, in addition to your usual Hostess Benefits of $60 to spend in the catalogue, in the Hostess Gallery or anywhere else you like.

When:  This promo runs from 1st October to 31st October
How:
  • Call me to place your order for the punch, stamp set or both     OR
  • Place a $450 oder to receive them free!
  • Book your workshop to get yourself and your friends all sorted for Christmas
  • Host a Catalogue Party by collecting orders from friends to the value of $450
I have selected dates and times available for special "Get Ready for Christmas" themed workshops, please give me a call to book, 

Monday, 25 July 2011

Welcome Christmas in Winter with the Inklings Blog Hop!


Welcome to the INKlings "Christmas in Winter" Blog Hop!

You may have arrived here from  Vanessa's blog or just be visiting my blog, whichever way once you’ve checked out my creations you can continue the hop through the link at the end of this post to the next team member.

How quick is this year going! Have you started to think about your Christmas cards and projects yet? The INKlings team has and we thought that this month was the perfect time to host a Christmas in July blog hop. You'll find lots of great ideas when you take a tour of the blogs of 15 of our crafty team members.

Want to win some Blog Candy? Simply leave a comment on each blog and then email Clare and let her know you’ve done so and you’ll be in the running for a fantastic prize of 15 handmade items plus other goodies.

Sorry Blog Candy prize not available to SU! demonstrators but you're more than welcome to leave us a comment!

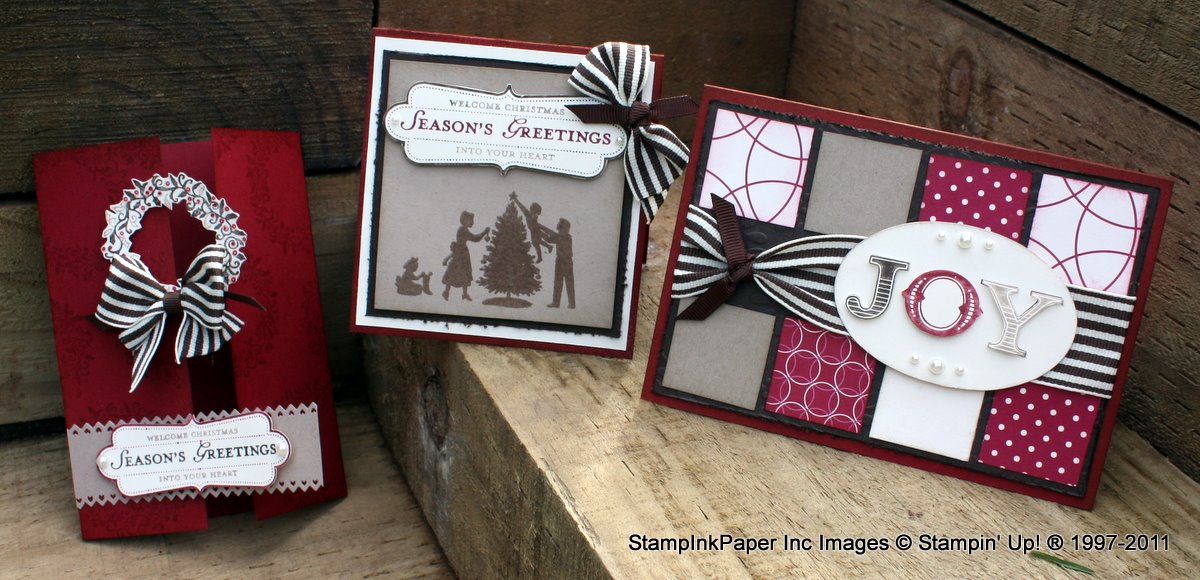
My projects use the delightful stamp set, "Welcome Christmas".  You can find it on page 26 of the Idea Book and Catalogue, 121584 $49.95 in woodmount, and 120597 $39.95 in clear mount.  It has a variety of images, so I find it quite versatile.  I've made three different cards with it, and some gift tags are under construction - you may have to come back another time to see those!  I've stuck to a simple palette of Crumb Cake, Cherry Cobbler, Early Espresso and Very Vanilla, and have used our Basics Adhesive Pearls and 1 1/4" striped grosgrain ribbon for embellishment on each of the three cards.


Card one is a 1/3 sheet card, so it's a good choice for a gift card, or if you have several squillion people on your Christmas card list.  It is quite suited to production en masse, and is the kind of card you could make while watching a DVD in the evenings.

The card base is Cherry Cobbler (oooh YUM!), and I have inked the edges and given it a good squirt with my DIY Shimmer Mist (you can click HERE for a tutorial I did earlier on this).  Next is a layer of Very Vanilla, cut just 1/4" smaller on each side for neat layering.  Then there is a layer of Early Espresso, my new favourite brown.  I've roughed up the edges with my trusty distressing tool from the Cutter Kit here.  (tip - you need this tool if your trimmer cuts tend towards the wonky, it masks a multitude of sins...)  More squirting with shimmer here too. 

Then, a Crumb Cake layer, sponged on the edges, and clear embossed using Versamark ink and the lovely silhouette style Christmas tree family stamp.  The label stamp is part of the set, and I have simply inked it with markers in Cherry Cobbler, Early Espresso and Crumb Cake, and stamped onto Very Vanilla.  It looks fiddly and time consuming, but it's faster and easier than you'd think.

I've added some Basics Pearls and some Stampin Dimensionals behind this to give it some lift from the front of the card.  To finish, I have used some of the extra wide stripy Grosgrain ribbon in matching Early Espresso.  When I first saw this wide ribbon, I thought "what the!" , thinking it would take masses of ribbon to make something on the right scale.  I've since discovered that there are several ways to use this wide ribbon on a card, and with pretty small pieces too.  Here I have taken a short snip, approximately 8-10cm, and have folded in half-ish (deliberately not evenly).  The centre is secured with a short piece of Early Espresso narrow grosgrain, and it's attached with a mini glue dot (or two for good measure).  Ta da!  Done!


Card 2 is a standard landscape orientation A5 fold, and again I have used Cherry Cobbler as the card base.  Then, a layer of Early Espresso cut 1/2" smaller is layered on this (and I've used the edge distressing tool again)  Before I distressed and attached it, I ran it through the Big Shot using the Finial Press Embossing Folder, you can see a peek of this behind where the ribbon is tied. The squares are cut from Very Vanilla, Crumb Cake, and Jolly Holiday DSP using the 1 1/4" square punch,  and inked the edges before attaching them to the Espresso panel.  Here's another way of using the wide ribbon, as a band across the centre, but tied at one point with matching narrow ribbon.  The "joy" sentiment is from the set, and I have stamped it twice, cutting a second layer of letters out for a dimensional effect.  I cut the oval using the Oval Big Shot Sizzix originals die, a great choice when you need more room than a punch.  It's dressed up with a few more pearls, and attached with Stampin' Dimensionals.


The final card in the trio is a Gate Fold A5 card.  The card base is Cherry Cobbler, and I have inked the edges and stamped with the gorgeous wreath stamp in matching ink all over the base.  The wreath was stamped again ont Very Vanilla after using markers in Cherry Cobbler, Early Espresso and Crumb Cake to pick out the berries and open leaves for some colour variation.  I then trimmed around it carefully, but for speed and ease of production, you could simply leave it as a stamped panel.  The "bow" is not really a bow - yet another way of using a small bit of wide ribbon for maximum effect.  it's about 15cm, bunched into two loops and secured with a needle and thread around the middle to stop it from springing apart.  I used my lighter portable miniature flame throwing tool to seal the ends of the ribbon on all these projects.  Never was a smoker really, but I will be mighty annoyed if these end up on a banned list sometime in the future!  I wrapped more Early Espresso narrow grosgrain around the centre, and the tails can be seen peeking through from the back for extra effect.  On the trimmed out wreath, I used some dots of Crystal Effects dimensional gloss adhesive to highlight the berries, but perhaps I should have used glitter, you'd be able to see it better in the pic!  The wreath is attached to only the left side of the gatefold, so you can still open the card in the normal way.  The same effect is used for the greeting and band, in Crumb Cake, and edged with the Pinking Hearts punch.  This punch appeared in the Summer Mini, but it is thankfully still available, and I am liking it more and more! The sentiment label was made as above for Card 1, and attached with Stampin Dimensionals and some blingy pearls attached.

I hope you have enjoyed looking at my projects, please don't be shy in asking a question about how I have done something, I love questions!  I will be running some Christmas Card Stamp-a-Stacks between now and the end of the year, you can sign up for my newsletter or follow my blog to be kept informed.

Well that’s all from me. Next stop on the INKlings’ Team Blog Hop is the lovely
Ryn Gibbs. Have fun and don't forget to leave a comment on each blog to win some great Blog Candy.

If for any reason you find a missing link on the blog hop head back here to find links to all the members taking part.   After the blog hop is over, I'll pop back in here to convert these to permalinks to the actual Blog Hop posts, so you will be able to do it all over again for inspiration later on!

1. Clare http://www.crafty-cow.com
2. Janice http://www.janicespencer.blogspot.com
3. Christie http://www.christiescreativecorner.blogspot.com
4. Kari http://www.karigail.wordpress.com
5. Joanna http://www.joannawassens.com
6. Michelle http://stampinground.wordpress.com
7. Alana http://www.alanagalagher.blogspot.com
8. Carol http://www.inkantations-and-inkarnations.blogspot.com
9. Cath http://cathdeanpapercraft.blogspot.com
10. Amy http://amyandersonsblog.blogspot.com
11. Vanessa http://stampness.blogspot.com
12. Michelle D http://stampinkpaper.blogspot.com
13. Ryn http://rynscraps.blogspot.com
14. Fiona B http://fionajanestamping.blogspot.com
15. Liz Halbisch http://lizhalbisch.blogspot.com

Friday, 22 July 2011

Get Ready for the Inklings "Christmas in Winter" bloghop!


It's time to get your thinking caps on, and gather some inspiration for your Christmas Projects!
Starting Monday 25th July at noon, you can take a tour of blogs where Inklings team members have posted some gorgeous projects to inspire you!  There will be blog candy on offer, so make a note in your diary, snuggle up with a notepad and hot cocoa, and get into the spirit of Christmas in Winter!

Friday, 11 February 2011

Ooops! A VERY early Christmas project - Wooden Advent Calendar wth Ski Slope and Welcome Christmas

Oh dear, it's been a lot longer between posts than I intended.  Life has intervened, with two kids starting school for the year, and myself just about to start back at uni after a long break from study.  I've lots of things on my 'to do' list before my course starts, but posting here wasn't at the top of the list, sorry!

So, without further ado, I present a project that is either:
a) very early for Christmas 2011 (because I'm SO organised!)
or


b) so late that you won't even look at it!

Hopefully you'll choose option A!


I used a wooden Advent Calendar kit, and decorated it with the (now retired) Ski Slope Designer Series Papers.  Probably the biggest trick to assembling the pieces is to ignore the advice regarding painting first.  Assemble first!!  Yes, painting might be slightly more time consuming, but not as time consuming (or frustrating) as needing to sand back all the pieces before they'd fit!!!

The little drawers are covered in strips of DSP, and then decorated with rhinestones and Early Espresso marker doodle borders.  I painted the chipboard numbers in colours I blended to match Chocolate Chip, Riding Hood red and Kiwi Kiss.  The beauty of the SU DSPs is that the patterns and colours co-ordinate so well, and the double sided patterns make it a snap to use little offcuts and strips to vary the look.
I sponged the edges of the raw chipboard drawers with Chocolate Chip ink also, to take away the grey look.  The wooden snowflakes were coated in Tombow Multi glue and covered with our Supernova and Galaxy microfine glitters.  So Sparkly!!  I attached them to the frame with mini Glue dots.

The back of the calendar is covered with a 12x12 sheet of textured cardstock in Riding Hood Red, and I used strips of a red Ski Slope DSP to make a border.  I chose a Baja Breeze print Ski Slope DSP for the front window background.  I didn't stick in the page, as I wanted to be able to re-do one with each year's christmas tree kid pic.

The page is 8x8", on Baja Breeze textured cardstock.  I used the "So Swirly" wheel to decorate one edge, and sponged the other sides with Baja ink.  The photo is matted on Old Olive, with a border made with the Scallop Trim border punch.  A strip of Real Red cardstock is at one side, with faux stitching made with the Mat Pack kit and white gel pen.  Under the other side of the photo I used strips of Ski Slope paper cut into banner shapes.  The "Christmas" stamp is from Basic Phrases, and the "Joy" is from Welcome Christmas,  I stamped in Marina Mist, but it still wasn't 'popping' from the background as well as I'd like, so I traced around with the white gel pen to match the stitching doodles.  A snowflake from Snow Swirled was stamped in Whisper White Craft ink and punched out with the scallop circle, and I stamped the ornaments from the Tree Trimmings set in Chocolate Chip, Baja Breeze, Real Red and Old Olive, mounting them on dimensionals and drawing 'strings' in with more gel pen.

The finishing touches were the drawer contents, but they are all long gone!!!  The little drawers are a good size to put praline chocolate balls and mini chocolate santa figures (I got mine from Aldi because I love their Moser Roth choc balls!)  You could probably squeeze in about 6 balls.

Hope you like, I am looking forward to bringing it out again for this coming Christmas, and making a new insert page with my cherubs.

Back again  soon!  (sooner than last time I promise!!)

Thursday, 30 December 2010

Gold Medal for exemplary customer service awarded to " Pink Poppy "


I am very much a believer in excellent customer service, and it is something I try hard to provide myself.  However, every now and again, I come across service that goes so far above and beyond the norm that I feel proud to bestow my thanks in as public a way as possible - hence this unusual blog post:

The back-story - On Christmas afternoon my 9yo son unwrapped a gift from his auntie, which included a cool animal shaped "Balloon Ball Buddy"  Miss Soon To Be 6 also received one.  Of the assorted treasures they received, these toys were the most captivating, and were quickly extricated from their packaging and inflated.  For a short few minutes, there was much amusement and pleasure, but then Master 9's tore apart under very moderate inflation.  There were tears, quite a few of them, wrapped in much disappointment.  Miss STB6 very graciously offered to stem the flow by telling Master 9 that she would share hers with him, although she was now anxious that her toy would suffer the same fate.  I offered that I would try and find him a replacement as soon as possible, and so as not to forget, and before the packaging could be binned, I sent off an email explaining the story above to the distributor address on the packaging,  Yipose Trading Company P/L, who are most commonly known as "Pink Poppy" , purveyor of all things pink and girly.  You've almost certainly seen their stands of hair clips and bows and similar goodies on your shopping adventures, but I'd never seen the balloon toys before.

Scroll forward to 9am Boxing Day morning, when the doorbell sounds.  Expecting to find neigbouring children keen to play, imagine my stunned amazement to find a representative from Pink Poppy, with not one, but TWO replacement "Ball Buddies", and an additional gift for both Master 9 and Miss STB6 of a cool 'projector' pen, and a sturdy kid-sized shopping bag to boot.  There were a few more tears, of happiness this time, along with profuse thanks.  Mere hours after sending the enquiry, on a traditional family day, where no one would be expected to read work-related emails, let alone act upon them.  Quite simply amazing!

I am so very impressed at the speed and thoughtfullness with which the drama was resolved, and would like to congratulate the people responsible for their excellent service.  You certainly made our day, and restored a little faith in the commercial world as well.  A very well deserved "StampInkPaper Gold Medal of Service " is hereby bestowed upon you!  If you're reading this and have an outlet that suits their range, perhaps you should check them out as a supplier!!