Saturday, 29 May 2010

Very Distressed, Very Vintage, Very Vogue!

This card is a CASE from one I found on Splitcoast Stampers, made by Sage Kimble


I changed the colours a little, using the delectable Soft Suede cardstock, combined with layers of Confetti Cream.  The base layer has been stamped with "Sanded" background.  The next two layers are Confetti Cream, but stamped in different colours - Soft Suede for the bottom layer and Sahara Sand for the top.  They started out as plain rectangular pieces, and I stamped first with the "Very Vintage" Stampin' Around jumbo wheel before attacking them madly!  It was very therapeutic!  I misted them (from the reverse side) with water, and scrunched until the pieces were soft and pliable, like fabric.  Our Confetti Cream and Confetti White are ideal for this technique, as they are a heavy weight hand-made style cardstock with long paper fibres,

I flattened the pieces out and swiped/sponged some extra patches of colour, Creamy Caramel, Soft Suede, Sahara Sand to highlight some of the creased areas, adding to the aged/vintage effect.  The top, slightly smaller layer was positioned over the lower layer, and I hand-teared the right hand side away, rolling the edge to create even more texture.

The flower accent was stamped using "Vintage Vogue" in Soft Suede ink onto both Confetti Cream and Soft Suede cardstock, then cut out, ruffled slightly and assembled with an Antique Brass "Build a Brad"  At the bottom, some Kraft taffeta ribbon is tied with some Linen thread and some more "Vintage Vogue" elements, a leaf and small flower with an Antique Brass brad to secure.

The inconspicuous greeting was stamped on a piece of Confetti Cream using the "Tiny Tags" stamp set, punched with the Jewelry tag punch, and tied on to a Corduroy button.  Sage has used a Kraft button, a colour we don't (yet?) have, so I used a retired Kiwi Kiss button, and bleached the colour out using liquid bleach.  I sponged it over with Sahara Sand ink and a touch of Soft Suede to get a good match.

I loved making this card, I hope you like the effect!  I have also made a variation on this card, that I like even more - perhaps I'll post that one next?

Wednesday, 26 May 2010

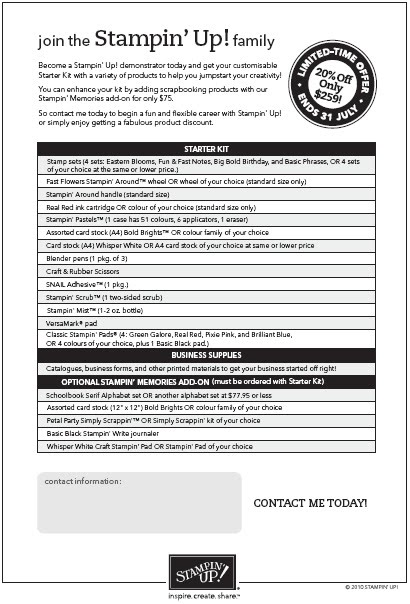
The time is..... NOW! Joining Special - save more than 50% off retail prices!


It's never been a better time to join my StampInkPaper team of Stampin' Up! Demonstrators.
Between now and JULY 31st, you can get started on your own profitable business from as little as $259
The Starter Kit contains products valued at over $560, so this represents a more than 50% discount on retail prices, the Starter Kit has never represented better value!
The Standard kit contains everything you need to begin your business, but it is also highly customisable.  There are 4 stamp sets, and you can select alternate sets to suit your tastes (up to the same or lower value per set) .  You can choose which colour family cardstock, which colour inkpads, which Stampin' Around wheel and cartridge etc.  Should you choose to add the fabulous "Stampin' Memories" kit for an extra $75, you will receive a further $150 worth of products, including 12x12 cardstock, an alphabet stamp set, Simply Scrappin kit and more.
Click HERE for the fine details listing what comes in your Starter Kit.

This offer is just ideal if you have been pondering this opportunity for a while - there is absolutely nothing to lose!  The only ongoing requirement to remain as an active demonstrator is to place orders totalling $550 (catalogue value) in each Stampin' Up! quarter.  Everything else is up to you - from building your own team and generating real income, to self-funding your passion for stamping and papercrafts.  IMAGINE that!  Guilt free purchases of as many stamp sets, accessories and more, knowing it has all been paid for by your very own Stampin' Up! Demonstrator business.  It's a very nice feeling, I can attest to that myself!

As your Upline, I offer you a unique combination of access to some of the largest Demonstrator team forums while maintaining individualised attention to my team members.  Please feel free to contact any of my downline team - Carolyn Gibbs, Clare McIllhatton or Kay Jacob to ask them if I am the right upline for you.

So - get out that wishlist, grab the catalogue, think about where this could take you, and CONTACT ME for more information.  You can even sign up online in around 30 minutes, with your ABN and Starter Kit order ready to go.  Simply visit my Demonstrator Business Website at http://michelledyson.stampinup.net/ and click on the "join now" button.  My Recruiter Authorisation Password is: ciaran  You'll soon receive your Stampin' Up! Demonstrator ID, and some emails to log you into the Stampin' Up! Demonstrator website.  You can then get started placing orders right away!

The next few months with Stampin' Up! will see the release of a new Idea Book and Catalogue with lots of new products and stamp sets, a new Online Discussion forum called "Stampin' Connection, a Colour Renovation and more - join now and you'll be ideally placed to take advantage of customer excitement and start making your Stampin' Passion pay for itself and more!

Monday, 24 May 2010

Convention - what a blast!!!!!

Phew!  I overslept this morning after a HUUUUUGEEE weekend of being inspired, creating and sharing.  But, the kids were duly shuttled through morning routine and onto the bus in record time.

Stampin' Up Convention 2010 was the best event so far - and they have all been great, so that's a pretty good rating!  The perfect mix of stamping, creating and business stuff (which still manages to be energising and inspiring!)

Just a quick post right now, hopefully I'll be back later when I've done some unpacking and photography, but I wanted to show you my swap card.  I was pleased with it, and judging by the rate at which they flew out of my swap box, I think others loved it too!

The card base is Old Olive, cut using the Scallop Circle Big Shot die, using a folded piece of A5 cardstock.  The fold is positioned just on the inside of the cutting lines on the die, to create a hinge rather than two scallop circles.  I used the "Very Vintage" Stampin' Around wheel to ink up the background (so fast, using an Old Olive cartridge inserted), and sponged the edges too.

 Next up is a So Saffron circle, cut on my Circle Scissor.  So easy!  Yes, EASY!  So easy that my hubby was able to cut me a few more all on his own, to bring to the Awards Dinner, so I could assemble a few extra.  I didn't even need to talk him through it, cool hey!


OK, after the So Saffron circle there is a Not Quite Navy circle, also cut on the Circle Scissor.  This layer is stamped with the totally GORGEOUS Pendant Park Tree, and edges sponged as usual for definition.  The Owl stamp is from the "Fox and Friends" set, so versatile.  I inked him up with More Mustard, and used my Chocolate Chip marker to add some accents to his ears, eyes, wing and belly feathers.  He is stamped onto a 1 3/4" circle of Confetti Cream, to become a 'moon' behind him.  Of course he needs something to sit on, and what better that the branch from the 2 Step Bird Punch, cut from Old Olive.

 To finish, you could stamp anything you liked on a scallop circle, word window or other punch, but I used the word 'hoot!' from the Owl Together Now stamp set, punched with the Jewelry tag punch and tied on with a bit of Linen Thread.  Hope you like! 

Back soon with some exciting news about joining my Stampin' Up! team - there is a fabulous deal to sign up between NOW and 31st July.   So, take out your wishlist, check out the standard kit on the inside back cover, and start IMAGINING where you could take your own, flexible and fun business or hobby.  To Convention in Melbourne next year perhaps??  Stay tuned...