Friday 29 October 2010

Punch Art Blog Hop - tutorials and samples galore!

Hello and welcome to the inaugural South Pacific punch art blog hop!!!


We are a bunch of Stampin Up demonstrators from New Zealand and Australia who love our Stampin' Up! punches. We have gotten together to showcase a selection of the punches you can purchase from Stampin' Up!. We know we will inspire you and encourage you to use those punches in new and beautiful ways. Please leave a comment and let us know what you think to go in the draw to win some yummy scrummy punch art blog candy (sorry, offer not available to su demos, but you're most welcome to leave a comment!).

Here's the list in case you get lost, you can start wherever you like, but to enter the Blog Candy Draw you must comment on all 15 blogs.

1. 2-step Bird  and Word Window - Karen Southwell - http://www.kareniescrafts.blogspot.com/ 


2. Petal card Double Punch - Carol-Ann Torrie http://queen-of-scraps.blogspot.com/

3. Fancy Flower - Sally Williams - http://www.sallycancraft.com/

4.  2 step Owl - Julia Leece - http://www.juliascards.blogspot.com/

5 XL Tag - Amy  http://ladybugsanddaisychains.blogspot.com/

6 Round tab  - Melissa Davies http://beedevinedesigns.blogspot.com/

7 Modern Label  - Michelle Dyson http://stampinkpaper.blogspot.com/2010/10/punch-art-blog-hop-tutorials-and.html

8 Jewellry tag medium, Boho Blossoms, 5 petal flower- clare mcilhatton http://www.crafty-cow.com/

9 Heart small , Scallop Square, Heart to Heart , Full Heart- Lisa Bullock http://daffyscrapper.wordpress.com/

10 Ovals - Pauline Bennetts - http://www.paulinebennetts.com/stampede

11 Butterfly - Tia Routledge  http://craftingwithtia.weebly.com/my-blog.html

12  Circle punches -  Emma Kirton  - http://www.emmakirton.blogspot.com/

13 Ornament - Angie Jones - http://angiescraftfusion.blogspot.com/

14 Scallop trim border and corner- Andrea Buckland http://creatingcardswithandrea.blogspot.com/
15 Eyelet border - Steph Gray http://stampinsteph.wordpress.com/


OK, I'm No 7 on the list, Michelle Dyson. You may have come here from Melissa Davies' blog or just be stopping by here randomly.  I've chosen the delectable "Modern Label" punch, which I affectionately term the "dog bone" because of it's shape.  Like the Word Window punch, it's a must have for adding sentiments neatly, but it's even more useful for the slightly larger and longer sentiments that can look a bit squished in the Word Window.  But hey, you *need* both of them anyway!! LOL :)  My projects also use a few other punches you may recognise, and will probably see more of as you hop through the tour! 

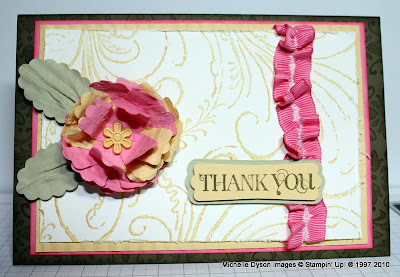
Here's my project, and a little tutorial about a neat trick using the Magnetic Movers and Shapers Moveable Pieces to co-ordinate with your punches.


Many of our Stampin' Up! punches can be used to create pretty 3D layered flowers, but this one has a nice cottage-y look, reminding me of a paeony flower.

The first step is to punch multiple Modern Label shapes from cardstock of your choice.  I have used So Saffron and Regal Rose, but you can stick to a single colour, or choose any other you like.


Next, I've folded them in half and used my Paper Snips to cut little diagonal snips from the middle fold, to give the 'petals' a waist, so to speak.  I've also punched a Circle Scallop to use as the base of the flower, this helps to keep it all together.

Next step is to make the cardstock flexible enough to split apart into layers, the "suede-ing' technique.  You can scrunch by hand, but that takes a while. If you have a Crimper tool (sort of like a punch in it's usefulness!), you can soften multiple punched shapes at once, and it's much easier on the hands too.  Roll the punchies back and forth through the Crimper, not quite all the way so they fall out.  Then eject them and put them back in at a 90 degree angle, and repeat.  This is breaking down the paper fibres and before long you will see the layers of paper making up the cardstock start to separate, like below.


Now it will be quite easy to peel apart the layers, producing two sides, with a soft, suede-like surface.
   It's a good idea to make lots, as there will be some casualties during the separation process.


I used my paper piercing tool and Mat Pack foam mat to poke a hole in the centre of each petal, and threaded them onto a Flower Brad.  You can twist the petals around gently to arrange them how you like once they are on the brad spike. 

Almost finished flower, with ruffled petals.

I did a little tutorial a few posts ago on this blog, showing how easy it is to create your own shimmer mist using our Shimmer Paint.  I tracked down some unscented Isopropanol (Rubbing Alcohol, Isocol) from my local pharmacy, good news for those of us with sensitivities to perfume!  I used the Champagne Mist colour to spray my flower.  The alcohol evaporates very quickly, but while it is damp you can shape and mould the flower

 Ta-da!!!  You can see the dampness and the shimmer.
 Here is another little trick, making ruffled ribbon.  It works with most ribbons, this one is wide grosgrain.  Make a small snip in the centre of one end, and draw out a thread (only one or two strands, or it will be too hard to pull on)


It helps if you fold over the other end, and either stitch or staple it, to help prevent the thread pulling all the way out.  Ease the ruffles along the length.  You will need to start with a length of ribbon at least two and a half times the finished length you want.
Use Sticky Strip tape to secure the ruffled piece on the card, and press down to hold in place. No need to remove the staples, they'll be hidden on the back.

So, here are the tools I used and the finished project.  That little purple and black block is the Movers and Shapers piece that matches the Modern Label punch, see below for the cool (and economical!) trick!
 
The card base is Soft Suede, and I used the Decor Stampin' Around wheel to roll Soft Suede ink around the perimeter.  Next there is a layer of Regal Rose with sponged edges.  Then, a layer of So Saffron, which I rolled through the Crimper in both directions to echo the distressed flower.
The top layer is Very Vanilla, stamped in So Saffron using French FIligree background stamp, and I used the Cutter Kit distressing tool to roughen up the edges.
The leaves for the flower are made from the Scallop Oval punch, in River Rock cardstock.  I could have used Pear Pizzazz I guess, but didn't want to add another colour.  They are also crimped, and this makes them soft and flexible enough to fold and 'smoosh' into a leaf.  I used Mini Glue dots to attach.  The flower was attached with Sticky Strip, since it needs to STAY there!  The sentiment is stamped in Soft Suede on So Saffron, with the Curly Cute stamp set. 
 
But wait, you say, there's another layer under there?  How did you do that??  Ah HA!!
 
Here's what you need:  2 x clear cutting plates, and either a third cutting plate or a black "Texturz Impressions" pad  - this is simply to adjust the thickness to compensate for the lack of the Movers and Shapers base die.
The shapes in the Punch Windows set can be seen there, the Scallop Oval, Large Heart, Modern Label and Large Star.  All will result in a shape that is just slightly larger than the punched shape, so you can layer them!!
The little square block  is an optional extra, it's a "Magnetic Ejection Blank" and just helps to get the cardstock off the shaper piece.


 Layer as follows:  Clear plate (non cutting if you save one plate for cut marks like I do)
Mover and Shaper piece, foam up
Cardstock over the top (hold in place with a little Dotto if needed)
Second Clear Plate (cutting)
Third clear plate or Black Impressions pad
Roll through!
 Ta Daaaaa!
Cool hey!!
The best part is that the set of 4 pieces is just $54.95.  Essentially, that makes 4 punches.  Great if you don't have the punch as an alternative, and even greater if you have the matching punch to layer with!
 
I hope you've enjoyed my tutorials, please say HI! and feel free to ask any questions you might have.
Next Stop on the Blog Hop is my super-dooper talented downline, Punch Art Queen Clare McIllhatton, whose idea this hop was :)  Enjoy!!
Monday 25 October 2010

We Stamp for Lara - starts November 1st, please help!

Please get behind me and many other Stampin' Up! Demonstrators in our support for a fellow demo, Madonna Dunn.  Madonna's youngest daughter, Lara May, was unexpectedly born with the most severe form of Cerebral Palsy, and will need ongoing treatment, therapy and extensive support for her lifetime.  As with anything medical, special needs means especially expensive.  Essential items that we take for granted such as chairs, strollers and car seats are available, but at a cost of many thousands of dollars.  To this end, Madonna and the members of the wider Elite team have organised a project, We Stamp for Lara.  This is a month-long event, to which you can subscribe for a cost of $25.00.  Entry into the event gives you access to a wonderful selection of tutorials, challenges and daily prize drawings, as well as a gallery and forum.  Everyone involved has donated their time and skills to ensure that every cent raised will benefit Lara.  Madonna, angel that she is, has also arranged to donate any outgrown equipment to the Xavier Children's Support Network for the use of other children like Lara, so your participation will benefit others for years to come.

There is just a few days before the event begins, so please share this information with your crafty friends, and have a great time doing something GOOD.  Payment is via Paypal, and you can click on the button at the right hand side to sign up NOW!

Thank you!

Wednesday 20 October 2010

Intensive Beginner's All Day Class - Saturday 13th November


Saturday 13th November, 2010
Cherrybrook, North Western Sydney
10am - 4pm Intensive Cardmaking and Stamping Class

If you've dabbled around the edges of cardmaking, or are a scrapper at heart who'd like to branch out, then this class is for you!


We'll be starting from scratch, and covering all the essential information and techniques you'll need to start creating your own professional-looking cards.

There is no prior knowledge assumed, but even if you've been making cards for a while, I PROMISE you'll learn lots of tips to make your cards look even better.  I can pretty much guarantee you'll be saying "I didn't know that!" and/or "ahhh, so THAT's how it works!" throughout the day!

We'll be starting with the material I cover in my usual 2 hour beginner's class, and add as many more techniques as we can fit into a 10am -4pm day. You'll go home with a selection of finished projects and technique samples, and all the confidence you need to dive into this most rewarding craft.

To ensure individual attention, the class is for a maximum of FOUR students, and I have ONE space available for the upcoming date. I'm happy to take names and organise future dates for this class, so don't hesitate to get in touch.

Class Cost: $50.00 per person, includes all materials, comprehensive notes, coffee and cake. Lunch is available at local shops a few minutes walk away, or BYO.

Things to bring: Bone folder and paper trimmer (if you have them). A selection of adhesives including a SNAIL or similar tape runner, double sided tape and foam dimensionals.

To book, please call me on (02) 9484 9447 or 0403 175790, or contact me via email at michelle.dyson@bigpond.com

Ooohhh! FREE Ribbon! Christmas Bundle Promotion ON NOW


OK, back to scheduled programming now that Blogger Image upload is functioning again, I hope the"Test Pattern" I have just taken down has piqued your interest!  Ta daaaaa!  Purty picture installed!

(!!!  Sorry, these kinds of technical glitches seem to happen with notorious regularity, right after I have managed to do something a little bit "WOW" (for me, anyway!!)  !!!)

So - on to the nitty-gritty written details about the pretty promotion we have running right now!
There's a selection of bundles designed to get you right on top of your Christmas Creating tasks, and the deals have been sweetened with some delicious FREE ribbon rolls! Choose any of four different ribbon packs with each purchase of a bundle.  Or, host a workshop with sales of $550 to choose a free ribbon roll.  And, should there be bundles in that workshop order, then they get ribbon too!
The ribbons are not currently available in our catalogues, and there's a choice of 4 styles -
Mistletoe Ribbon pack - bottom roll on composite image above - I am having an educated guess at it being a roll of Old Olive taffeta ribbon and a roll of red-stitched white grosgrain .

Or, choose Real Red 3/4" polka dot ribbon - this was a fave in a mini recently, so take a second chance to nab some while you can!

Or, choose Riding Hood Red wide stripe grosgrain ribbon, matching the other colours in this style in our current catalogue, but in the most gorgeous Christmas red and vanilla.  Yum!

Or, a twill style stripe ribbon in vanilla, olive and red, the Sleigh Bells ribbon, shown at the left of the top image with the little spotty box.

But wait!  There's more!

One of the bundles is a delicious combo of the "Welcome Christmas" stamp set with a brand new paper pack, Christmas Cocoa Specialty paper.  This paper has a selection of patterns in Real Red, Soft Suede and Crumb Cake, and features flocked and metallic accents!  Pic is above, but I can't wait to get my hands on it, since it is reputed to be even more appealing 'in the flesh'

OK, so the bundles are:

Gifted Bundle:  Gifted Stamp set  and Jolly Holiday DSP - p21  $66.90 in Wood mount, $56.90 in clear
This stamp set has images ideal for making quick tags, but three of the five stamps are also ideal for making accent panels for your card fronts.  So versatile!  The Jolly Holiday paper features the delicious Cherry Cobbler colour, Old Olive, and Very Vanilla. These items have been specially selected to co-ordinate as one of the themed 'suites' in our catalogue this year, "Traditional Christmas"

Welcome Christmas Bundle:  I described this above, couldn't help myself!  $69.90 in wood mount, $59.90 in clear mount.  See the set on p26, it's the one with the beautiful wreath and label greeting on the red card at the right of the top image.  It's also got a large JOYstamp, and a sledding and tree decorating silhouette image.  My pick of ALL the Christmas stamp sets this year!

Season of Joy Bundle: $67.90 in wood mount only, comes with the set and the matching So Swirly jumbo wheel as the bundle.

Delightful Decorations Bundle:  If you haven't already succumbed to the wonderful Ornament punch, then take this great opportunity to get some extra value with the bundle of the punch and matching "Delightful Decorations" stamp set.  $72.90 in wood mount.

To order, just give me a call on (02) 9484 9447 or email me .  Your order can be delivered anywhere within Australia for just $5.95 or 5% of your order total (whichever is higher)  Only about 8 weeks to go.....!!

Tuesday 12 October 2010

Sneak Peek... FAST Christmas Card Stamp-a-Stack THIS FRIDAY


Three card designs, five of each.  One class.  THIS FRIDAY evening OCTOBER 15th.  Doors open 7.15pm for a 7.30pm start.  $25 class cost, including Stampin' Up! envelopes and all materials provided, just come along, stamp and assemble!  Limited seats available, call 0403 175 790 or email to book...

Tuesday 5 October 2010

I am in LERVE! DIY Glimmer mist with SU! Shimmer Paint Tutorial

Oooh, I just looked at my hand, it's all sparkly!!
I'm so excited, I have just had a play with a new product in our catalogue, Shimmer Paint - available in three colours, Frost White, Platinum and Champagne Mist.
When I first saw the catalogue I was a little disappointed that we didn't get the Smooch Spritz products that the US have in their catalogue, but not any more, cos these are BETTER!  More versatile, and more economical to boot!  Yay!  I love it when things turn out like that :)  It's called Shimmer Paint, but that's really not the best name, as it's an ink really.  It can be used on fabric (heat set with an iron to make it permanent and washable), it can be daubered onto a stamp directly, it can be painted onto a pre-stamped image, and, using this method, spritzed over things to make them all glittery!  There's no doubt more applications, but these are a good enough reason to get some already, anything else is just a bonus!


OK, what do you need - it's dead easy to do, so don't hold back!
*Bottle of Shimmer Paint - teeny tiny bottles of 14grams, but they'll go a LLLOOOONNNGGG way using this technique, $11.50 each, find them on page 143.
*Some Rubbing Alcohol (aka Isopropyl Alcohol, Isopropanol, Isocol) from your local supermarket or pharmacy.
*An eye-dropper, you just want to be able to add the ink dropwise.  I've used a transfer pipette since I happened to have one (insert whistling innocently smilie HERE ;))  A baby panadol doser is probably rattling around most homes, would probably work fine.
*A small spray bottle.  I've used a mini mister from Ranger as I like the superfine mist, but any small spray bottle will do.

1. Fill the spray bottle almost to the top (about 1cm head space) with Isopropanol
2. Shake the Shimmer Paint bottle well, it has a ball mixer in there, so you should hear it rattle
3. First wet the inside of your dropper with Isopropanol, by sucking some in and then ejecting, this will stop too much of the ink from clinging to the inside.  Then carefully suck up a tiny amount of Shimmer Paint, about 10 drops worth and add to the misting bottle, rinse the dropper by sucking up and down until all the paint is gone from the dropper, close the bottles!
4. Shake well before each use, then simply spray onto your cardstock and let it dry.

That's it - too easy.  The Isopropanol evaporates very quickly, so it won't take long to dry.  If you want more shimmer, you can either add a second/third spray, or add a few more drops of paint to your misting bottle.  If you're like me, you'll be digging through your scraps box to test it out on all kinds of cardstock and thinking of all the possibilities!

Here's what it looks like, although it is the devil to capture photographically!  The best photo was on dark cardstock, Basic Gray, but the effect was equally beautiful on both Rose Red, Whisper White, and looked especially pretty on a pre-embossed piece of Very Vanilla, using the Vintage Wallpaper folder.

As you can see, it has turned Basic Gray into something more like "Dazzling Pewter", it's quite like a car pearl metallic paint finish, but matte.

So cool, hope you like my instructions, please come back and tell me how you went with your attempts, I'd love to see what you come up with!

Monday 4 October 2010

Quick, Clean and Simple Christmas Card Stamp-a-Stack FRIDAY OCTOBER 15th

Christmas Card Stamp-a-Stack - Quick, Clean and Simple
Friday 15th October, 7.30pm till around 10.30pm


The next Christmas Card Stamp-a-Stack is all about making cards suitable for fast, easy construction, but maintaining a hand-crafted and elegant style.  Just what you need when you have a long list of friends and family and are short on time (isn't that everyone?)
It will be held on the evening of Friday 15th October. It's a fantastic opportunity to get started on your stash of Christmas cards for the year with much of the hard work done for you. You'll make 15 cards, 5 each in three different designs. Stay tuned for some sneak peeks when I've finalised the samples. Everything is provided for you - pre-cut cardstock, all materials and embellishments, adhesive and beautiful Stampin' Up! envelopes to match. The class will be set up so you can construct the cards in an assembly-line format, with full instructions to create more later if you wish. The cost of the class is $25 and places are limited to ensure individual attention. Please give me a call if you'd like to book a seat, on 9484 9447 or 0403 175 790, or email me.

New In Colors and Printed Petals for Charlotte


Here is a card I made a week or two back, for a special 5 year old, Charlotte!  I've used several of this year's In Colors, Blushing Bride, Concord Crush and Pear Pizzazz, combined with crisp Whisper White.  I stamped the base card with Blushing Bride (I can see that I will be abbreviating that to BB before too much further into the year!!)  Then I edged a panel of luscious Concord Crush with the Scallop Trim border punch.  I then played around with some strips of Pear Pizzazz, and gave them the Scallop Trim treatment too.  I was comparing length so I'd know where to chop, when it occured to me that it looked pretty good if I offset the Pear just behind the Concord, to create a double layer. 

The Whisper White panel I stamped with all of the Printed Petals smaller stamps, in the three colours.  Then I whipped out my favourite new tool of the catalogue, the Versamarker Pen!!  This magic pen allows you to create embossed accents wherever you'd like, create embossed handwriting, and lots more.  I sprinkled clear embossing powder over, and heated with the heat tool, leaving the shiny areas to highlight the flowers.

The large flower I created using the Emboss Resist technique, by stamping onto Whisper White using Versamark ink, which I clear embossed.  I then used sponges and daubers to add areas of colour to the open areas of the flower.  To finish, I used some of the beautiful stitched poly ribbon in Pear Pizzazz, and added a Modern Label punched sentiment from the "Party this Way" stamp set.

In other news, I got a lovely surprise yesterday when I was given a blog award! Thanks Angie!
I'm to share three things about myself, and pass on the award to 5 more bloggers who's work I admire for offering that little bit extra!.

1. I'm left handed
2. I have three cats, two Burmese girls and a big boofa British Blue boy
3. I have a PhD in molecular biology, although that seems like a lifetime ago!

The five lovely ladies I'm bestowing this award upon are...
1. Amanda
2. Clare
3. Lisa
4. Beth
5. Vanessa

Off to bed with me, daylight savings has begun and I always make the mistake of staying up too late, luckily there is no-one else here to wake me up in the morning!!